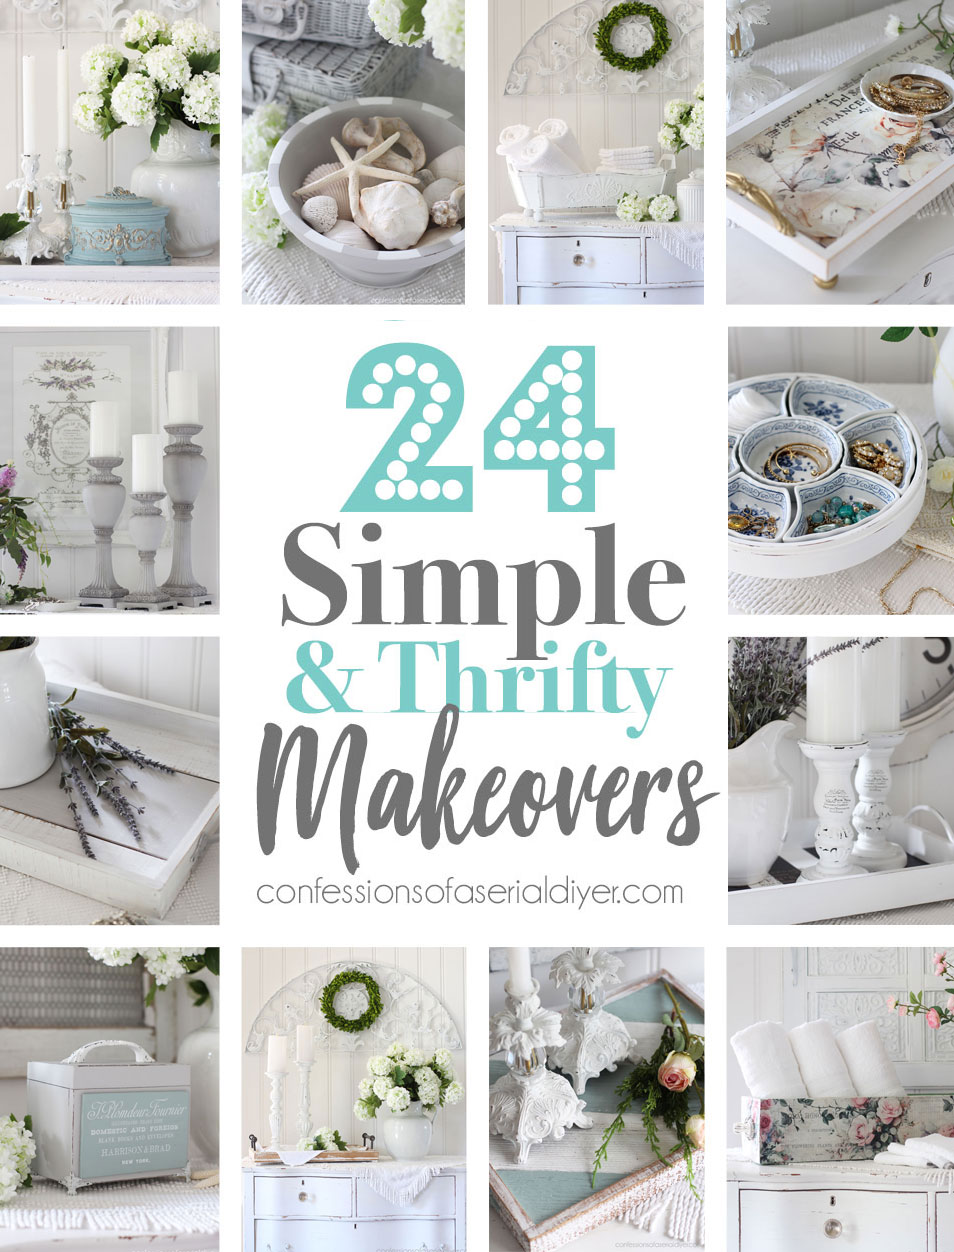
Thrifty friends, this post is for you! I recently shared my top furniture makeovers and my top decor makeovers from the past year, and I always have a couple of my Painting the Smalls posts that make the list! Instead of including them in my countdown, I opted instead to do one large round-up of these simple & thrifty makeovers that made a BIG impact!
Seeing these simple mini makeovers might just inspire you to look at things you already have in a whole new way!
Lots of makeover inspiration ahead!
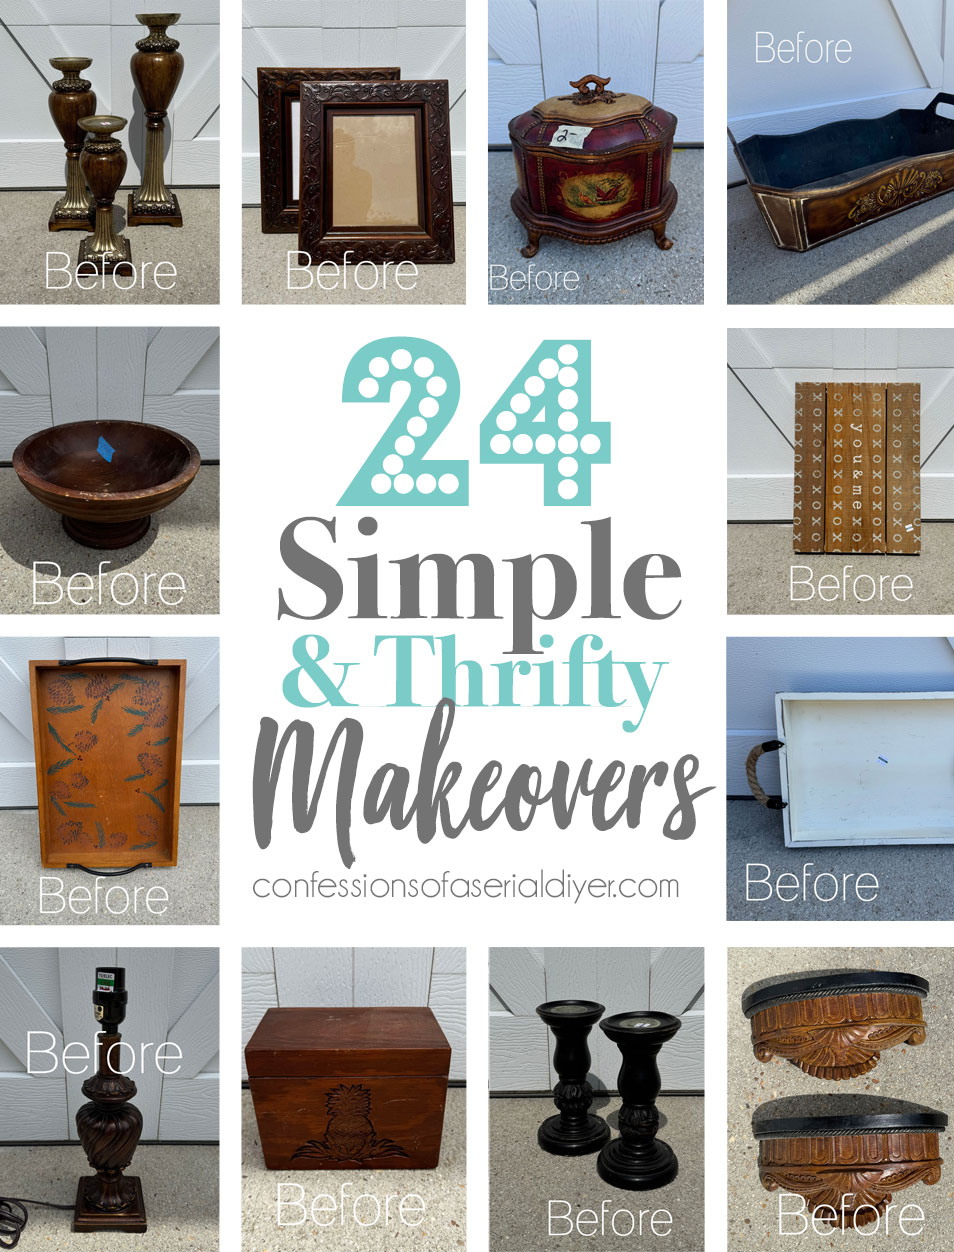
I won’t be including any in-progress shots, but you can find more details about each makeover by clicking the link I’ve provided below each one.
Here are 24 Simple & Thrifty Makeovers that made a big impact!
ENJOY!
Mini Makeover #1
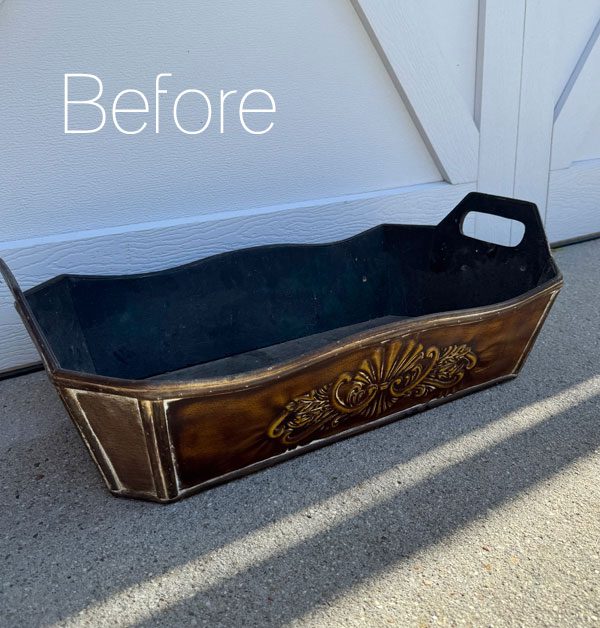
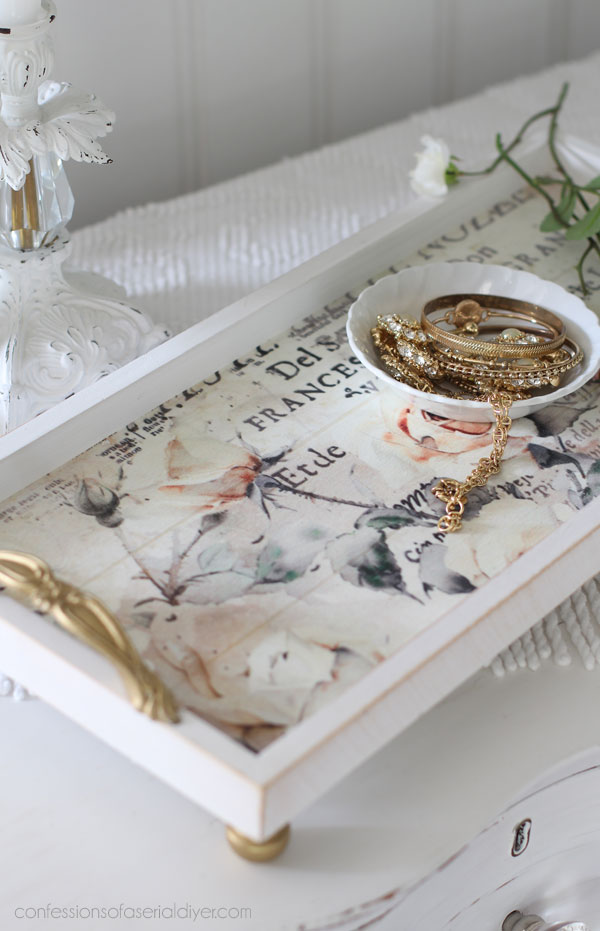
First up is this simple tray I picked up for $3.99 at the thrift store:
This one got updated with Fluff white paint and a combination of the Vintage Script Mastery transfer and the Garden Whispers transfer:
Transfers are such an easy way to update something!
Painting the Smalls #32
Mini Makeover #2
Mini Makeover number two started out as this little box that was priced at only $2:
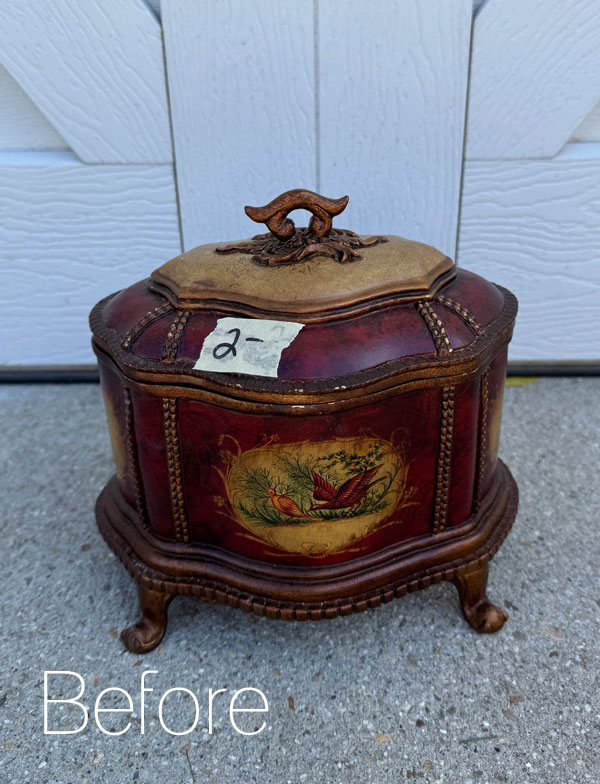
This one got two coats of Secret Path and then I embellished further with an older lavender transfer and Silver Gilding Wax:
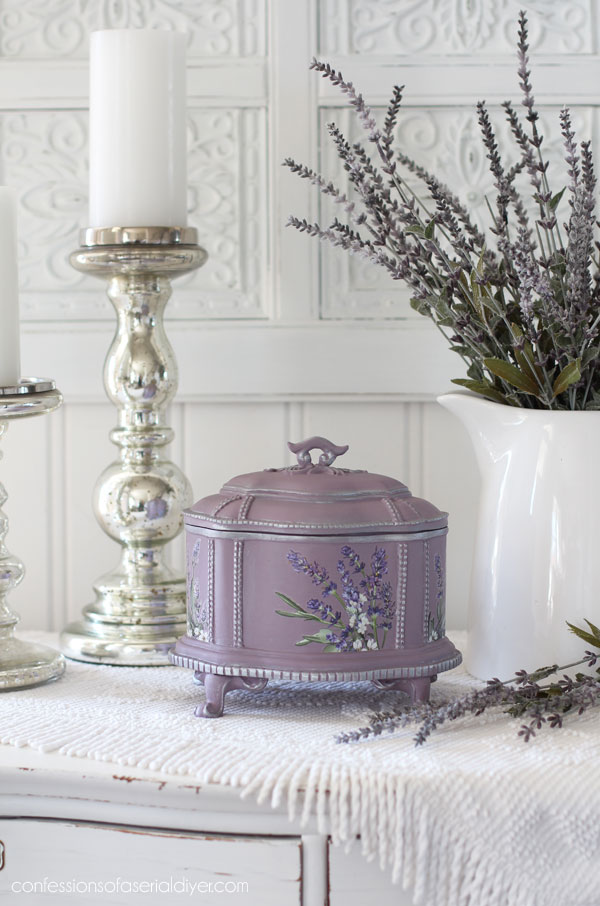
This one was sealed with Best Dang Wax in Clear.
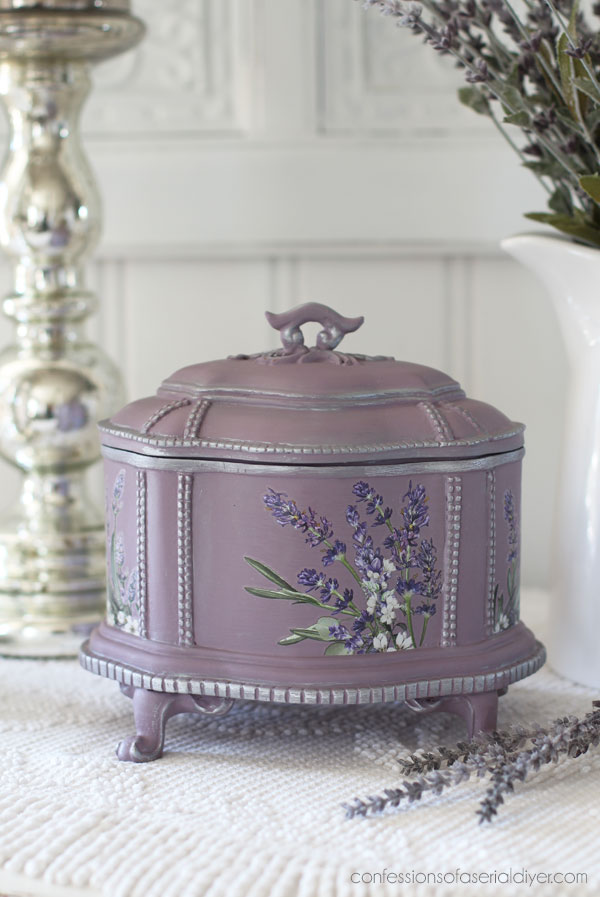
This one was night and day!
Painting the Smalls #32
Mini Makeover #3
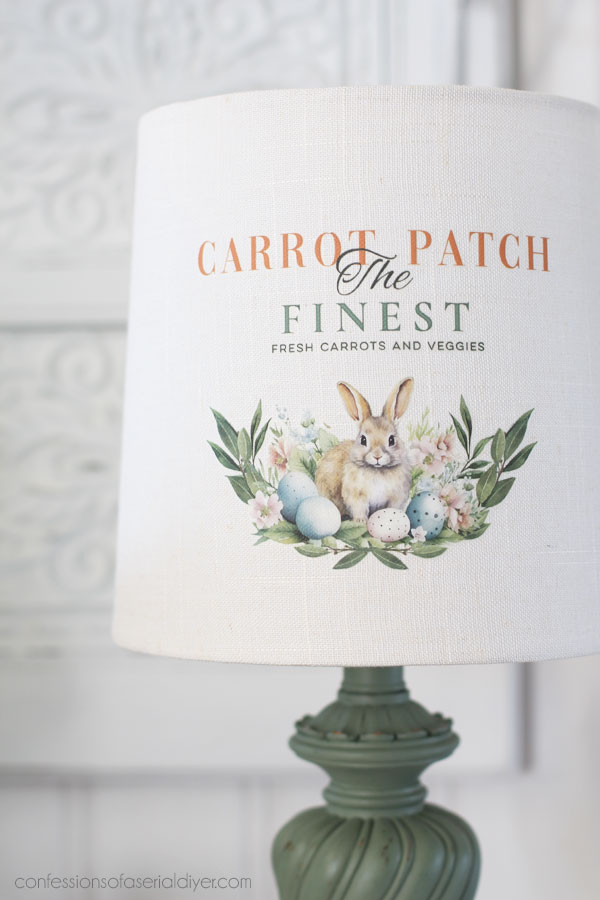
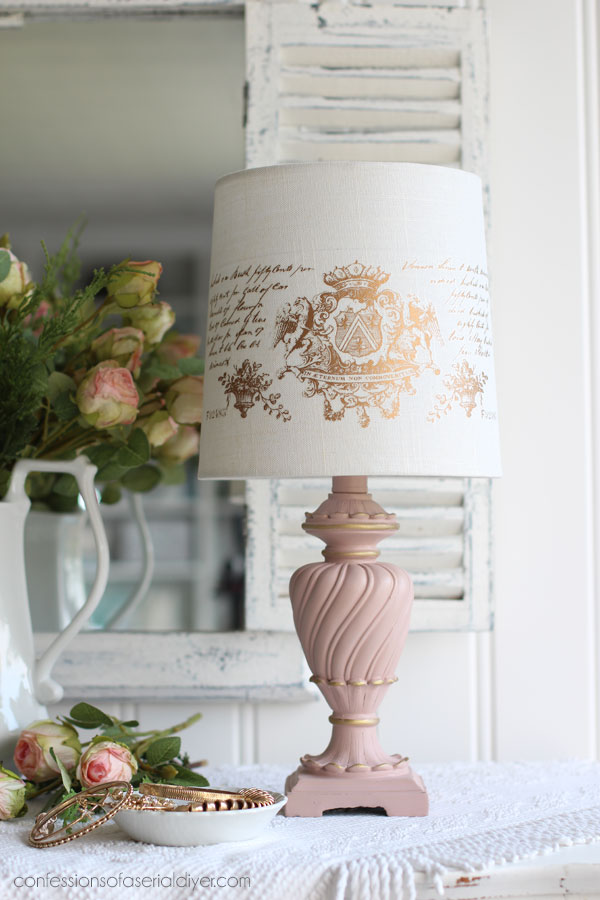
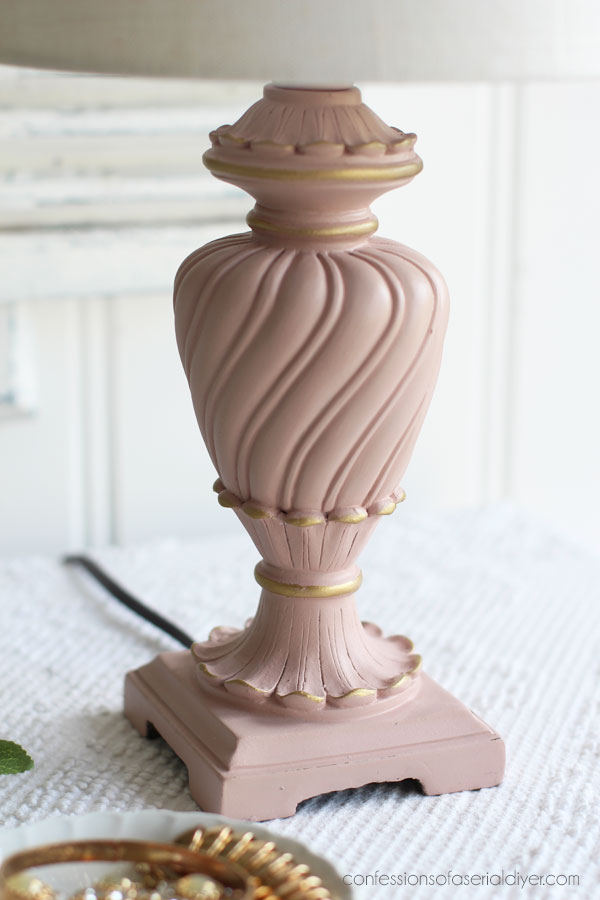
Makeover number three is this simple lamp that was just under $5 at the thrift store:
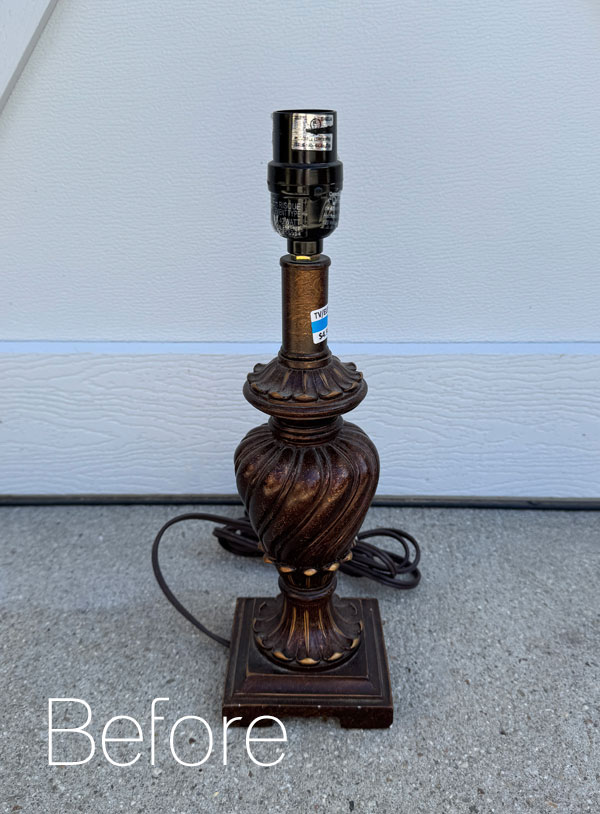
This is one of two lamps I’ve redone of this style. You’ll see the other one a bit later.
Weeping Willow and this super sweet bunny transfer did wonders for this one! (This bunny transfer is no longer available, but there are new ones that will be available on January 29th in my shop!)
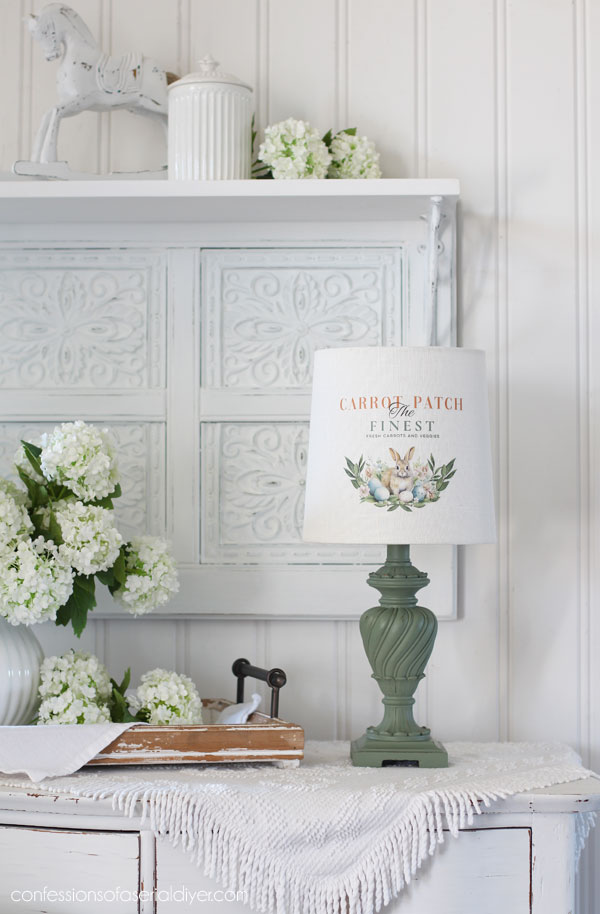
I just love doing pieces for little ones!
Painting the Smalls #32
Mini Makeover #4
Next up is this metal piece that I thought was one of those metal doormats when I first spied it at a yard sale for $10:
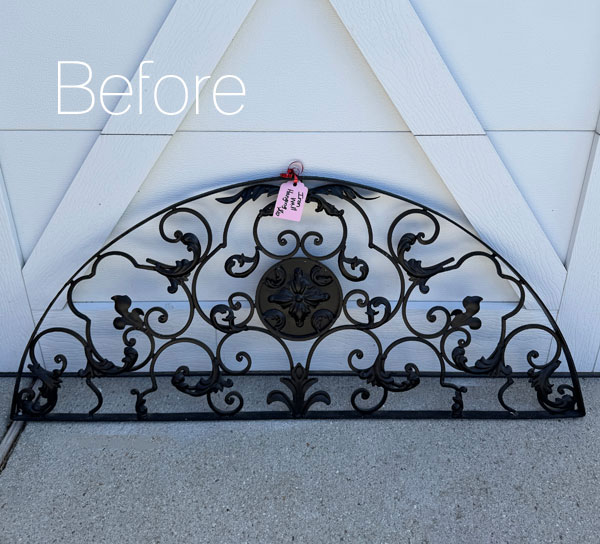
This one is just a good reminder that these dated iron looking pieces can look so good refreshed with a little paint!
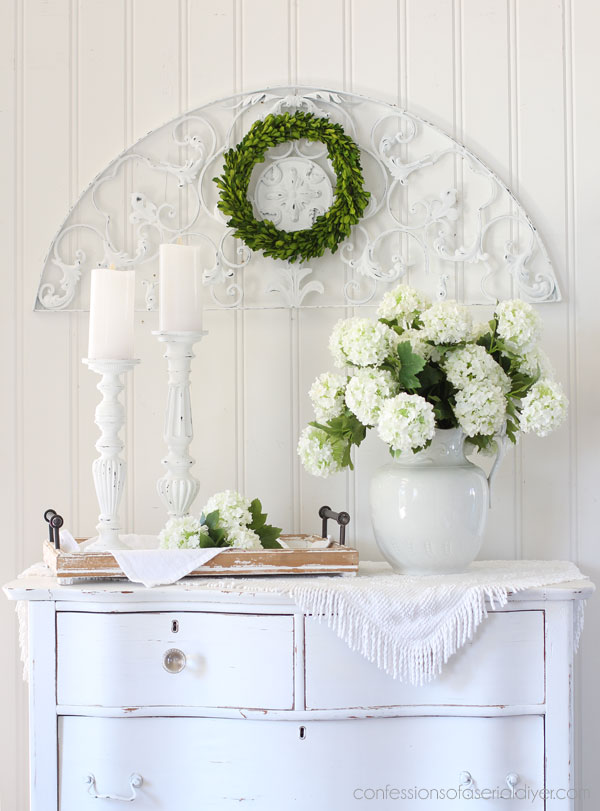
This would be great above a doorway or window, maybe?
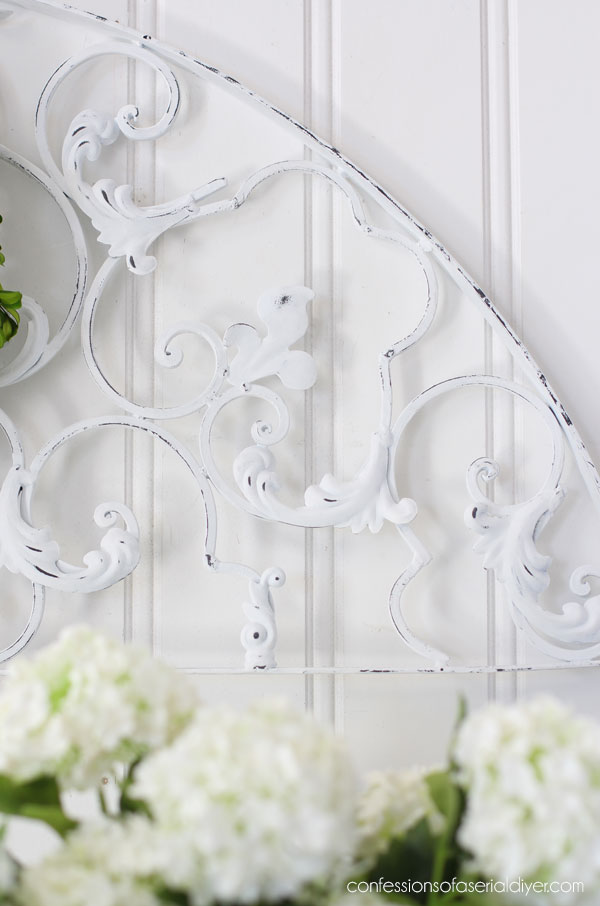
PAINTING THE SMALLS #33
Mini Makeover #5
I don’t recall what I paid for this next one as I didn’t mention it in the original post, but it was a thrift store find and I loved it right away:
This one did have some bleed, so it did need priming with Bonding BOSS. I stuck with white on this one too and also added feet:

But on the inside, I embellished with stripes in French Linen and added some script with the Vintage Script Mastery Transfer:
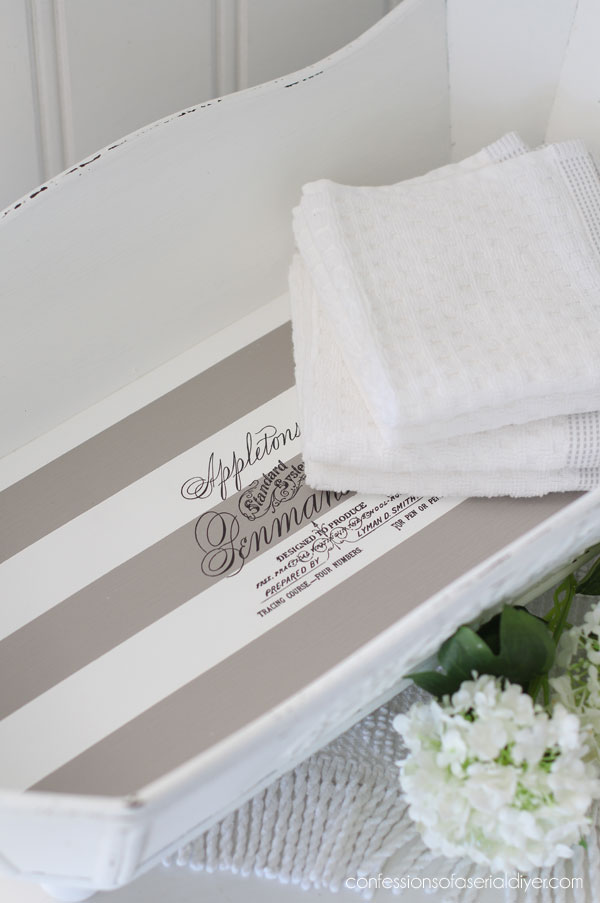
PAINTING THE SMALLS #33
Mini Makeover #6
I always gravitate towards small, ornate boxes, and this one was an estate sale find for $6 minus 20%:
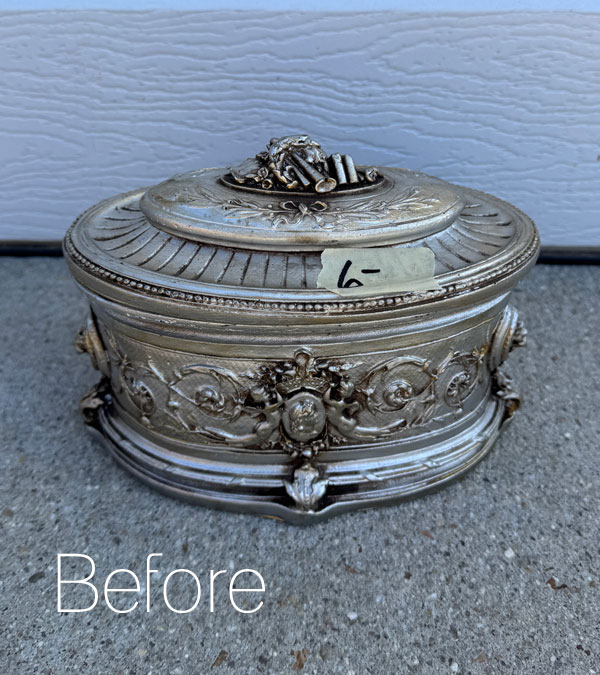
I painted this one in Vintage Duck Egg Blue, and then I highlighted the details using the new antique gold gilding wax:
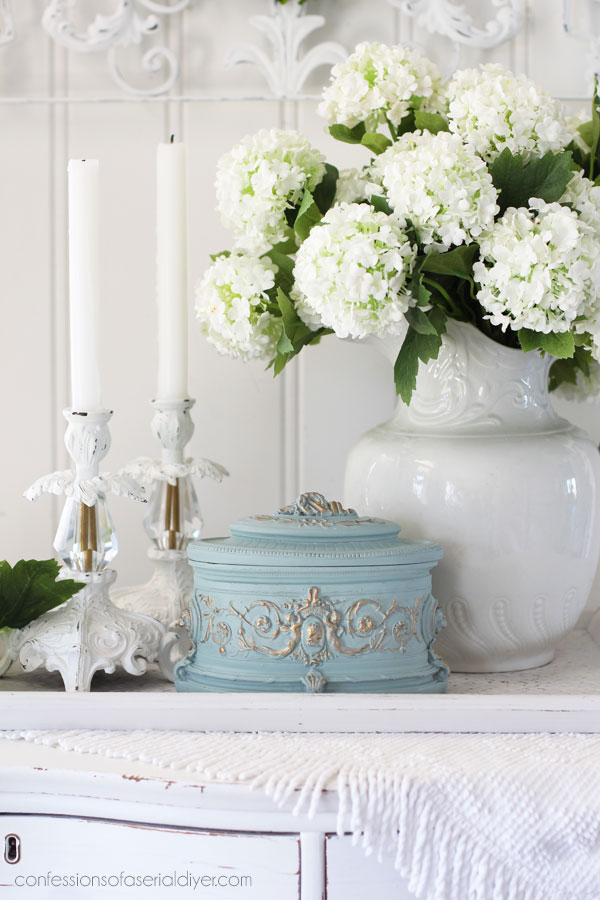
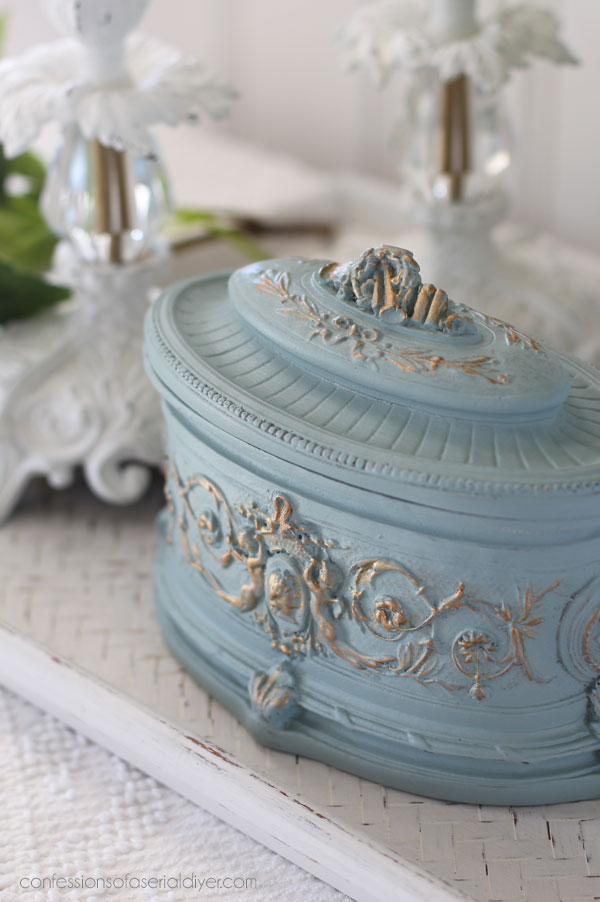
PAINTING THE SMALLS #33
Mini Makeover #7
The next few were from the Painting the Smalls, the Decoupage Edition. I used several decoupage papers that were new at the time.
Mini makeover number seven was this primitive box that I picked up for $4.99:
The bottom of this piece was especially warped, so it would not sit flat which led to me taking it apart to replace the bottom. I also ended up taking some length off.
One of my favorite brighter colors, Mint Julep, and the Rosy Reverie decoupage paper did wonders on this one:
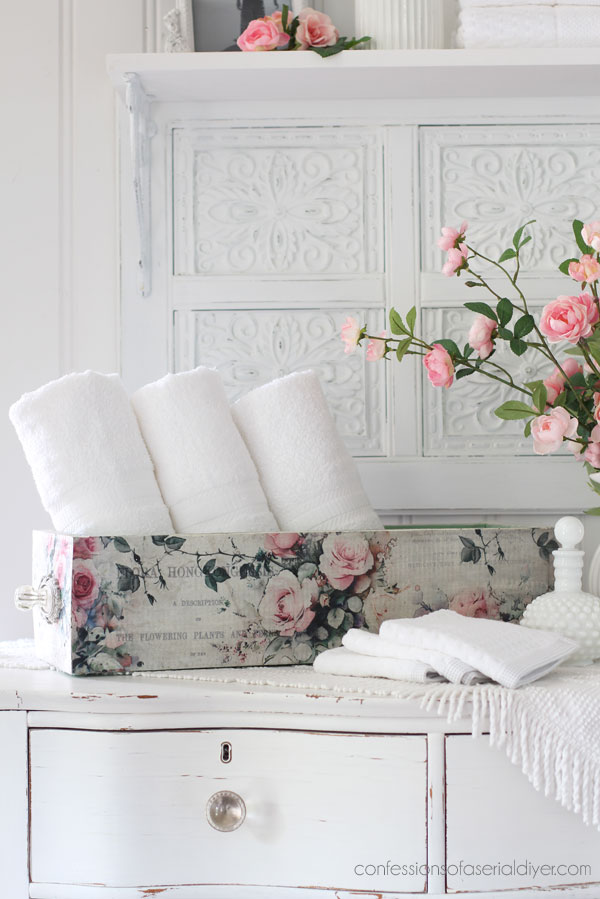
The Mint Julep is inside!
And adding a back plate to the new glass knobs using the SOHO Fusion mould added another special touch…
PAINTING THE SMALLS #34
Mini Makeover #8
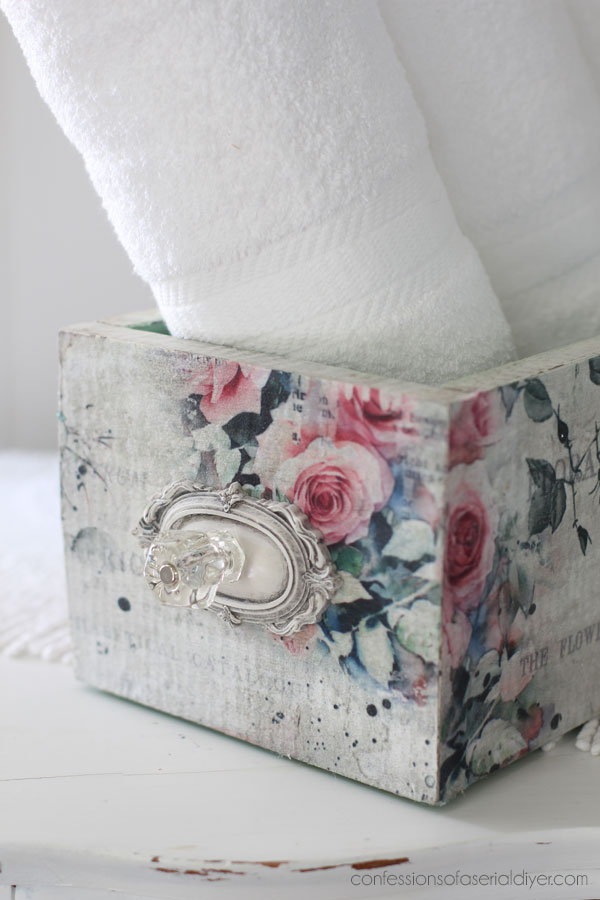
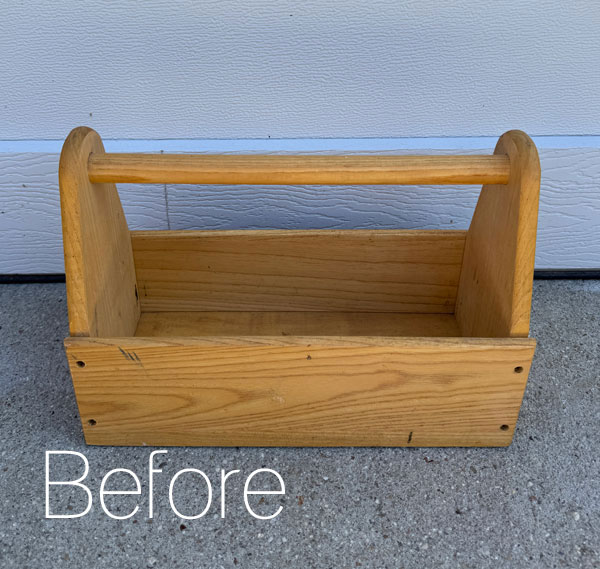
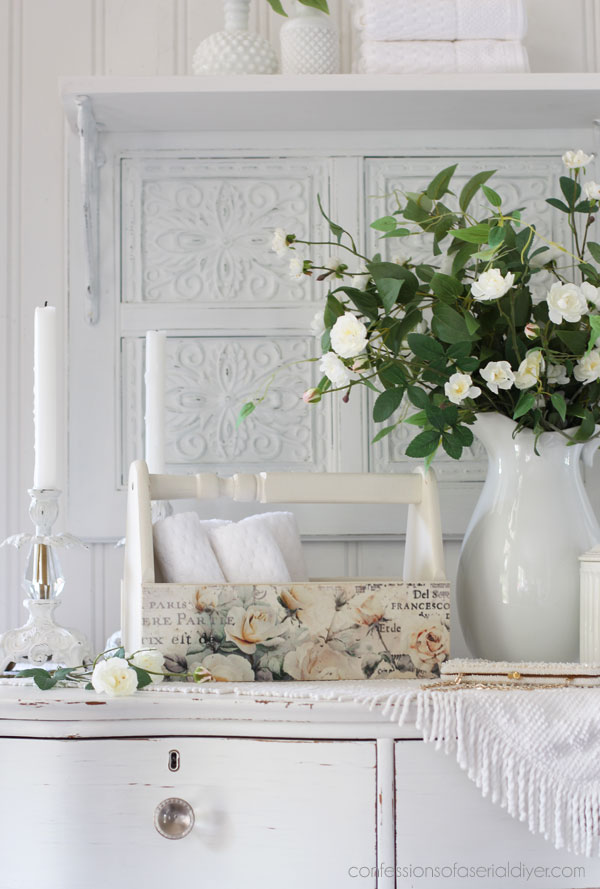
Up next is this little tool box I picked up for $2.98:
I chose this gorgeous, soft floral paper called My Garden Whimsy to embellish this box:
I just love this release of papers!
I also updated the handle on this one:
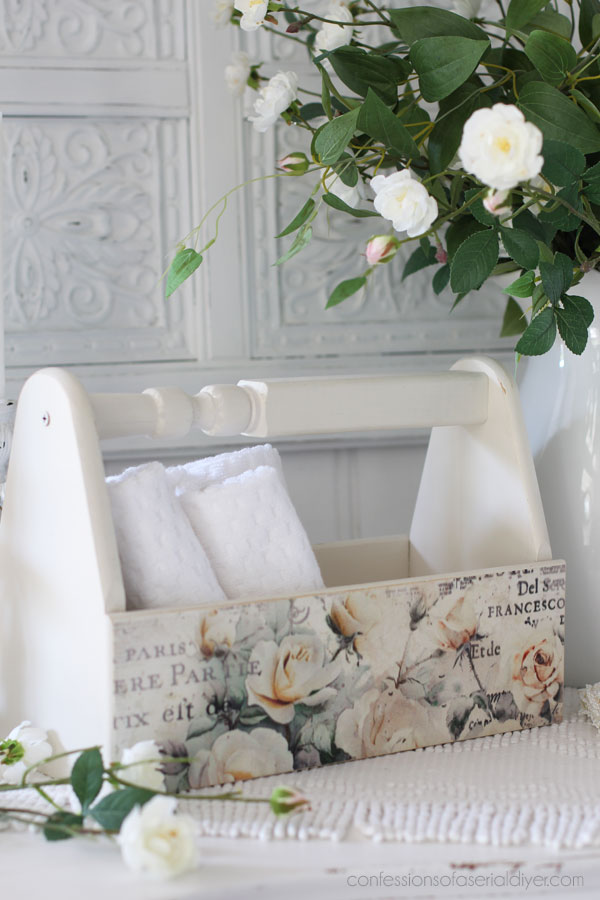
PAINTING THE SMALLS #34
Mini Makeover #9
I used the same paper on this $3.99 thrift store find:
I added it to the bottom, and then I added feet and handles to finish it off:
These little wooden dowel caps are what I used for the feet…then I used Gold Gilding wax on those and the handles.

PAINTING THE SMALLS #34
Mini Makeover #10
This next piece was quite unique and even though it was $14.96, I bought it anyway!
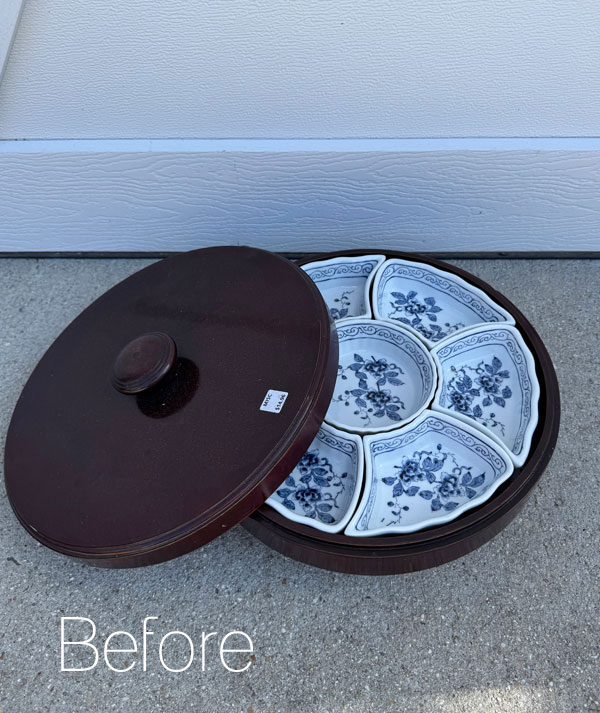
I ended up having to ditch the lid because it was extremely difficult to get on and off.
The base was painted in a simple white using bright white Cotton, and once it was painted, I sanded all over to smooth and distress some and then sealed with satin Clear Coat.
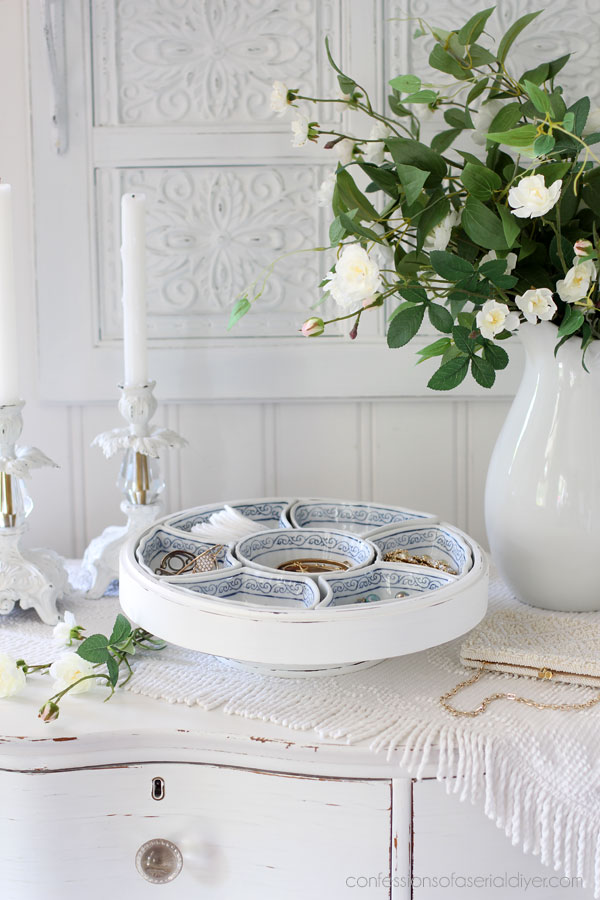
It could still certainly be used to serve food, but I thought it was fun to use as jewelry storage here…
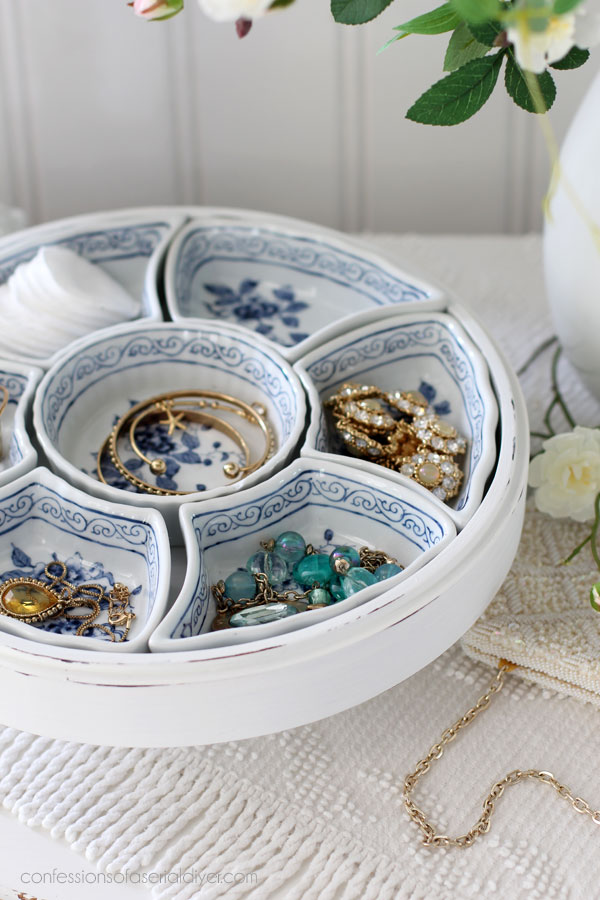
PAINTING THE SMALLS #34
Mini Makeover #11
The next piece is this kind of ugly duckling I found at a yard sale for $3:
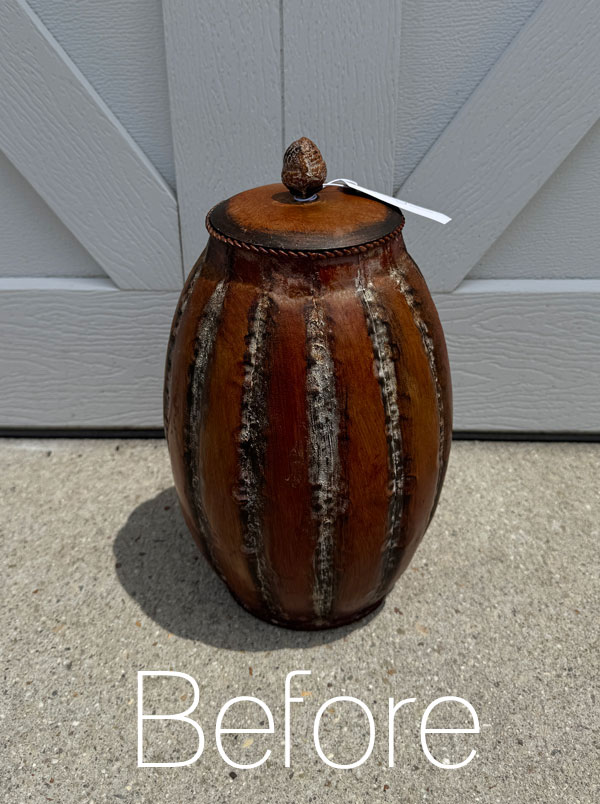
It reminded me of a tall pumpkin, but I was curious if painting it in a pretty color would do it any favors, so I took a chance on it.
After priming, I gave it a coat of Vintage Duck Egg Blue mixed 50/50 with Cotton and then sealed with Clear Best Dang Wax:
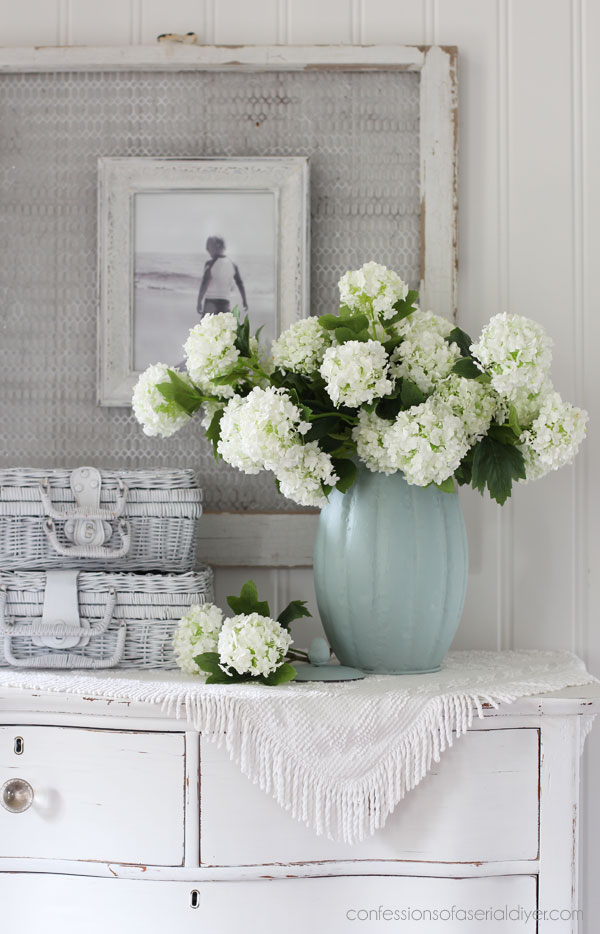
It ended up making a sweet vase! You could always add a glass vase inside if you wanted to add real flowers.
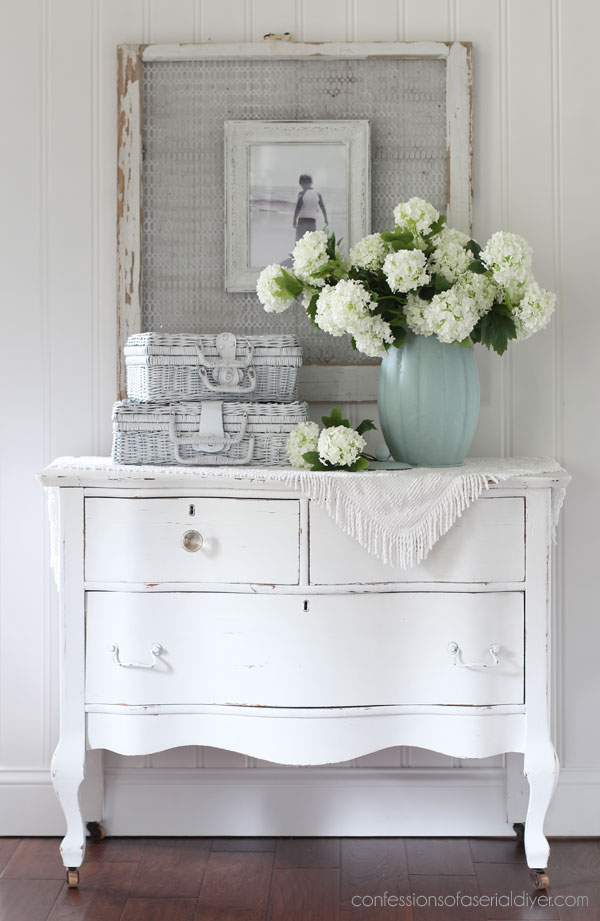
PAINTING THE SMALLS #35
Mini Makeover #12
I picked up this next piece at a yard sale this season for only one dollar!
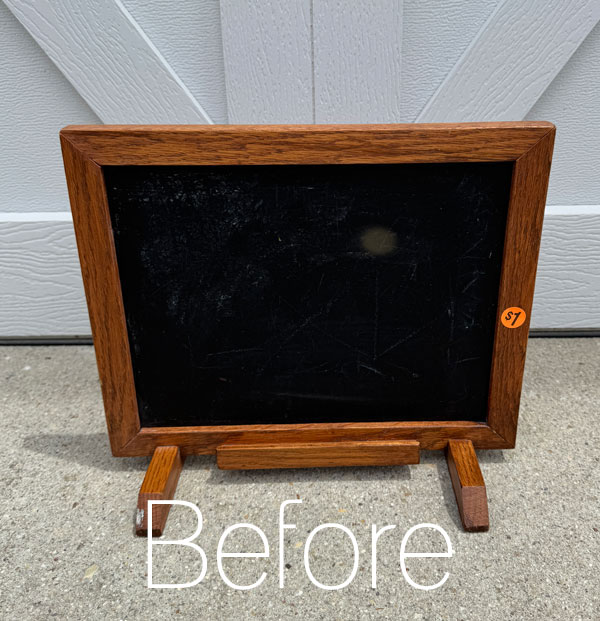
I loved this little find that the seller’s dad had made many years ago.
It got freshened up with Mint Julep which really gave it life!
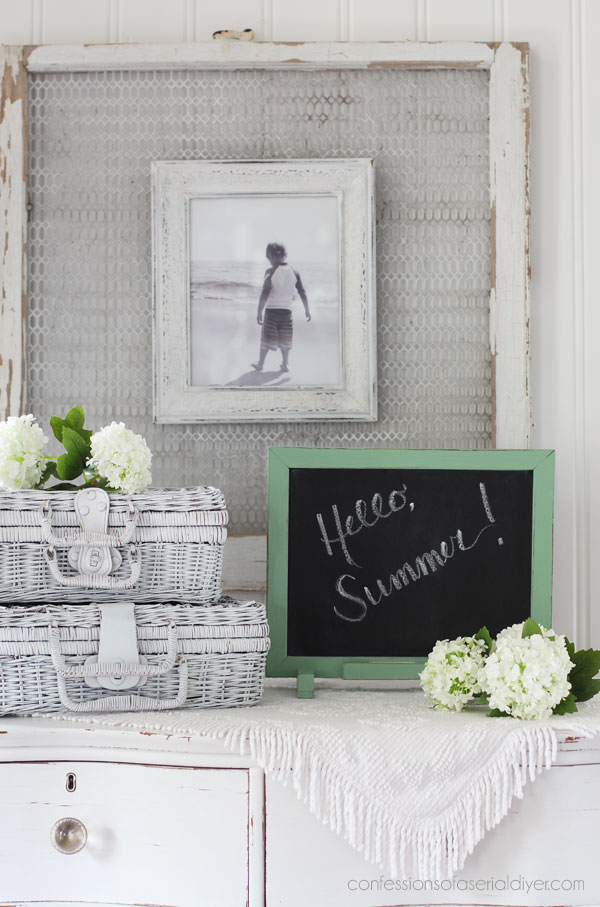
It even has a spot for chalk:
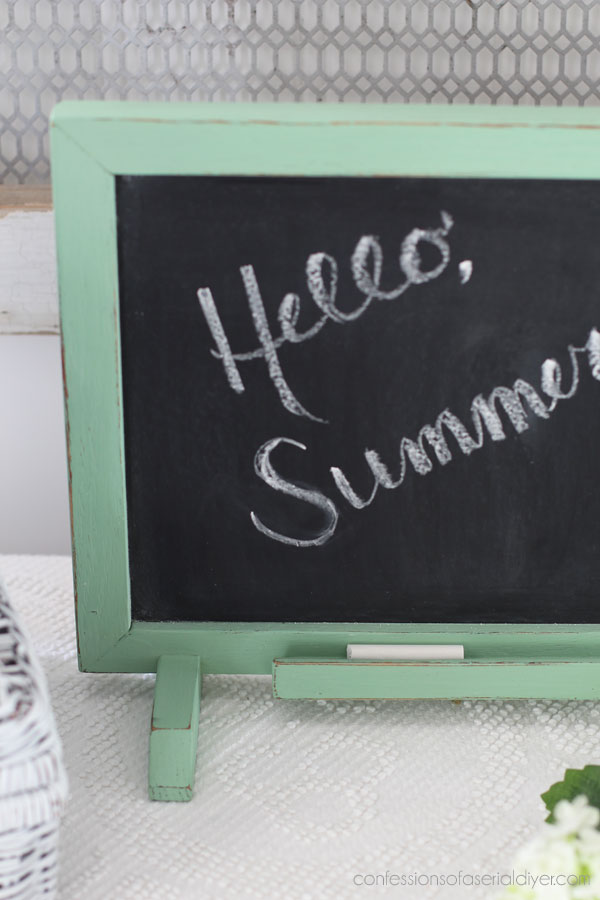
It still lives in my booth, and my shoppers leave the kindest messages!

PAINTING THE SMALLS #35
Mini Makeover #13
Next up is this sad wooden bowl that set me back $2 at a yard sale:
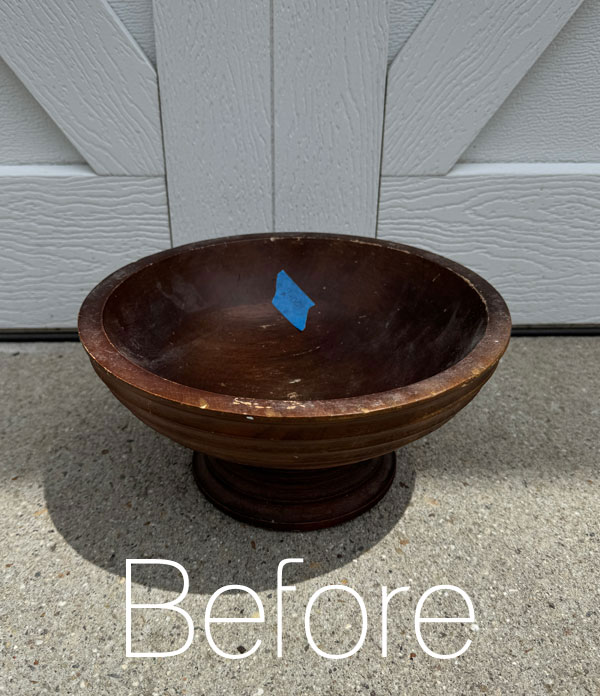
I painted it in a Cotton/Hurricane Gray custom mix that makes the perfect soft gray.

And, I added some stripe detail around the top. After a light sanding, this too was sealed with Clear Best Dang Wax.
PAINTING THE SMALLS #35
Mini Makeover #14
This set of ornate shelves I found at a yard sale last summer for $5 didn’t get too much love when I shared them, but I really liked how they turned out:
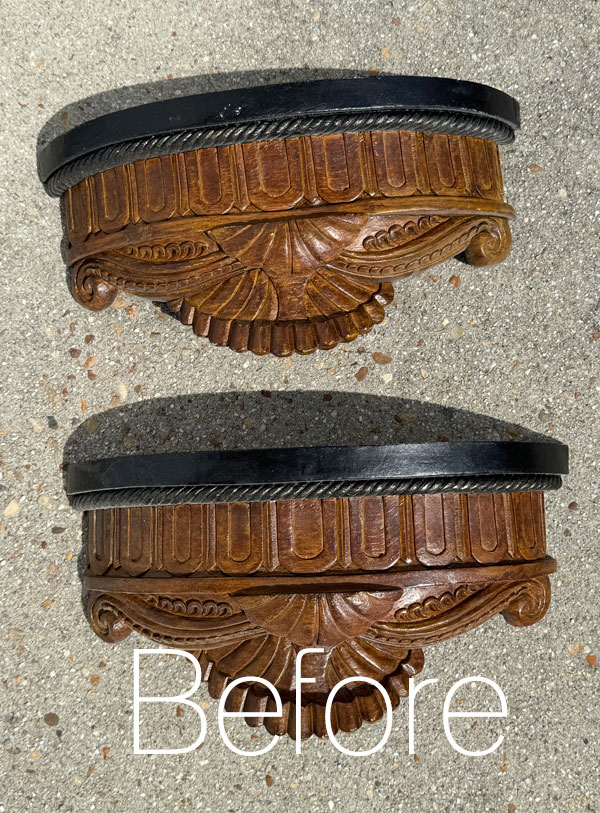
I chose to do a wash on these ornate shelves by applying a coat of Cotton and wiping it back off with clean cloth. The tops were painted solid white.
Painting them did wonders!

PAINTING THE SMALLS #35
Mini Makeover #15
I was really leaning into the grays for these next few!
Up next is this set of candle holders I found for a steal for only $6.99 for all three!!

I decided to go with the same gray I used earlier on the bowl, mixing about 25% Hurricane Gray with about 75% Cotton.
Then I added some depth using black Best Dang Wax:

So much softer now, perfect for a bedroom…

PAINTING THE SMALLS #36
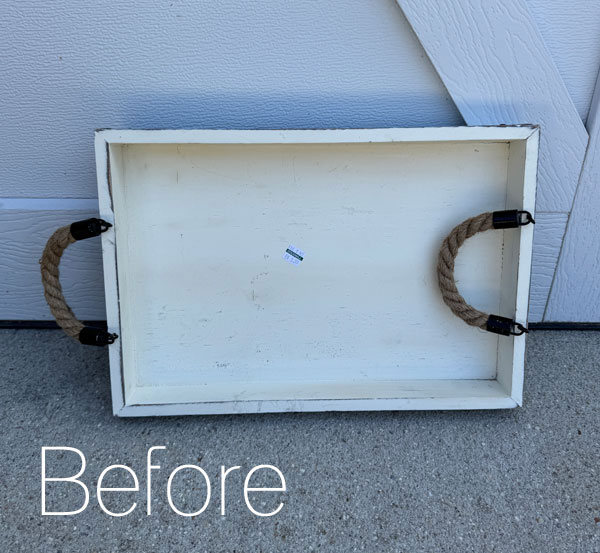
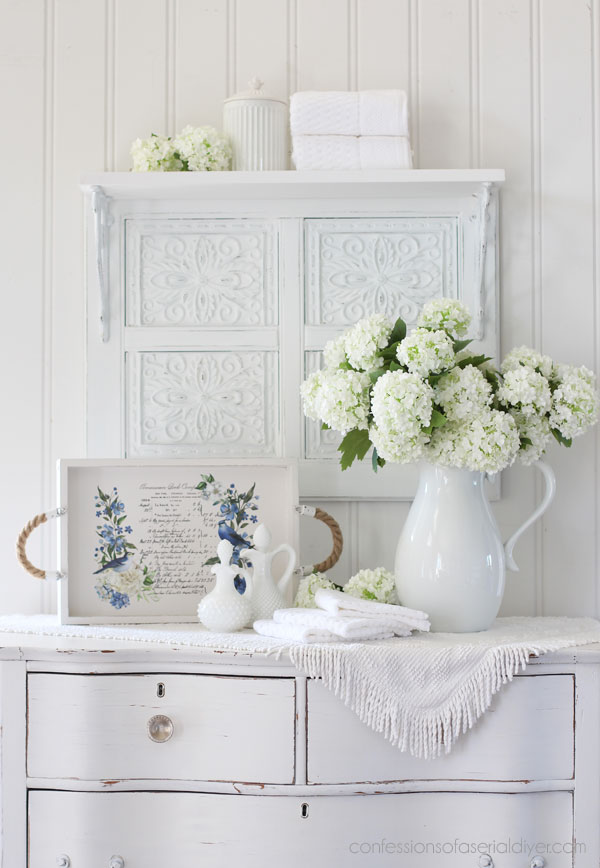
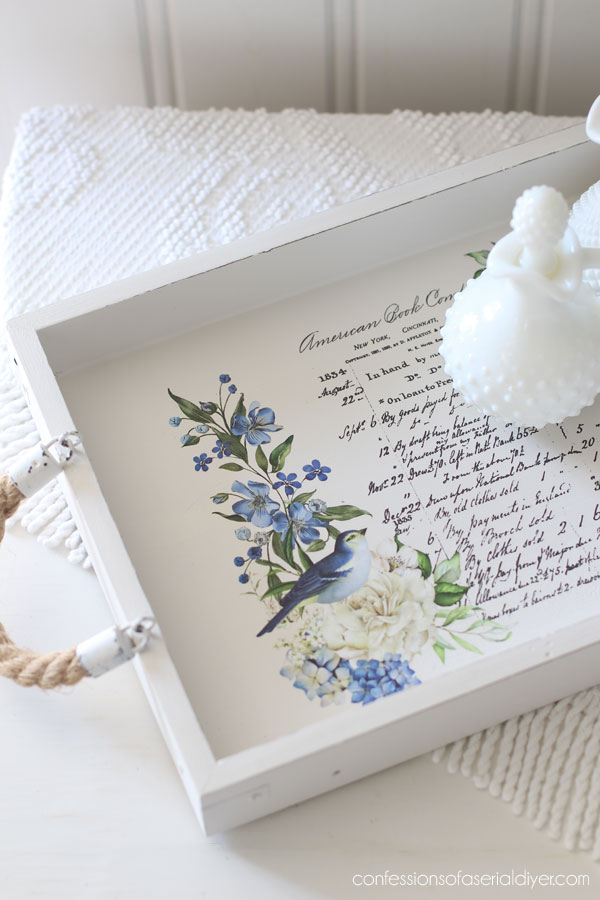
Mini Makeover #16
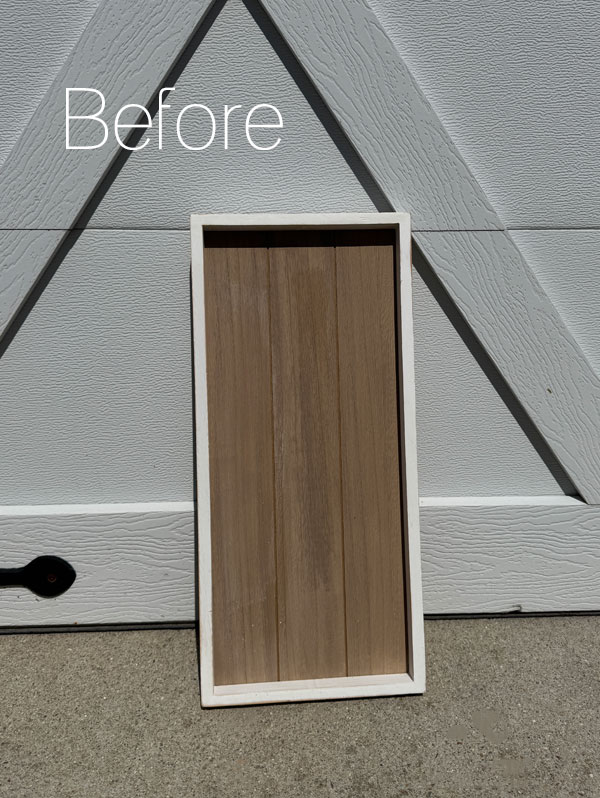
Mini makeover #16 is another piece of “art”, this wooden wall art that I found for $5.99 at the thrift store:

I liked the idea that I could easily flip it over, add handles, and turn it into a tray, and that is exactly what I did!

I used Cotton and the same gray mix to stripe the center and paint the new handles:

PAINTING THE SMALLS #36
Mini Makeover #17
Next up is this recipe box I picked up for 25% off of $2.98:

I love to redo these tiny boxes! Well, any kind of box really, but especially the tiny ones!
I redid two more HERE and HERE.
I chose to paint this one in the same custom gray mix I used on the candle holders and tray as well. Then, I added a little sign to the front to cover the pineapple..

The handle and feet take it up a notch too!

PAINTING THE SMALLS #36
Mini Makeover #18
Here’s a piece of framed art that got a sweet update. It was a $3 yard sale find:

My original plan didn’t work out, but plan B was much cuter! After painting the frame in a simple Cotton White, I turned it into new artwork by adding this adorable bunny from the Dreamy Bunnies decoupage three pack!

How sweet it is! There are three papers in this pack that are a good size. I was able to frame just the section I wanted from this one, but you can see the other two I used in larger frames HERE. (They are too cute to miss!)

PAINTING THE SMALLS #36
Mini Makeover #19
Up next is this lamp that I found on clearance for $2.98 at the thrift store:
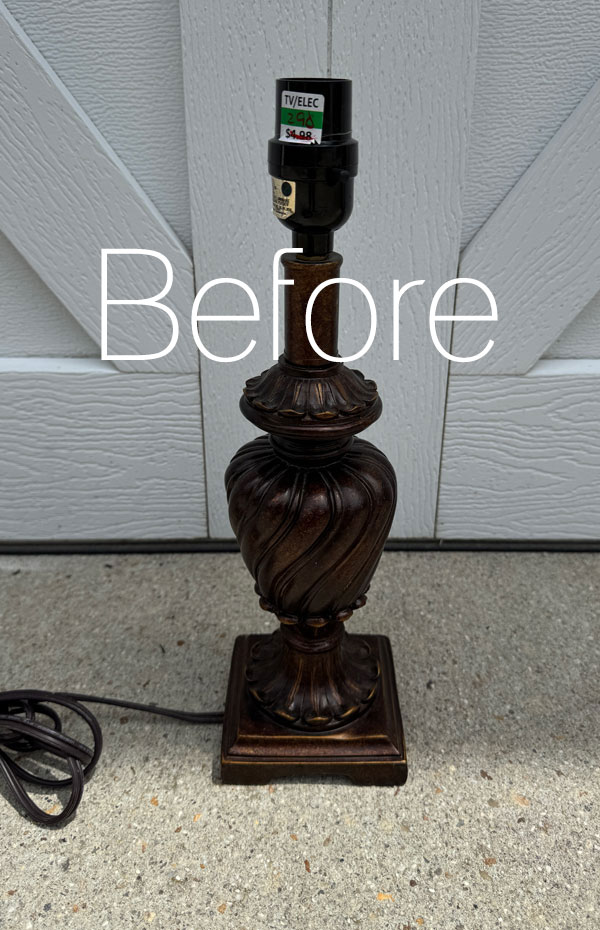
If it looks familiar, it is the same as the bunny lamp I shared earlier. Had I found them at the same time, I would definitely have made them match as sets sell more quickly!
This one got a look all its own though using Tea Rose on the base and the Queen’s Glory transfer on the shade:
I’ve used that one quite a bit! I also highlighted some of the detail using Gold Gilding Wax:
Painting the Smalls #37
These two lamps couldn’t be more different!
Mini Makeover #20
At number twenty is this framed art I found for $3.99:
I knew right away it could make a cute little tray. I decided to fill the inside with a design using old fence pickets I found in my sister’s neighborhood.
Once I had the pickets cut to fit, I opted to paint them, alternating Cotton and a 50/50 Vintage Duck Egg Blue/Cotton mix:
Here’s a peek at the inside:
Painting the Smalls #37
This is quite small. Had it been a bit bigger, I would have kept it for myself!
Mini Makeover #21
Y’all enjoyed this very simple clock redo from the next round. It was a thrift store find for $2.99:

It didn’t need much at all! I added these dainty feet, and then applied gold gilding wax to those and the knob on top:
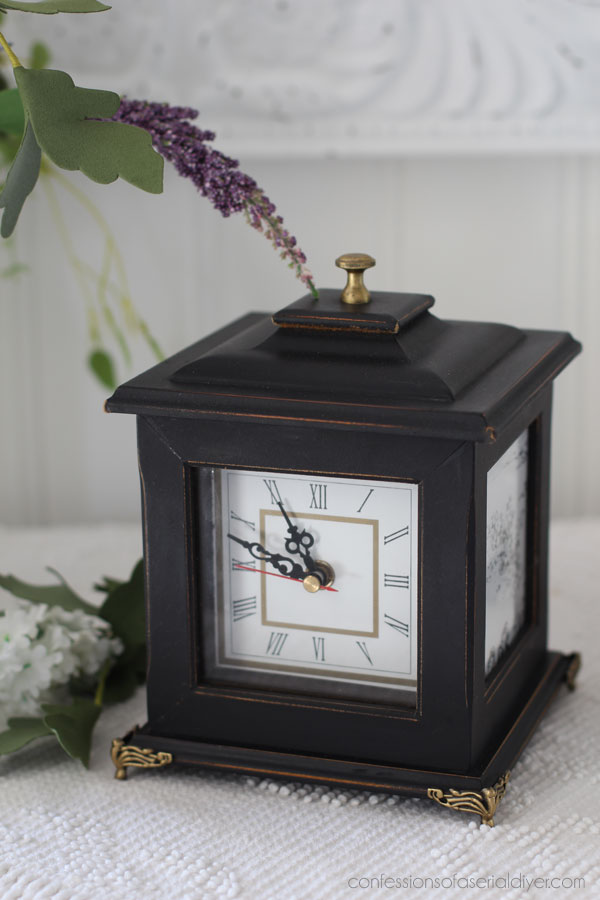
And I was able to flip the yellowed toile paper on the sides over to reveal a bright white background:

Painting the Smalls #38
Mini Makeover #22
Next up is another set of candlesticks! I picked this set up for $3.99 for both:

After painting them bright white, I dug through my stash of transfers and pulled out this set of Paris Cottage Knob transfers to finish them off:

I did sand here and there to highlight those details…

Painting the Smalls #38
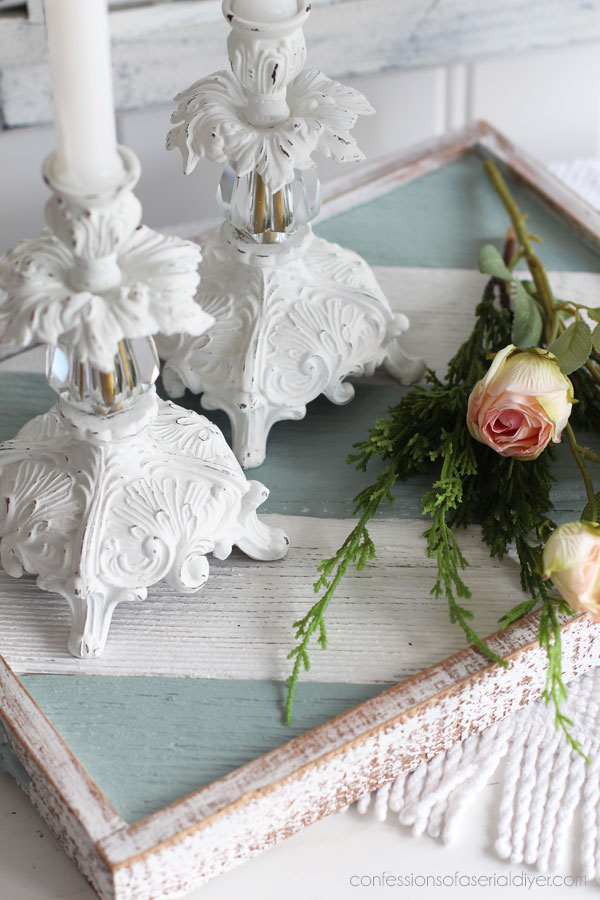
Mini Makeover #23
Just two more to go! This one started out as this tray, probably originally for the holidays, that I found for $3.98:

Paint did wonders with this one…I went with a classic black and white stripe using Caviar and Cotton:

I pulled out the leftovers I had from this Queen’s Glory transfer once again, and I also added these sweet feet!

Painting the Smalls #38
Mini Makeover #24
And to finish off, this one was not part of a Painting the Smalls post, but they were definitely considered smalls! I picked up these two frames for only $1.99 each a the thrift store:

For this set, I chose one of Dixie Belle’s newest chalk mineral paint colors, Gardenia, and used the Greenery Grace transfer from Redesign to turn them into fresh, new art:
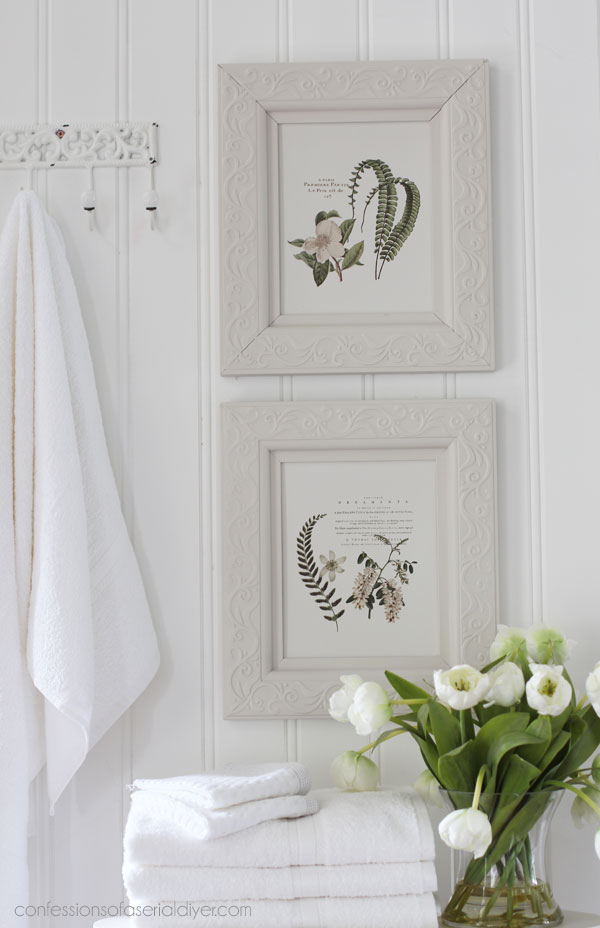
These would be great in a bathroom adding to that spa feel!
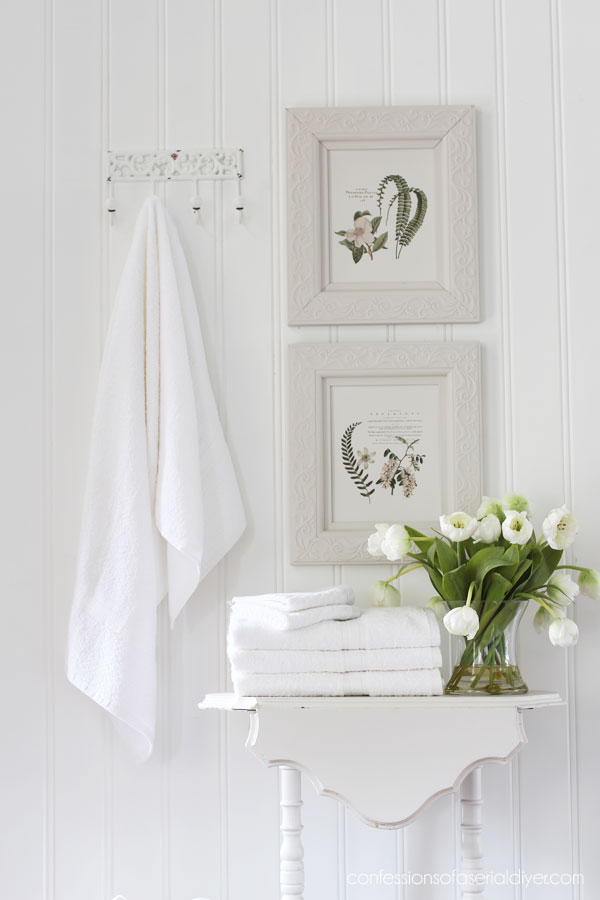
Upcycled Picture Frames
You would never know they started as thrift store picture frames!
And that’s 24 simple & thrifty makeovers!
Now I’m definitely ready to get back to transforming treasures! How about you?
For even more smalls inspo, here’s the smalls round up I shared last year…
There are over 25 makeovers in that post to see!

25+ Simple Smalls Makeovers
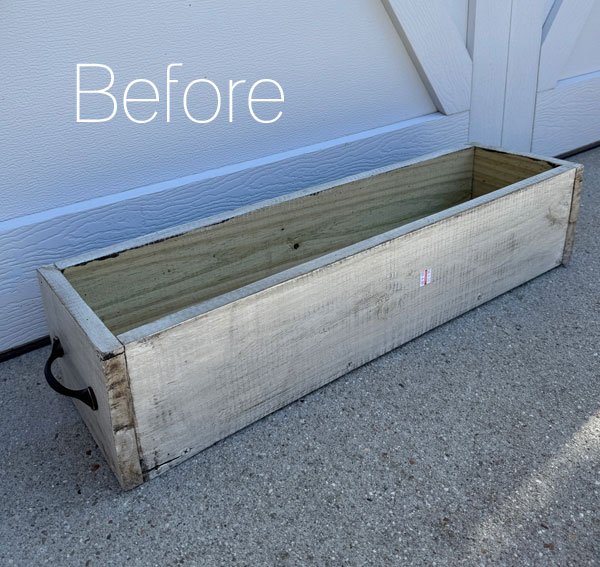
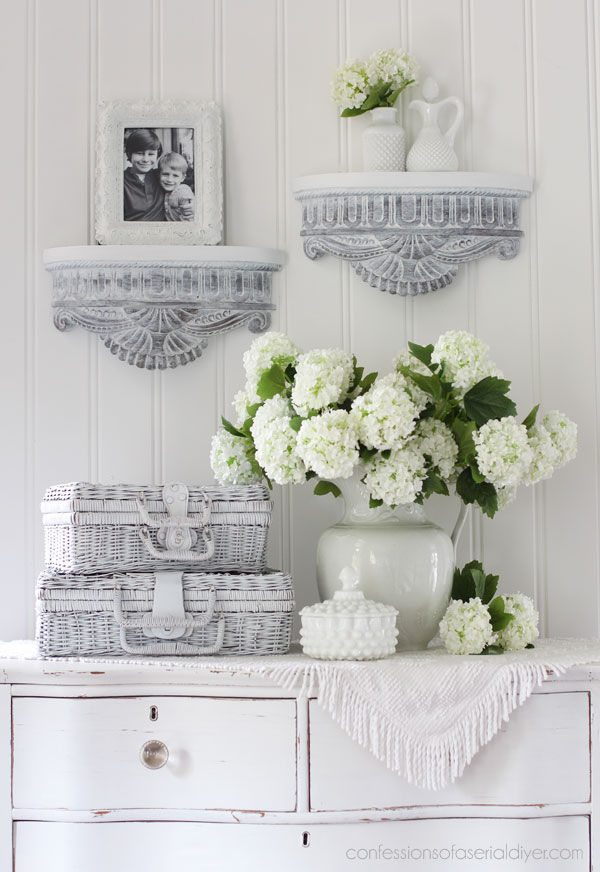
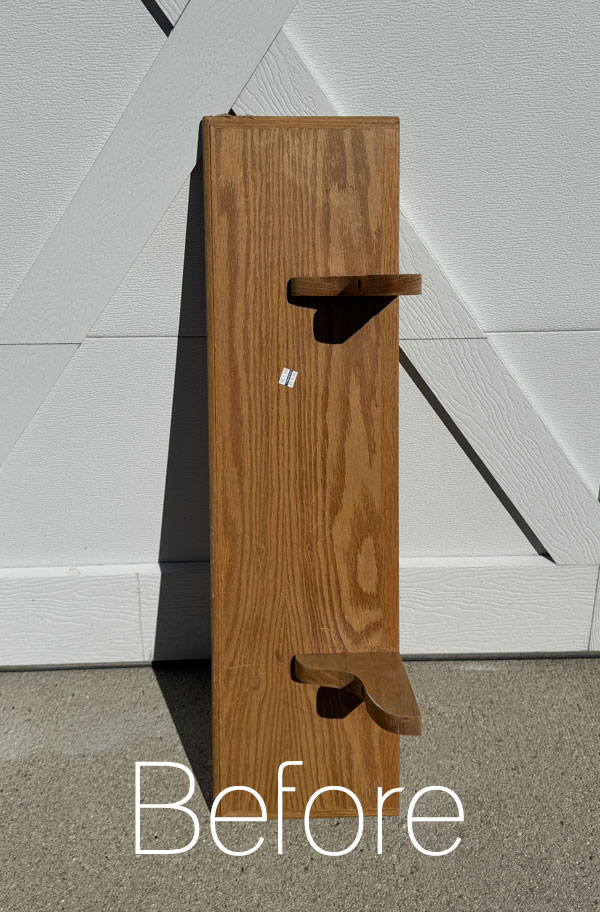
I’ll be back to it on Tuesday, sharing what I did with this shelf for the first Trashy Treasures Tuesday of the year!
See y’all then!
UPDATE: Wait until you see how I updated this one!! See it HERE now!
XOXO,

Don’t Miss a Thing!
If you like what you see, there are several ways to follow along!
EMAIL * INSTAGRAM * FACEBOOK * PINTEREST


Get FREE SHIPPING on all orders over $50. No code needed at checkout! Orders under $50 always enjoy $8 flat rate shipping! Most orders ship same or next business day!


Mary Kaiser says
Oh so fun! you make over alot of thing, and every one of them turn out beautiful! Of this bunch I have to say love the box with secret garden and the lavendar transfer. I also love the lamp in green with the sweet tansfer on the shade! I am really looking foward to seeing what you do in 2026!
Christy says
Good morning, Mary! Thank you so much! I love both of those as well, and I cannot wait to get back into creating!! Have a wonderful weekend! XOXO
Janice Redden says
Christy, so much fun to look back; I think 3 and 6 are my favorites…love little boxes….and of course the sweet framed bunny!
I’m looking forward to what you have in store for Tuesday and beyond!
For some reason, I’ve stopped getting your posts in my incoming mail; checked my settings, spam etc and see no reason….any changes on your end? Could just be computer gremlins…
Christy says
Thank you, my friend! I too love little boxes as you know lol. I am so excited for a brand new year of makeovers! And oh no…I haven’t changed anything on my end. Usually, it’s just that my posts land in another folder, often something like newsletters since I send to a large audience. You can try adding my email address to your contacts ([email protected]), and your provider should send them to your main inbox. Let me know if that doesn’t work! XOXO
Nana Diana says
WOW! That is a lot of ‘littles’ makeovers. Amazing transformations. It’s wonderful to see the magic of paint turning something dated/ugly into something usable and pretty.
Question for you- Do you know where you got the print of the bunny in the frame? I have a grandgirl that loves bunnies and that print would be perfect for her.
Have a great Thursday-off to host a ladies luncheon today. xo Diana
Christy says
Thank you, Diana! I am always amazed at what the smallest changes can do. And yes, that is one of a set of three decoupage papers I have in my shop. You can see that here: https://theserialdiyer.etsy.com/listing/1661219726 I linked to where I used the other two in the pack in the post if you want to see those…so cute! Enjoy your luncheon! XOXO
Lorri says
They are all beautiful….every one of them… my favorite is #14 and the cute Bunny makeover…😍
Christy says
Thank you, Lorri! I love how those mini shelves turned out too, and of course, who doesn’t love bunnies? Have a great weekend! XOXO
Cecilia says
Now that shelf brings back memories of that era! Can’t wait to see its transformation! I love how all the smalls have a new lease on life and all prettied up! I love the lavender box…one of my favorites along with the gorgeous rose paper projects. I love your blog! So inspiring. Thank you for sharing all your ideas and how tos.
😊Cecilia
Christy says
Aww I appreciate that so much, Cecilia! I really love the smalls…such simple changes can do so much. It makes me so happy that you enjoy what I share, my friend! XOXO
Liz Shivel says
Hi Christy, the second batch of smalls are just as inspiring as the first batch! Happy New Year 2026 to you!🥳 Laila & Luci send purrs to Layla! 🐈.
Christy says
I’m so glad you enjoyed them, Liz, thank you! Happy 2026 to you and your sweet kitties too, my friend! XOXO
Lizzy says
These are all so pretty. I’m always amazed by what creativity and a little paint can do. I think my favorite is the small ornate box. (#6.) I liked it before and after!
Christy says
Thanks so much, Lizzy! I too am still amazed what such small changes can do sometimes! That small box didn’t last long, and I liked the before as well lol…almost didn’t want to touch it! XOXO
Cyndi says
Again, so much fun to see these again. I have a few pieces like some of these and now I’m reminded of what I can do with them! Yay!
Christy says
I’m so glad you enjoyed them, Cyndi, thank you! And I’m glad I could offer a little inspo for your own pieces. Happy weekend, my friend! XOXO
Geri Davis says
Happy New Year Christy, I’ve gotten so much inspiration from the pieces that you have done this past year and appreciate you sharing your projects! I now tend to take a second look at the thrift store pieces!!
Christy says
Happy New Year to you too and thank you! I love that you are enjoying creating…it’s the best! And yes, some of those unassuming pieces at the thrift store can become real treasures! XOXO