Jenkins Artifactory Plug-in
we recommend also installing the Jenkins JFrog Plugin, and gradually migrate your jobs from the old plugin to the new one.
Migrate to the Jenkins JFrog Plugin
If you're already using the Artifactory Plugin, we recommend also installing the JFrog Plugin, and gradually migrate your jobs from the old plugin to the new one. You can also have your existing jobs use the two plugins. The old plugin will continue to be supported, however new functionality will most likely make it into the new plugin only.
Why Did We Create the Jenkins JFrog Plugin?
We want to ensure that the Jenkins plugin continues receiving new functionality and improvements. that are added very frequently to JFrog CLI. JFrog CLI already includes significantly more features than the Jenkins Artifactory Plugin. The new JFrog plugin will be receiving these updates automatically.
How is the Jenkins JFrog Plugin Different from the Jenkins Artifactory Plugin?
Unlike the Jenkins Artifactory plugin, the Jenkins JFrog plugin completely relies on JFrog CLI, and serves as a wrapper for it. This means that the APIs you'll be using in your Pipeline jobs look very similar to JFrog CLI commands. The Jenkins JFrog plugin also does not support UI based Jenkins jobs, such as Free-Style jobs. It supports Pipeline jobs only.
How do I get Started?
Read the JFrog Plugin documentation to get started.
Plug-in Version 4.0.0 is available now
We recently released a major version of the Jenkins Artifactory plugin - version 4.0.0.
This release includes the breaking change - Builds that utilize Gradle version below 6.8.1 are no longer supported.
The reason for this change is to support the Gradle Version Catalog feature.
The popular Jenkins Artifactory Plugin brings Artifactory Build Integration support to Jenkins.
This integration allows your build jobs to deploy artifacts and resolve dependencies to and from Artifactory, and then have them linked to the build job that created them. The plugin includes a vast collection of features, including a rich pipeline API library and release management for Maven and Gradle builds with Staging and Promotion.
The plugin currently require version 2.159 or above of Jenkins.
Get started with configuring the Jenkins Artifactory Plug-in.
Learn More
Jenkins Cheat Sheet for Jenkins Pipelines and Continuous Integration
Watch the Screencast
Integrate of the Jenkins Artifactory Plug-in with JFrog Pipelines
JFrog Pipelines integration with Jenkins is supported since version 1.6 of JFrog Pipelines and version 3.7.0 of the Jenkins Artifactory Plugin. This integration allows triggering a Jenkins job from JFrog Pipelines. The Jenkins job is triggered using JFrog Pipeline's native Jenkins step. When the Jenkins job finishes, it reports the status to back to JFrog Pipelines.
The integration supports:
- Passing build parameters to the Jenkins job.
- Sending data from Jenkins back to JFrog Pipelines.
Set Up the Integration of Jenkins Artifactory Plug-in with Pipelines
-
Open the JFrog Pipelines UI.
-
Under Integrations, click on the_Add an Integration_button.
-
Choose _Jenkins Server_integration type and fill out all of the required fields.
-
Click on the _Generate_button to generate a token. This token is used by Jenkins to authenticate with JFrog Pipelines.

-
Copy the Callback URL and Token, and save them in Jenkins | Manage | Configure System | JFrog Pipelines server
Trigger a Jenkins Job from JFrog Pipelines
To trigger a Jenkins job from JFrog Pipelines, add the Jenkins step In your pipelines yaml as shown here.
- Name: MyJenkinsStep
    Type: Jenkins
    configuration:
        jenkinsJobName: <jenkins-job-name>
        Integrations:
        - name: MyJenkinsIntegration
Once the Jenkins job finishes, it will report back the status to the Jenkins step.
More Options with the Jenkins Artifactory Plug-in
For pipelines jobs in Jenkins, you also have the option of sending info from Jenkins back to JFrog Pipelines. This info will be received by JFrog Pipelines as output resources of the Jenkins step in JFrog Pipelines. Here's how you add those resources to the Jenkins pipeline script:
jfPipelines (
    outputResources: """[
        {
            "name": "pipelinesBuildInfo",
            "content": {
                "buildName": "${env.JOB_NAME}",
                "buildNumber": "${env.BUILD_NUMBER}"
            }
        }
    ]"""
)
By default, the Jenkins job status and the optional output resources are sent by Jenkins to JFrog Pipelines when the job finishes. You also however have the option of sending the status and output resources before the Jenkins job ends. Here's how you do it:
jfPipelines (
    reportStatus: "SUCCESS"
)
After Jenkins reports the status back to JFrog Pipelines, it does not wait for any response from JFrog Pipelines, and the job continues to the next step immediately.
You also have the option of putting the reportStatus and outputResources together as follows:
jfPipelines (
    reportStatus: "SUCCESS",
    outputResources: """[
        {
            "name": "pipelinesBuildInfo",
            "content": {
                "buildName": "${env.JOB_NAME}",
                "buildNumber": "${env.BUILD_NUMBER}"
            }
        }
    ]"""
)
The supported statuses are SUCCESS, UNSTABLE, FAILURE, NOT_BUILT or ABORTED.
The Jenkins job will report the status to JFrog Pipelines only once. If you don't report the status as part fo the pipelines script as shown above, Jenkins will report it when the job finishes.
Multi-Configuration (Freestyle) Projects with the Jenkins Artifactory Plug-In
A multi-configuration project can be used to avoid duplicating many similar steps that would otherwise be made by different builds.
The plugin is used in the same way as the other Freestyle builds, but under "Deploy artifacts to Artifactory" you will find a mandatory *Combination Matches *field where you can enter the specific matrix combinations to which the plugin will deploy the artifacts.

Combination Match Fields
Here you can specify build combinations that you want to deploy through a Groovy expression that returns true or false.
When you specify a Groovy expression here, only the build combinations that result in true will be deployed to Artifactory. In evaluating the expression, multi-configuration axes are exposed as variables (with their values set to the current combination evaluated).
The Groovy expression uses the same syntax used in Combination Filter under Configuration Matrix
For example, if you are building on different agents for different jdk`s you would specify the following:
| Deploy "if both linux and jdk7, it's invalid " | !(label=="linux" && jdk=="jdk7" |
| Deploy "if on master, just do jdk7 " | (label=="master").implies(jdk=="jdk7") |
Important Note
Deployment of the same Maven artifacts by more than one matrix job is not supported!
Trigger Builds with the Jenkins Artifactory Plug-in
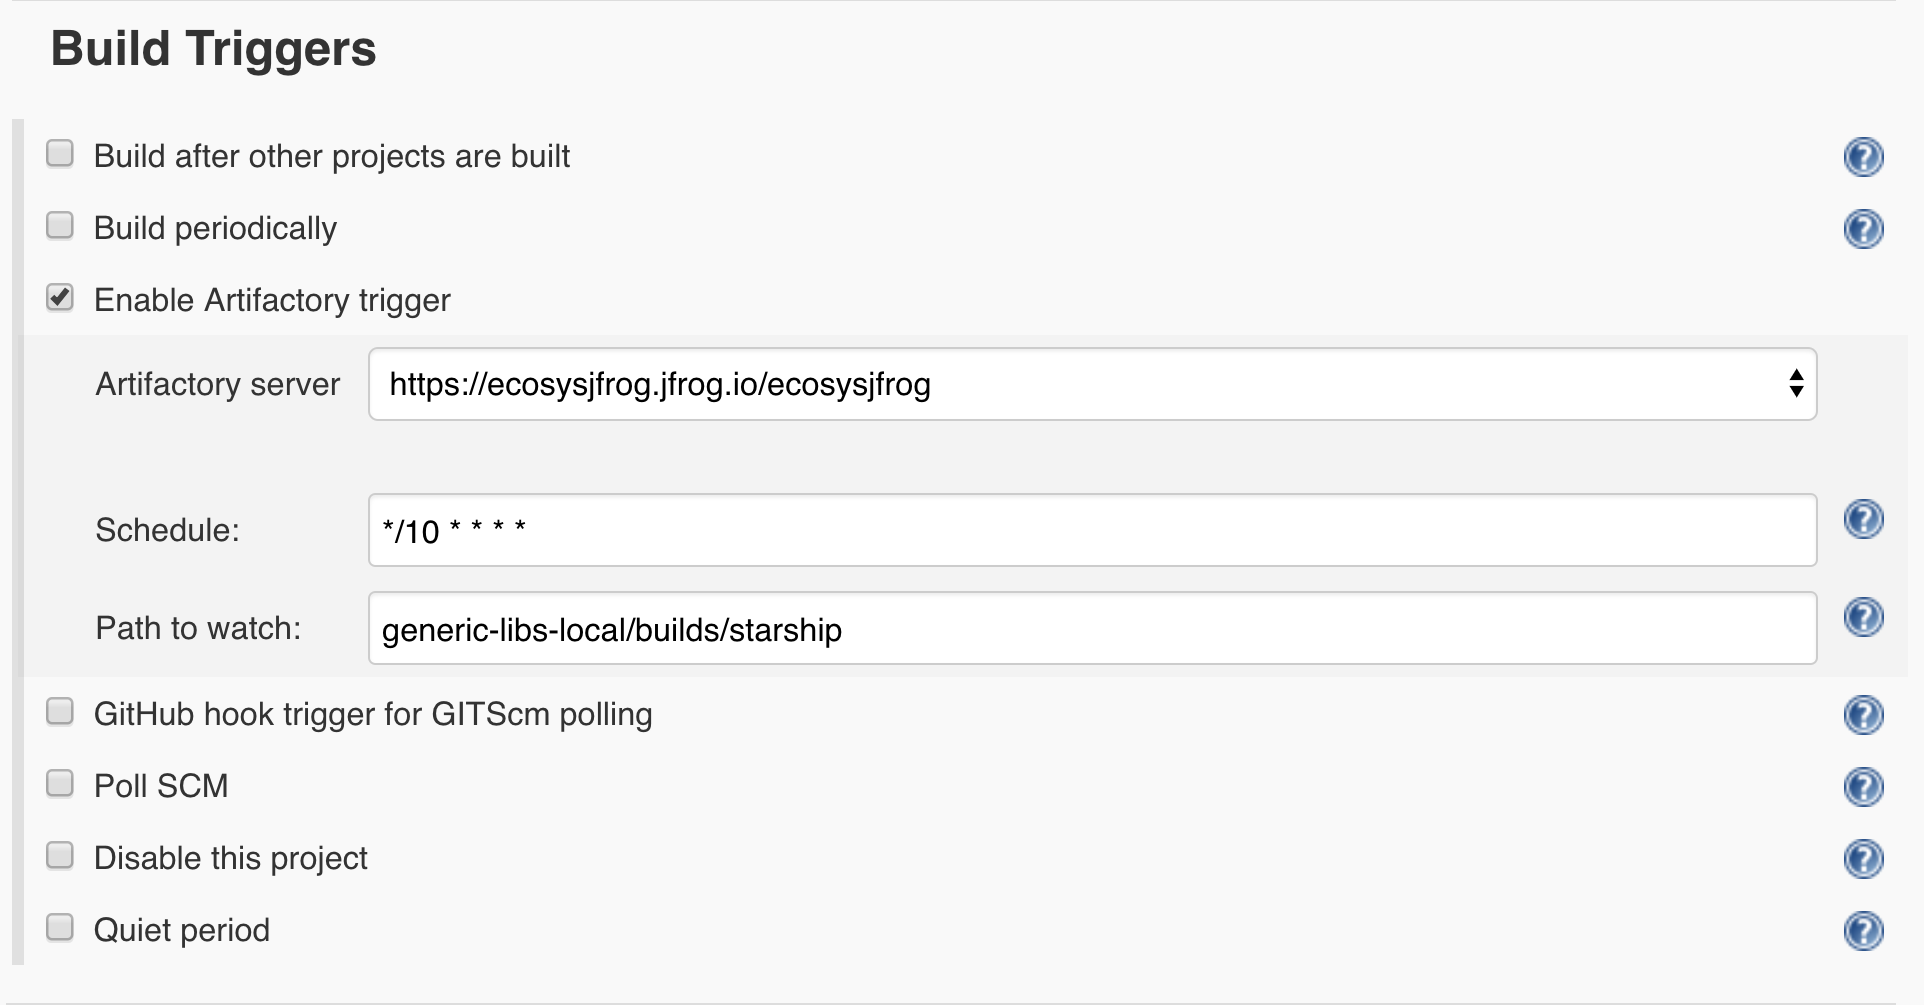
The Artifactory Trigger allows a Jenkins job to be automatically triggered when files are added or modified in a specific Artifactory path. The trigger periodically polls Artifactory to check if the job should be triggered.
To enable the Artifactory trigger, follow these steps:
-
In the Jenkins job UI, go to Build Triggers, and check the Enable Artifactory trigger checkbox.
-
Select an Artifactory server.
-
Define a cron expression in the Schedule field. For example, to pull Artifactory every ten minutes, set ***/10 * * * ***
-
Set a Path to watch. For example, when setting generic-libs-local/builds/starship, Jenkins polls the /builds/starship folder under the generic-libs-local repository in Artifactory for new or modified files.
JIRA Integration and the Jenkins Artifactory Plug-in
JIRA Integration is supported only in Free-Style and Maven jobs.
Pipeline jobs support a more generic integration, which allows integrating with any issue tracking system. See the Collecting Build Issues section in Declarative and Scripted Pipeline APIs documentation pages.
The Jenkins plugin may be used in conjunction with the Jenkins JIRA plugin to record the build's affected issues, and include those issues in the Build Info descriptor inside Artifactory and as searchable properties on deployed artifacts.
The SCM commit messages must include the JIRA issue ID. For example:HAP-007 - Shaken, not stirred
To activate the JIRA integration, make sure that Jenkins is set with a valid JIRA site configuration and select the Enable JIRA Integration in the job configuration page:

Aggregate Issues from Previous Builds
It is possible to collect under a build deployed to Artifactory all JIRA issues affected by this build as well as previous builds. This allows you, for example, to see all issues between the previous release to the current build, and if the build is a new release build - to see all issues addresses in the new release.
To accumulate JIRA issues across builds, check the "Aggregate issues from previous builds" option and configure the last build status the aggregation should begin from. The default last status is "Released" (case insensitive), which means aggregation will begin from the first build after the last "Released" one.

Build Isolation and the Jenkins Artifactory Plugin
Build Isolation is currently supported only in Free-Style and Maven jobs.
When executing the same chain of integration (snapshot) builds in parallel, a situation may arise in which downstream builds resolve snapshot dependencies which are not the original dependencies existing when the build was triggered.
This can happen when a root upstream build has run and triggered downstream builds that depend on its produced artifacts. Then the upstream has run again before the running downstream builds has finished, so these builds may resolve newly created upstream artifacts that are not meant for them, leading to conflicts.

Solution
The Jenkins plugin offers a new checkbox for its Maven/Gradle builds 'Enable isolated resolution for downstream builds' which plants a new 'build.root' property that is added to the resolution URL.
This property will then be read by the direct children of this build and implanting them in their resolution URLs respectively, thus guaranteeing that the parent artifact resolved is the one that was built prior to the build being run.
- Maven: In order for Maven to use the above feature, the checkbox needs to be checked for the root build only, and make sure that all artifacts are being resolved from Artifactory by using the 'Resolve artifacts from Artifactory' feature. This will enforce Maven to use the resolution URL with Maven builds, alongside with the 'build.root' property as a matrix param in the resolution URL.
- Gradle: Once the 'Enable isolated resolution for downstream builds' has been checked, the build.root property will be added to all existing resolvers.
Discard Old Builds
To use this functionality in pipeline jobs, please refer to one of the Triggering Build Retention sections in the Artifactory Pipeline APIs documentation page.
The Jenkins project configuration lets you specify a policy for handling old builds.
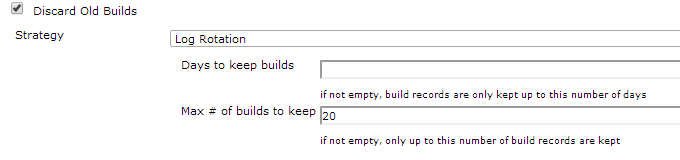
You can delete old builds based on age or number as follows:
| Parameter | Description |
|---|---|
| Days to keep builds | The number of days that a build should be kept before it is deleted |
| Max # of builds to keep | The maximum number of builds that should be kept. When a new build is created, the oldest one will be deleted |
Once these parameters are defined, in the Post-build Actions section, you can specify that Artifactory should also discard old builds according to these settings as follows:

| Parameter | Description |
|---|---|
| Discard old builds from Artifactory | Configures Artifactory to discard old builds according to the Jenkins project settings above |
| Discard build artifacts | Configures Artifactory to also discard the artifacts within the build |
Excluded Artifacts and the BuildInfo
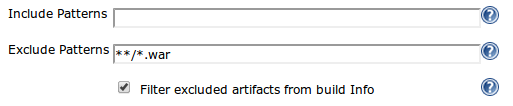
By default when providing exclude patterns for artifacts, they will not get deployed into Artifactory but they will get included in the final BuildInfo JSON.
By marking the "Filter excluded artifacts from build Info" the excluded artifacts will appear in a different section inside the BuildInfo and by this providing a clear understanding of the entire Build.
This is also crucial for the promotion procedure, since it scans your BuildInfo JSON and trying to promote all the artifacts there, it will fail when you excluded artifacts unless you mark this option.
Configure Repositories with Variables
This section is relevant for Free-Style and Maven jobs only,.

You can select text mode in which you can type out your target repository.
In your target repository name, you can use variables that will be dynamically replaced with a value at build time.
The variables should be specified with a dollar-sign prefix and be enclosed by curly brackets.
For example: ${deployRepository}, ${resolveSnapshotRepository}, ${repoPrefix}-${repoName} etc.
The variables are replaced by values from one of the following job environments:
- Predefined Jenkins environment variables.
- Jenkins properties
- Parameters configured in the Jenkins configuration under the "This build is parameterized" section - these parameters could be replaced by a value from the UI or using the Jenkins REST API.
- Injected variables via one of the Jenkins plugins ("EnvInject" for example).
Dynamically Disable Deployment of Artifacts and Build-info
Maven, Gradle and Ivy builds can be configured to deploy artifacts and/or build information to Artifactory. For example, in the case of Gradle builds, you would set the Publishing repository field and check Capture and publish build-info. Maven and Ivy have similar (although slightly different) configuration parameters. By setting these parameters, you can configure each build tool respectively to deploy build artifacts and/or build information to Artifactory. However, there may be specific cases in which you want to override this setting and disable deploying artifacts and build information. In these cases, you can pass the following two system properties to any of the build tools:
-
artifactory.publish.artifacts
-
artifactory.publish.buildInfo
For example, for a Maven build, you can add these system properties to the Goals and options field as follows:
clean install -Dartifactory.publish.artifacts=false -Dartifactory.publish.buildInfo=falseTo control these properties dynamically, you can replace the values with Jenkins variables or Environment variables that you define as follows
clean install -Dartifactory.publish.artifacts=$PUBLISH_ARTIFACTS -Dartifactory.publish.buildInfo=$PUBLISH_BUILDINFOUse the Jenkins Job DSL Plugin
The Jenkins Job DSL plugin allows the programmatic creation of jobs using a DSL. Using the Jenkins Job DSL plugin, you can create Jenkins jobs to run Artifactory operations. To learn about the Jenkins Job DSL, see the Job DSL Tutorial.
To view Seed job examples and instructions for each type of Jenkins jobs, see jenkins-job-dsl-examples.
Release Notes for the Jenkins Artifactory Plug-in
View the Jenkins Artifactory Plug-In Release Notes.
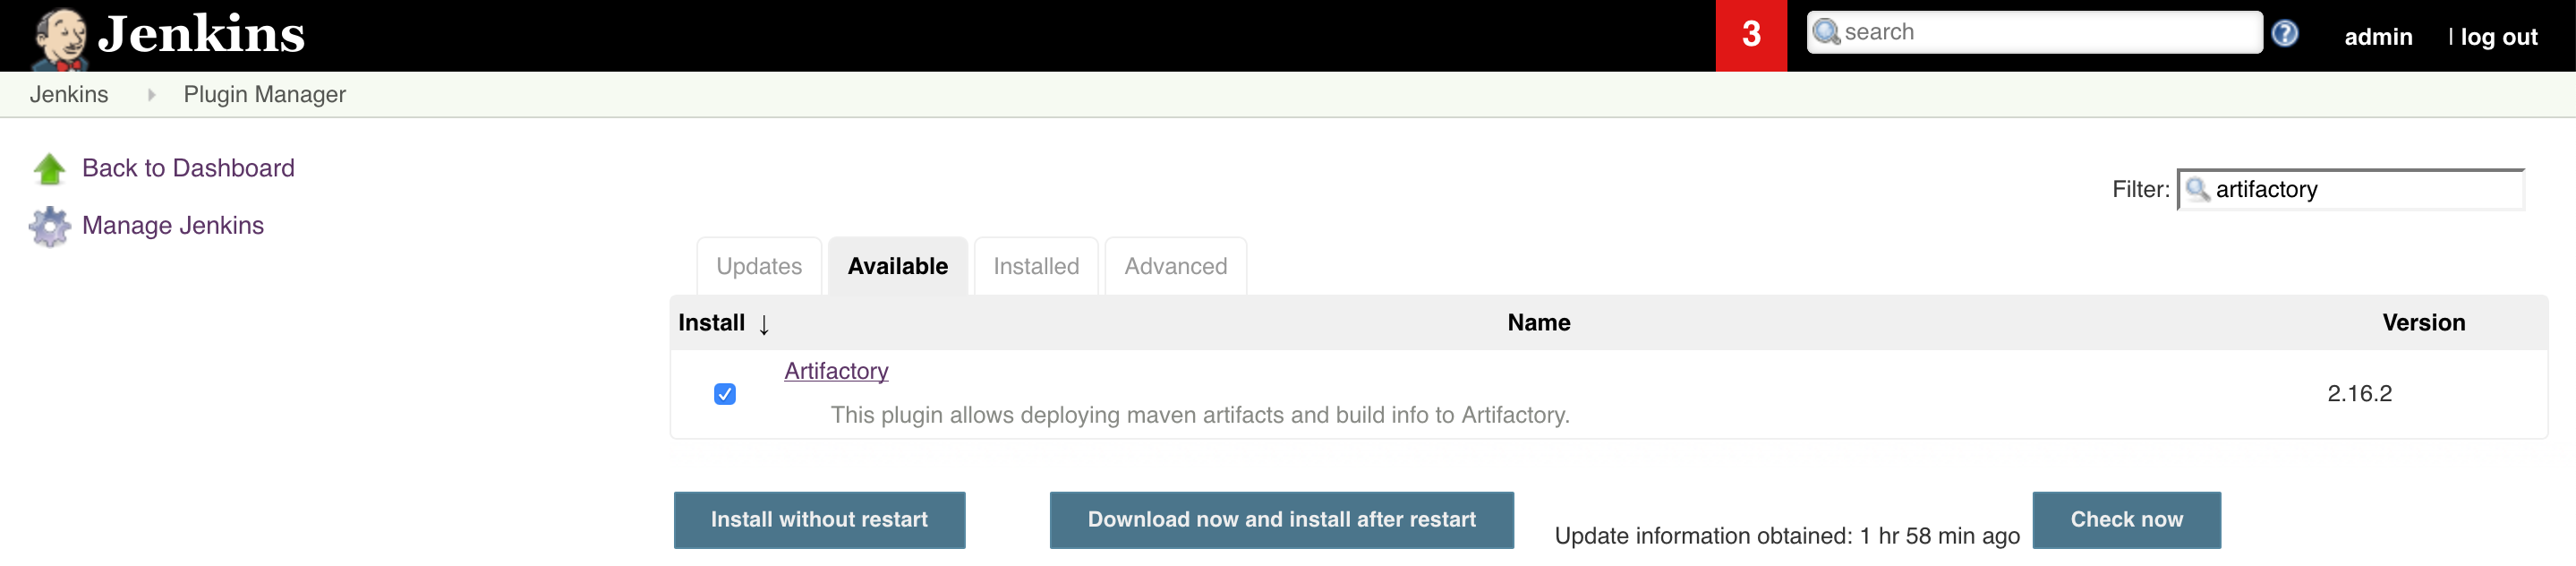
Configure Jenkins Artifactory Plug-in
To install the Jenkins Artifactory Plugin, go to Manage Jenkins > Manage Plugins, click on the Available tab and search for Artifactory. Select the Artifactory plugin and click Download Now and Install After Restart.
Working With Pipeline Jobs in Jenkins
Pipeline jobs allow building a continuous delivery pipeline with Jenkins by creating a script that defines the steps of your build. For those not familiar with Jenkins Pipeline, please refer to the Pipeline Tutorial or the Getting Started With Pipeline documentation.
The Jenkins Artifactory Plugin adds pipeline APIs to support Artifactory operations as part of the build. You have the added option of downloading dependencies, uploading artifacts, and publishing build-info to Artifactory from a Pipeline script, in addition to integration with build tools and package managers.
Use Declarative or Scripted Syntax with Pipelines
Scripted and Declarative syntaxes are two different approaches to defining your pipeline jobs in Jenkins. When working with the Jenkins Artifactory plugin, be sure to choose either scripted or declarative. In other words, do not use declarative and scripted steps within a single pipeline. This will not work.
More information on the difference between the two can be found in the Jenkins Pipeline Syntax documentation.
Integration Benefits JFrog Artifactory and Jenkins-CI
Declarative Pipeline Syntax
Pipeline jobs simplify building continuous delivery workflows with Jenkins by creating a script that defines the steps of your build. For those not familiar with Jenkins Pipeline, please refer to the Pipeline Tutorial or the Getting Started With Pipeline documentation.
The Jenkins Artifactory Plugin supports Artifactory operations pipeline APIs. You have the added option of downloading dependencies, uploading artifacts, and publishing build-info to Artifactory from a pipeline script.
This page describes how to use declarative pipeline syntax with Artifactory. Declarative syntax is available from version 3.0.0 of the Jenkins Artifactory Plugin.
Tip
Scripted syntax is also supported. Read more about it here.
Examples
The Jenkins Pipeline Examples can help get you started creating your pipeline jobs with Artifactory.
Integration Benefits JFrog Artifactory and Jenkins-CI
Create an Artifactory Server Instance - Declarative Pipeline Syntax
There are two ways to tell the pipeline script which Artifactory server to use. You can either define the server details as part of the pipeline script, or define the server details in Manage | Configure System.
If you choose to define the Artifactory server in the pipeline, add the following to the script:
rtServer (
    id: 'Artifactory-1',
    url: 'http://my-artifactory-domain/artifactory',
        // If you're using username and password:
    username: 'user',
    password: 'password',
        // If you're using Credentials ID:
        credentialsId: 'ccrreeddeennttiiaall',
        // If Jenkins is configured to use an http proxy, you can bypass the proxy when using this Artifactory server:
        bypassProxy: true,
        // Configure the connection timeout (in seconds).
        // The default value (if not configured) is 300 seconds:
        timeout: 300
)
You can also use a Jenkins Credential ID instead of the username and password:
The id property (Artifactory-1 in the above examples) is a unique identifier for this server, allowing us to reference this server later in the script. If you prefer to define the server in Manage | Configure System, you don't need to add the rtServerit definition as shown above. You can use the reference the server using its configured Server ID.
Upload and Download Files - Declarative Pipeline Syntax
To download the files, add the following closure to the pipeline script:
rtDownload (
    serverId: 'Artifactory-1',
    spec: '''{
          "files": [
            {
              "pattern": "bazinga-repo/froggy-files/",
              "target": "bazinga/"
            }
          ]
    }''',

    // Optional - Associate the downloaded files with the following custom build name and build number,
    // as build dependencies.
    // If not set, the files will be associated with the default build name and build number (i.e the
    // the Jenkins job name and number).
    buildName: 'holyFrog',
    buildNumber: '42',
    // Optional - Only if this build is associated with a project in Artifactory, set the project key as follows.
    project: 'my-project-key'
)
In the above example, file are downloaded from the Artifactory server referenced by the Artifactory-1 server ID.
The above closure also includes a File Spec, which specifies the files which files should be downloaded. In this example, all ZIP files in the bazinga-repo/froggy-files/ Artifactory path should be downloaded into the bazinga directory on your Jenkins agent file system.
Uploading files is very similar. The following example uploads all ZIP files which include froggy in their names into the froggy-files folder in the bazinga-repo Artifactory repository.
rtUpload (
    serverId: 'Artifactory-1',
    spec: '''{
          "files": [
            {
              "pattern": "bazinga/*froggy*.zip",
              "target": "bazinga-repo/froggy-files/"
            }
         ]
    }''',

    // Optional - Associate the uploaded files with the following custom build name and build number,
    // as build artifacts.
    // If not set, the files will be associated with the default build name and build number (i.e the
    // the Jenkins job name and number).
    buildName: 'holyFrog',
    buildNumber: '42',
    // Optional - Only if this build is associated with a project in Artifactory, set the project key as follows.
    project: 'my-project-key'
)
You can manage the File Spec in separate files, instead of adding it as part of the rtUpload and rtDownload closures. This allows managing the File Specs in a source control, possible with the project sources. Here's how you access the File Spec i the rtUpload. The configuration is similar in thertDownload closure****:****
rtUpload (
    serverId: 'Artifactory-1',
    specPath: 'path/to/spec/relative/to/workspace/spec.json',

    // Optional - Associate the uploaded files with the following custom build name and build number.
    // If not set, the files will be associated with the default build name and build number (i.e the
    // the Jenkins job name and number).
    buildName: 'holyFrog',
    buildNumber: '42',
    // Optional - Only if this build is associated with a project in Artifactory, set the project key as follows.
    project: 'my-project-key'
)
You can read about using File Specs for downloading and uploading files here.
If you'd like to fail the build in case no files are uploaded or downloaded, add the failNoOp property to the rtUpload or rtDownload closures as follows:
rtUpload (
    serverId: 'Artifactory-1',
    specPath: 'path/to/spec/relative/to/workspace/spec.json',
    failNoOp: true,

    // Optional - Associate the uploaded files with the following custom build name and build number.
    // If not set, the files will be associated with the default build name and build number (i.e the
    // the Jenkins job name and number).
    buildName: 'holyFrog',
    buildNumber: '42',
    // Optional - Only if this build is associated with a project in Artifactory, set the project key as follows.
    project: 'my-project-key'
)
Set and Delete Properties on Files in Artifactory - Declarative Pipeline Syntax
When uploading files to Artifactory using the rtUpload closure, you have the option of setting properties on the files. These properties can be later used to filter and download those files.
In some cases, you may want want to set properties on files that are already in Artifactory. The way to this is very similar to the way you define which files to download or upload: A FileSpec is used to filter the filter on which the properties should be set. The properties to be set are sent outside the File Spec. Here's an example.
rtSetProps (
        serverId: 'Artifactory-1',
        specPath: 'path/to/spec/relative/to/workspace/spec.json',
        props: 'p1=v1;p2=v2',
        failNoOp: true
)
In the above example:
- The serverId property is used to reference pre-configured Artifactory server instance as described in the Creating Artifactory Server Instance section.
- The specPath property include a path to a File Spec, which has a similar structure to the File Spec used for downloading files.
- The props property defines the properties we'd like to set. In the above example we're setting two properties - p1 and p2 with the v1 and v2 values respectively.
- The failNoOp property is optional. Setting it to true will cause the job to fail, if no properties have been set.
You also have the option of specifying the File Spec directly inside the rtSetProps closure as follows.
rtSetProps (
        serverId: 'Artifactory-1',
        props: 'p1=v1;p2=v2',
        spec: '''{
            "files": [{
                "pattern": "my-froggy-local-repo",
                "props": "filter-by-this-prop=yes"
        }]}'''
)
The rtDeleteProps closure is used to delete properties from files in Artifactory, The syntax is pretty similar to the rtSetProps closure. The only difference is that in the rtDeleteProps, we specify only the names of the properties to delete. The names are comma separated. The properties values should not be specified. Here's an example:
rtDeleteProps (
        serverId: 'Artifactory-1',
        specPath: 'path/to/spec/relative/to/workspace/spec.json',
        props: 'p1,p2,p3',
        failNoOp: true
)
Similarly to the rtSetProps closure, the File Spec can be defined implicitly in inside the closure as shown here:
rtDeleteProps (
        serverId: 'Artifactory-1',
        props: 'p1,p2,p3',
        spec: '''{
            "files": [{
                "pattern": "my-froggy-local-repo",
                "props": "filter-by-this-prop=yes"
        }]}'''
)
Publish Build-Info to Artifactory - Declarative Pipeline Syntax
If you're not yet familiar with the build-info entity, read about it here.
Files that are downloaded by the rtDownload closure are automatically registered as the current build's dependencies, while files that are uploaded by the rtUpload closure are registered as the build artifacrts. The depedencies and artifacts are recorded locally and can be later published as build-info to Artifactory.
Here's how you publish the build-info to Artifactory:
rtPublishBuildInfo (
    serverId: 'Artifactory-1',
    // The buildName and buildNumber below are optional. If you do not set them, the Jenkins job name is used
    // as the build name. The same goes for the build number.
    // If you choose to set custom build name and build number by adding the following buildName and
    // buildNumber properties, you should make sure that previous build steps (for example rtDownload
    // and rtIpload) have the same buildName and buildNumber set. If they don't, then these steps will not
    // be included in the build-info.
    buildName: 'holyFrog',
    buildNumber: '42',
    // Optional - Only if this build is associated with a project in Artifactory, set the project key as follows.
    project: 'my-project-key'
)
If you set a custom build name and number as shown above, please make sure to set the same build name and number in the rtUpload or rtDownload closures as shown below. If you don't, Artifactory will not be able to associate these files with the build and therefore their files will not be displayed in Artifactory.
rtDownload (
    serverId: 'Artifactory-1',
    // Build name and build number for the build-info:
    buildName: 'holyFrog',
    buildNumber: '42',
    // Optional - Only if this build is associated with a project in Artifactory, set the project key as follows.
    project: 'my-project-key',
    // You also have the option of customising the build-info module name:
    module: 'my-custom-build-info-module-name',
    specPath: 'path/to/spec/relative/to/workspace/spec.json'
)

rtUpload (
    serverId: 'Artifactory-1',
    // Build name and build number for the build-info:
    buildName: 'holyFrog',
    buildNumber: '42',
    // Optional - Only if this build is associated with a project in Artifactory, set the project key as follows.
    project: 'my-project-key',
    // You also have the option of customising the build-info module name:
    module: 'my-custom-build-info-module-name',
    specPath: 'path/to/spec/relative/to/workspace/spec.json'
)
Capture Environment Variables - Declarative Pipeline Syntax
To set the Build-Info object to automatically capture environment variables while downloading and uploading files, add the following to your script.
Note
It is important to place the rtBuildInfo closure before any steps associated with this build (for example, rtDownload and rtUpload), so that its configured functionality (for example, environment variables collection) will be invoked as part of these steps.
rtBuildInfo (
    captureEnv: true,

    // Optional - Build name and build number. If not set, the Jenkins job's build name and build number are used.
    buildName: 'my-build',
    buildNumber: '20',
    // Optional - Only if this build is associated with a project in Artifactory, set the project key as follows.
    project: 'my-project-key'
)
By default, environment variables names which include "password", "psw", "secret", "token", or "key" (case insensitive) are excluded and will not be published to Artifactory.
You can add more include/exclude patterns with wildcards as follows:
rtBuildInfo (
    captureEnv: true,
    includeEnvPatterns: ['*abc*', '*bcd*'],
    excludeEnvPatterns: ['*private*', 'internal-*'],

    // Optional - Build name and build number. If not set, the Jenkins job's build name and build number are used.
    buildName: 'my-build',
    buildNumber: '20'
    // Optional - Only if this build is associated with a project in Artifactory, set the project key as follows.
    project: 'my-project-key'
)
Trigger Build Retention - Declarative Pipeline Syntax
Build retention can be triggered when publishing build-info to Artifactory using the rtPublishBuildInfo closure. Setting build retention therefore should be done before publishing the build, by using the rtBuildInfo closure, as shown below. Please make sure to place the following configuration in the script before the rtPublishBuildInfo closure.
rtBuildInfo (
    // Optional - Maximum builds to keep in Artifactory.
    maxBuilds: 1,
    // Optional - Maximum days to keep the builds in Artifactory.
    maxDays: 2,
    // Optional - List of build numbers to keep in Artifactory.
    doNotDiscardBuilds: ['3'],
    // Optional (the default is false) - Also delete the build artifacts when deleting a build.
    deleteBuildArtifacts: true,

    // Optional - Build name and build number. If not set, the Jenkins job's build name and build number are used.
    buildName: 'my-build',
    buildNumber: '20',
    // Optional - Only if this build is associated with a project in Artifactory, set the project key as follows.
    project: 'my-project-key'
)
Collect Build Issues - Declarative Pipeline Syntax
The build-info can include the issues which were handled as part of the build. The list of issues is automatically collected by Jenkins from the git commit messages. This requires the project developers to use a consistent commit message format, which includes the issue ID and issue summary, for example:
HAP-1364 - Replace tabs with spaces
The list of issues can be then viewed in the Builds UI in Artifactory, along with a link to the issue in the issues tracking system.
The information required for collecting the issues is provided through a JSON configuration. This configuration can be provided as a file or as a JSON string.
Here's an example for issues collection configuration.
{
    'version': 1,
    'issues': {
        'trackerName': 'JIRA',
        'regexp': '(.+-[0-9]+)\\s-\\s(.+)',
        'keyGroupIndex': 1,
        'summaryGroupIndex': 2,
        'trackerUrl': 'http://my-jira.com/issues',
        'aggregate': 'true',
        'aggregationStatus': 'RELEASED'
    }
}
Configuration file properties:
Property name | Description |
|---|---|
Version | The schema version is intended for internal use. Do not change! |
trackerName | The name (type) of the issue tracking system. For example, JIRA. This property can take any value. |
trackerUrl | The issue tracking URL. This value is used for constructing a direct link to the issues in the Artifactory build UI. |
keyGroupIndex | The capturing group index in the regular expression used for retrieving the issue key. In the example above, setting the index to "1" retrieves HAP-1364 from this commit message: HAP-1364 - Replace tabs with spaces |
summaryGroupIndex | The capturing group index in the regular expression for retrieving the issue summary. In the example above, setting the index to "2" retrieves the sample issue from this commit message: HAP-1364 - Replace tabs with spaces |
aggregate | Set to true, if you wish all builds to include issues from previous builds. |
aggregationStatus | If aggregate is set to true, this property indicates how far in time should the issues be aggregated. In the above example, issues will be aggregated from previous builds, until a build with a RELEASE status is found. Build statuses are set when a build is promoted using the jfrog rt build-promote command. |
regexp | A regular expression used for matching the git commit messages. The expression should include two capturing groups - for the issue key (ID) and the issue summary. In the example above, the regular expression matches the commit messages as displayed in the following example: HAP-1364 - Replace tabs with spaces |
Here's how you set issues collection in the pipeline script.
rtCollectIssues (
    serverId: 'Artifactory-1',
    config: '''{
        "version": 1,
        "issues": {
            "trackerName": "JIRA",
            "regexp": "(.+-[0-9]+)\\s-\\s(.+)",
            "keyGroupIndex": 1,
            "summaryGroupIndex": 2,
            "trackerUrl": "http://my-jira.com/issues",
            "aggregate": "true",
            "aggregationStatus": "RELEASED"
        }
    }''',
)
In the above example, the issues config is embedded inside the rtCollectIssues closure. You also have the option of providing a file which includes the issues configuration. Here's how you do this:
rtCollectIssues (
    serverId: 'Artifactory-1',
    configPath: '/path/to/config.json'
)
If you'd like add the issues information to a specific build-info, you can also provide build name and build number as follows:
rtCollectIssues (
    serverId: 'Artifactory-1',
    configPath: '/path/to/config'
    buildName: 'my-build',
    buildNumber: '20',
    // Optional - Only if this build is associated with a project in Artifactory, set the project key as follows.
    project: 'my-project-key'
)Note
To help you get started, we recommend using the Github Examples.
Aggregate Builds - Declarative Pipeline Syntax
The build-info published to Artifactory can include multiple modules representing different build steps. As shown earlier in this section, you just need to pass the same buildName and buildNumber to all the steps that need it (rtUpload for example).
What happens however if your build process runs on multiple machines or it is spread across different time periods? How do you aggregate all the build steps into one build-info?
When your build process runs on multiple machines or it is spread across different time periods, you have the option of creating and publishing a separate build-info for each segment of the build process, and then aggregating all those published builds into one build-info. The end result is one build-info which references other, previously published build-infos.
In the following example, our pipeline script publishes two build-info instances to Artifactory:
rtPublishBuildInfo (
    serverId: 'Artifactory-1',
    buildName: 'my-app-linux',
    buildNumber: '1'
)

rtPublishBuildInfo (
    serverId: 'Artifactory-1',
    buildName: 'my-app-windows',
    buildNumber: '1'
)
At this point, we have two build-infos stored in Artifactory. Now let's create our final build-info, which references the previous two:
rtBuildAppend(
    // Mandatory:
    serverId: 'Artifactory-1',
    appendBuildName: 'my-app-linux',
    appendBuildNumber: '1',

    // The buildName and buildNumber below are optional. If you do not set them, the Jenkins job name is used
    // as the build name. The same goes for the build number.
    // If you choose to set custom build name and build number by adding the following buildName and
    // buildNumber properties, you should make sure that previous build steps (for example rtDownload
    // and rtIpload) have the same buildName and buildNumber set. If they don't, then these steps will not
    // be included in the build-info.
    buildName: 'final',
    buildNumber: '1'
)

rtBuildAppend(
    // Mandatory:
    serverId: 'Artifactory-1',
    appendBuildName: 'my-app-windows',
    appendBuildNumber: '1',
    buildName: 'final',
    buildNumber: '1'
)

// Publish the aggregated build-info to Artifactory.
rtPublishBuildInfo (
    serverId: 'Artifactory-1',
    buildName: 'final',
    buildNumber: '1'
)
If the published builds in Artifactory are associated with a project, you should add the project key to the rtBuildAppend and rtPublishBuildInfo steps as follows.
rtBuildAppend(
    // Mandatory:
    serverId: 'Artifactory-1',
    appendBuildName: 'my-app-linux',
    appendBuildNumber: '1',
    buildName: 'final',
    buildNumber: '1',
    project: 'my-project-key'
)

rtBuildAppend(
    // Mandatory:
    serverId: 'Artifactory-1',
    appendBuildName: 'my-app-windows',
    appendBuildNumber: '1',
    buildName: 'final',
    buildNumber: '1',
    project: 'my-project-key'
)

// Publish the aggregated build-info to Artifactory.
rtPublishBuildInfo (
    serverId: 'Artifactory-1',
    buildName: 'final',
    buildNumber: '1',
    project: 'my-project-key'
)Note
Build Promotion and Build scanning with Xray are currently not supporting aggregated builds.
Promote Builds in Artifactory - Declarative Pipeline Syntax
To promote a build between repositories in Artifactory, define the promotion parameters in the rtPromote closure For example:
rtPromote (
    // Mandatory parameter

    buildName: 'MK',
    buildNumber: '48',
    // Optional - Only if this build is associated with a project in Artifactory, set the project key as follows.
    project: 'my-project-key',
    // Artifactory server ID from Jenkins configuration, or from configuration in the pipeline script
    serverId: 'Artifactory-1',
    // Name of target repository in Artifactory
    targetRepo: 'libs-release-local',

    // Optional parameters

    // Comment and Status to be displayed in the Build History tab in Artifactory
    comment: 'this is the promotion comment',
    status: 'Released',
    // Specifies the source repository for build artifacts.
    sourceRepo: 'libs-snapshot-local',
    // Indicates whether to promote the build dependencies, in addition to the artifacts. False by default.
    includeDependencies: true,
    // Indicates whether to fail the promotion process in case of failing to move or copy one of the files. False by default
    failFast: true,
    // Indicates whether to copy the files. Move is the default.
    copy: true
)
Allow Interactive Promotion for Published Builds - Declarative Pipeline Syntax
The Promoting Builds in Artifactory section describes how your Pipeline script can promote builds in Artifactory. In some cases however, you'd like the build promotion to be performed after the build finished. You can configure your Pipeline job to expose some or all the builds it publishes to Artifactory, so that they can be later promoted interactively using a GUI.
When the build finishes, the promotion window will be accessible by clicking on the promotion icon, next to the build run. To enable interactive promotion for a published build, add the rtAddInteractivePromotion as shown below.
rtAddInteractivePromotion (
    // Mandatory parameters

    // Artifactory server ID from Jenkins configuration, or from configuration in the pipeline script
    serverId: 'Artifactory-1',
    buildName: 'MK',
    buildNumber: '48',
    // Only if this build is associated with a project in Artifactory, set the project key as follows.
    project: 'my-project-key',

    // Optional parameters

    If set, the promotion window will display this label instead of the build name and number.
    displayName: 'Promote me please',
    // Name of target repository in Artifactory
    targetRepo: 'libs-release-local
    // Comment and Status to be displayed in the Build History tab in Artifactory
    comment: 'this is the promotion comment',
    status: 'Released',
    // Specifies the source repository for build artifacts.
    sourceRepo: 'libs-snapshot-local',
    // Indicates whether to promote the build dependencies, in addition to the artifacts. False by default.
    includeDependencies: true,
    // Indicates whether to fail the promotion process in case of failing to move or copy one of the files. False by default
    failFast: true,
    // Indicates whether to copy the files. Move is the default.
    copy: true
)
You can add multiple _rtAddInteractivePromotion_closures, to include multiple builds in the promotion window.
Maven Builds with Artifactory - Declarative Pipeline Syntax
Maven builds can resolve dependencies, deploy artifacts and publish build-info to Artifactory.
Maven Compatibility
- The minimum Maven version supported is 3.3.9
- The deployment to Artifacts is triggered both by the deploy and install phases.
To run Maven builds with Artifactory from your Pipeline script, you first need to create an Artifactory server instance, as described in the _Creating an Artifactory Server Instance_section.
The next step is to define an rtMavenResolver closure, which defines the dependencies resolution details, and an rtMavenDeployer closure, which defines the artifacts deployment details. Here's an example:
rtMavenResolver (
    id: 'resolver-unique-id',
    serverId: 'Artifactory-1',
    releaseRepo: 'libs-release',
    snapshotRepo: 'libs-snapshot'
)

rtMavenDeployer (
    id: 'deployer-unique-id',
    serverId: 'Artifactory-1',
    releaseRepo: 'libs-release-local',
    snapshotRepo: 'libs-snapshot-local',
    // By default, 3 threads are used to upload the artifacts to Artifactory. You can override this default by setting:
    threads: 6,
    // Attach custom properties to the published artifacts:
    properties: ['key1=value1', 'key2=value2']
)
As you can see in the example above, the resolver and deployer should have a unique ID, so that they can be referenced later in the script, In addition, they include an Artifactory server ID and the names of release and snapshot maven repositories.
Now we can run the maven build, referencing the resolver and deployer we defined:
rtMavenRun (
        // Tool name from Jenkins configuration.
    tool: MAVEN_TOOL,
    // Set to true if you'd like the build to use the Maven Wrapper.
    useWrapper: true,
    pom: 'maven-example/pom.xml',
    goals: 'clean install',
        // Maven options.
        opts: '-Xms1024m -Xmx4096m',
    resolverId: 'resolver-unique-id',
    deployerId: 'deployer-unique-id',
    // If the build name and build number are not set here, the current job name and number will be used:
    buildName: 'my-build-name',
    buildNumber: '17',
    // Optional - Only if this build is associated with a project in Artifactory, set the project key as follows.
    project: 'my-project-key'
)
Instead of setting the tool in the rtMavenRun closure, you can set the path to the Maven installation directory using the MAVEN_HOME environment variable as follows:
environment {
    MAVEN_HOME = '/tools/apache-maven-3.3.9'
}
In case you'd like Maven to use a different JDK than your build agent's default, no problem.
Simply set the JAVA_HOME environment variable to the desired JDK path (the path to the directory above the bin directory, which includes the java executable).
environment {
    JAVA_HOME = '/full/path/to/JDK'
}
The last thing you might want to do, is to publish the build-info for this build. See the Publishing Build Info to Artifactory section for how to do it.
Gradle Builds with Artifactory - Declarative Pipeline Syntax
Gradle builds can resolve dependencies, deploy artifacts and publish build-info to Artifactory.
Gradle Compatibility
The minimum Gradle version supported is 4.10
To run Gradle builds with Artifactory from your Pipeline script, you first need to create an Artifactory server instance, as described in the Creating an Artifactory Server Instance section.
The next step is to define an rtGradleResolver closure, which defines the dependencies resolution details, and an rtGradleDeployer closure, which defines the artifacts deployment details. Here's an example:
rtGradleResolver (
    id: 'resolver-unique-id',
    serverId: 'Artifactory-1',
    repo: 'maven-remote'
)

rtGradleDeployer (
    id: 'deployer-unique-id',
    serverId: 'Artifactory-1',
    repo: 'libs-snapshot-local',
    // Optional - By default, 3 threads are used to upload the artifacts to Artifactory. You can override this default by setting:
    threads: 6,
    // Optional - Attach custom properties to the published artifacts:
    properties: ['key1=value1', 'key2=value2'],
        // Optional - Gradle allows customizing the list of deployed artifacts by defining publications as part fo the Gradle build script.
        // Gradle publications are used to group artifacts together. You have the option of defining which of the defined publications Jenkins should use. Only the artifacts grouped by these publications will be deployed to Artifactory.
        // If you do not define the publications, a default publication, which includes the list of the produced artifacts by a java project will be used.
        // Here's how you define the list of publications.
        publications: ["mavenJava", "ivyJava"]
    // If you'd like to deploy the artifacts from all the publications defined in the gradle script, you can set the "ALL_PUBLICATIONS" string as follows
    // publications: ["ALL_PUBLICATIONS"]
)
As you can see in the example above, the resolver and deployer should have a unique ID, so that they can be referenced later in the script, In addition, they include an Artifactory server ID and the names of release and snapshot maven repositories.
If you're using gradle to build a project, which produces maven artifacts, you also have the option of defining two deployment repositories as part the rtGradleDeployer closure - one repository will be used for snapshot artifacts and one for release artifacts. Here's how you define it:
rtGradleDeployer (
    id: 'deployer-unique-id',
    serverId: 'Artifactory-1',
        releaseRepo: 'libs-release',
        snapshotRepo: 'libs-snapshot'
)
Now we can run the Gradle build, referencing the resolver and deployer we defined:
rtGradleRun (
        // Set to true if the Artifactory Plugin is already defined in build script.
    usesPlugin: true,
        // Tool name from Jenkins configuration.
    tool: GRADLE_TOOL,
        // Set to true if you'd like the build to use the Gradle Wrapper.
        useWrapper: true,
    rootDir: 'gradle-examples/gradle-example/',
    buildFile: 'build.gradle',
    tasks: 'clean artifactoryPublish',
    resolverId: 'resolver-unique-id',
    deployerId: 'deployer-unique-id',
    // If the build name and build number are not set here, the current job name and number will be used:
    buildName: 'my-build-name',
    buildNumber: '17',
    // Optional - Only if this build is associated with a project in Artifactory, set the project key as follows.
    project: 'my-project-key'
)
In case you'd like Gradle to use a different JDK than your build agent's default, no problem.
Simply set the JAVA_HOME environment variable to the desired JDK path (the path to the directory above the bin directory, which includes the java executable).
Here's you do it:
environment {
    JAVA_HOME = '/full/path/to/JDK'
}
The last thing you might want to do, is to publish the build-info for this build. See the Publishing Build Info to Artifactory section for how to do it.
Note
You also have the option of defining default values in the gradle build script. Read more about it here.
Python Builds with Artifactory - Declarative Pipeline Syntax
Tip
We recommend using the integration with the JFrog Jenkins Plugin, rather than using the following DSL.
Python builds can resolve dependencies, deploy artifacts and publish build-info to Artifactory. To run Python builds with Artifactory start by following these steps, to make sure your Jenkins agent is ready:
- Make sure Python is installed on the build agent and that the python command is in the PATH.
- Install pip. You can use the Pip Documentation and also Installing packages using pip and virtual environments.
- Make sure wheel and setuptools are installed. You can use the Installing Packages Documentation.
- Validate that the build agent is ready by running the following commands from the terminal:
Output Python version:
> python --version

Output pip version:
> pip --version

Verify wheel is installed:
> wheel -h

Verify setuptools is installed:
> pip show setuptools

Verify that virtual-environment is activated:
> echo $VIRTUAL_ENV
To run Python builds from your Pipeline script, you first need to create an Artifactory server instance, as described in the Creating an Artifactory Server Instance section.
The next step is to define an rtPipResolver, which defines the dependencies resolution details. Here's an example:
rtPipResolver (
    id: "resolver-unique-id",
    serverId: "Artifactory-1",
    repo: "pip-virtual"
)
As you can see in the example above, the resolver should have a unique ID, so that it can be referenced later in the script, In addition, it includes an Artifactory server ID and the name of the repository.
Now we can use the rtPipInstall closure, to resolve the pip dependencies. Notice that the closure references the resolver we defined above.
rtPipInstall (
    resolverId: "resolver-unique-id",
    args: "-r python-example/requirements.txt",
    envActivation: virtual_env_activation,
        // Jenkins spawns a new java process during this step's execution.
        // You have the option of passing any java args to this new process.
        javaArgs: '-agentlib:jdwp=transport=dt_socket,server=y,suspend=n,address=*:5005'
    // If the build name and build number are not set here, the current job name and number will be used:
    buildName: 'my-build-name',
    buildNumber: '17',
    // Optional - Only if this build is associated with a project in Artifactory, set the project key as follows.
    project: 'my-project-key'
)
Notice the envActivation property in the example above. Is is an optional property. Since it is mostly recommended to run pip commands inside a virtual environment, to achieve isolation for the pip build. To follow this recommendation, you have the option of using the envActivation by sending a shell script as its value, for setting up the virtual env.
In most cases, your build also produces artifacts. The artifacts produced can be deployed to Artifactory using the rtUpload closure, as described in the Uploading and Downloading Files section in this article.
The last thing you might want to do, is to publish the build-info for this build. See the Publishing Build Info to Artifactory section for how to do it.
More about build-info: You also have the option of customising the build-info module names. You do this by adding the module property to the rtPipInstall closure as follows:
rtPipInstall (
    resolverId: "resolver-unique-id",
    args: "-r python-example/requirements.txt",
    envActivation: virtual_env_activation,
        module: 'my-custom-build-info-module-name'
)
NuGet and .NET Core Builds with Artifactory - Declarative Pipeline Syntax
Tip
We recommend using the integration with the JFrog Jenkins Plugin, rather than using the following DSL.
The Artifactory Plugin's integration with the NuGet and .NET Core clients allow build resolve dependencies, deploy artifacts and publish build-info to Artifactory.
Note
- Depending on the client you'd like to use, please make sure either the nuget or dotnet clients are included in the build agent's PATH.
- If you're using the dotnet client, please note that the minimum version supported is .NET Core 3.1.200 SDK.
To run NuGet / DotNet Core builds with Artifactory from your Pipeline script, you first need to create an Artifactory server instance, as described in the Creating an Artifactory Server Instance section.
The next step is to define an rtNugetResolver or rtDotnetResolver (depending on whether you're using using NuGet or DorNet Core), which defines the dependencies resolution details. Here's an example:
rtNugetResolver (
    id: 'resolver-unique-id',
    serverId: 'Artifactory-1',
    repo: 'libs-nuget'
)

// OR

rtDotnetResolver (
    id: 'resolver-unique-id',
    serverId: 'Artifactory-1',
    repo: 'libs-nuget'
)
As you can see in the example above, the resolver should have a unique ID, so that it can be referenced later in the script, In addition, it includes an Artifactory server ID and the name of the repository.
Now we can use the rtNugetRun or rtDotnetRun closure, to resolve the NuGet dependencies. Notice that the closure references the resolver we defined above.
rtNugetRun (
    resolverId: "resolver-unique-id",
    args: "restore ./Examples.sln",
        // Optional - Jenkins spawns a new java process during this step's execution.
        // You have the option of passing any java args to this new process.
        javaArgs: "-agentlib:jdwp=transport=dt_socket,server=y,suspend=n,address=*:5005",
    // Optional - By default, the build uses NuGet API protocol v2. If you'd like to use v3, set it on the build instance as follows.
    apiProtocol: "v3"
    // If the build name and build number are not set here, the current job name and number will be used:
    buildName: 'my-build-name',
    buildNumber: '17',
    // Optional - Only if this build is associated with a project in Artifactory, set the project key as follows.
    project: 'my-project-key'
)

// OR

rtDotnetRun (
    resolverId: "resolver-unique-id",
    args: "restore ./Examples.sln",
        // Jenkins spawns a new java process during this step's execution.
        // You have the option of passing any java args to this new process.
        javaArgs: "-agentlib:jdwp=transport=dt_socket,server=y,suspend=n,address=*:5005",
    // Optional - By default, the build uses NuGet API protocol v2. If you'd like to use v3, set it on the build instance as follows.
    apiProtocol: "v3"
    // If the build name and build number are not set here, the current job name and number will be used:
    buildName: 'my-build-name',
    buildNumber: '17',
    // Optional - Only if this build is associated with a project in Artifactory, set the project key as follows.
    project: 'my-project-key'
)
In most cases, your build also produces artifacts. The artifacts can be NuGet packages, DLL files or any other type of artifact. The artifacts produced can be deployed to Artifactory using the rtUpload closure, as described in the Uploading and Downloading Files section in this article.
The last thing you might want to do, is to publish the build-info for this build. See the Publishing Build Info to Artifactory section for how to do it.
More about build-info: You also have the option of customising the build-info module names. You do this by adding the module property to the rtNugetRun or rtDotnetRun closures as follows:
rtNugetRun (
    resolverId: "resolver-unique-id",
    args: "restore ./Examples.sln",
        module: 'my-custom-build-info-module-name'
)

// OR

rtDotnetRun (
    resolverId: "resolver-unique-id",
    args: "restore ./Examples.sln",
        module: 'my-custom-build-info-module-name'
)
NPM Builds with Artifactory - Declarative Pipeline Syntax
NPM builds can resolve dependencies, deploy artifacts and publish build-info to Artifactory. To run NPM builds with Artifactory from your Pipeline script, you first need to create an Artifactory server instance, as described in the Creating an Artifactory Server Instance section.
The next step is to define an rtNpmResolver closure, which defines the dependencies resolution details, and an rtNpmDeployer closure, which defines the artifacts deployment details. Here's an example:
rtNpmResolver (
    id: 'resolver-unique-id',
    serverId: 'Artifactory-1',
    repo: 'libs-npm'
)

rtNpmDeployer (
    id: 'deployer-unique-id',
    serverId: 'Artifactory-1',
    repo: 'libs-npm-local',
    // Attach custom properties to the published artifacts:
    properties: ['key1=value1', 'key2=value2']
)
As you can see in the example above, the resolver and deployer should have a unique ID, so that they can be referenced later in the script, In addition, they include an Artifactory server ID and the name of the repository.
Now we can use the rtNpmInstall or rtNpmCi closures, to resolve the NPM dependencies. Notice that the closure references the resolver we defined above.
rtNpmInstall (
    // Optional tool name from Jenkins configuration
    tool: NPM_TOOL,
    // Optional path to the project root. If not set, the root of the workspace is assumed as the root project path.
    path: 'npm-example',
    // Optional npm flags or arguments.
    args: '--verbose',
    resolverId: 'resolver-unique-id',
        // Jenkins spawns a new java process during this step's execution.
        // You have the option of passing any java args to this new process.
        javaArgs: '-agentlib:jdwp=transport=dt_socket,server=y,suspend=n,address=*:5005'
    // If the build name and build number are not set here, the current job name and number will be used:
    buildName: 'my-build-name',
    buildNumber: '17',
    // Optional - Only if this build is associated with a project in Artifactory, set the project key as follows.
    project: 'my-project-key'
)Note
The rtNpmInstall step invokes the npm install command behind the scenes. If you'd like to use the npm ci command instead, simply replace the step name with rtNpmCi.
And to pack and publish the npm package out project creates, we use the rtNpmPublish closure with a reference to the deployer we defined.
rtNpmPublish (
    // Optional tool name from Jenkins configuration
    tool: 'npm-tool-name',
    // Optional path to the project root. If not set, the root of the workspace is assumed as the root project path.
    path: 'npm-example',
    deployerId: 'deployer-unique-id',
        // Jenkins spawns a new java process during this step's execution.
        // You have the option of passing any java args to this new process.
        javaArgs: '-agentlib:jdwp=transport=dt_socket,server=y,suspend=n,address=*:5005'
    // If the build name and build number are not set here, the current job name and number will be used:
    buildName: 'my-build-name',
    buildNumber: '17',
    // Optional - Only if this build is associated with a project in Artifactory, set the project key as follows.
    project: 'my-project-key'
)
The build uses the npm executable to install (download the dependencies) and also to pack the resulting npm package before publishing it. By default, Jenkins uses the npm executable, which is present in the agent’s PATH. You can also reference a tool defined in Jenkins configuration. Here's how:
environment {
    // Path to the NodeJS home directory (not to the npm executable)
    NODEJS_HOME = 'path/to/the/nodeJS/home'
}
// or
environment {
    // If a tool named 'nodejs-tool-name' is defined in Jenkins configuration.
    NODEJS_HOME = "${tool 'nodejs-tool-name'}"
}
// or
nodejs(nodeJSInstallationName: 'nodejs-tool-name') {
    // Only in this code scope, the npm defined by 'nodejs-tool-name' is used.
}
If the npm installation is not set, the npm executable which is found in the agent's PATH is used.
The last thing you might want to do, is to publish the build-info for this build. See the Publishing Build Info to Artifactory section for how to do it.
More about build-info: You also have the option of customising the build-info module names. You do this by adding the module property to the rtNpmInstall or rtNpmPublish closures as follows:
rtNpmInstall (
    tool: 'npm-tool-name',
    path: 'npm-example',
    resolverId: 'resolver-unique-id',
    module: 'my-custom-build-info-module-name'
)

rtNpmPublish (
    tool: 'npm-tool-name',
    path: 'npm-example',
    deployerId: 'deployer-unique-id'
    module: 'my-custom-build-info-module-name'
)
Go Builds with Artifactory - Declarative Pipeline Syntax
While building your Go projects, Jenkins can resolve dependencies, deploy artifacts and publish build-info to Artifactory.
Note
Please make sure that the go client is included in the build agent's PATH.
To run Go builds with Artifactory from your Pipeline script, you first need to create an Artifactory server instance, as described in the Creating an Artifactory Server Instance section.
The next step is to define an rtGoResolver closure, which defines the dependencies resolution details, and an rtGoDeployer closure, which defines the artifacts deployment details. Here's an example:
rtGoResolver (
    id: 'resolver-unique-id',
    serverId: 'Artifactory-1',
    repo: 'libs-go'
)

rtGoDeployer (
    id: 'deployer-unique-id',
    serverId: 'Artifactory-1',
    repo: 'libs-go-local',
    // Attach custom properties to the published artifacts:
    properties: ['key1=value1', 'key2=value2']
)
As you can see in the example above, the resolver and deployer should have a unique ID, so that they can be referenced later in the script, In addition, they include an Artifactory server ID and the name of the repository.
Now we can use the rtGoRun closure, to run the build..Notice that the closure references the resolver we defined above.
rtGoRun (
    path: 'path/to/the/project/root',
    resolverId: 'resolver-unique-id',
    args: 'build'
    // If the build name and build number are not set here, the current job name and number will be used:
    buildName: 'my-build-name',
    buildNumber: '17',
    // Optional - Only if this build is associated with a project in Artifactory, set the project key as follows.
    project: 'my-project-key'
)
Now that the project is built, you can pack and publish it to Artifactory as a Go package. We use the rtGoPublish closure with a reference to the deployer we defined.
rtGoPublish (
    path: "path/to/the/project/root',
    deployerId: 'deployer-unique-id',
    version: '1.0.0'
)
The last thing you might want to do, is to publish the build-info for this build. See the _Publishing Build Info to Artifactory_section for how to do it.
More about build-info: You also also have the option of customising the build-info module names. You do this by adding the module property to the rtGoRun or rtGoPublish closures as follows:
rtGoRun (
    path: 'path/to/the/project/root',
    resolverId: 'resolver-unique-id',
    args: 'build',
    module: 'my-custom-build-info-module-name'
)

rtGoPublish (
    path: 'path/to/the/project/root',
    deployerId: 'deployer-unique-id',
    version: '1.0.0',
    module: 'my-custom-build-info-module-name'
)
Conan Builds with Artifactory - Declarative Pipeline Syntax
Conan is a C/C++ Package Manager. The Artifactory Pipeline DSL includes APIs that make it easy for you to run Conan builds, using the Conan Client installed on your build agents. Here's what you need to do before you create your first Conan build job with Jenkins:
1, Install the latest Conan Client on your Jenkins build agent. Please refer to the Conan documentation for installation instructions.
-
Add the Conan Client executable to the PATH environment variable on your build agent, to make sure Jenkins is able to use the client.
-
Create a Conan repository in Artifactory as described in the Conan Repositories Artifactory documentation.
OK. Let's start coding your first Conan Pipeline script.
Let's start by creating a Conan Client instance:
rtConanClient (
    id: "myConanClient"
)
When creating the Conan client, you can also specify the Conan user home directory as shown below:
rtConanClient (
    id: "myConanClient",
        userHome: "conan/my-conan-user-home"
)
We can now configure our new conan client by adding an Artifactory repository to it. In our example, we're adding the 'conan-local' repository, located in the Artifactory server, referenced by the pre-configured server ID:
rtConanRemote (
    name: "myRemoteName",
    serverId: "Artifactory-1",
    repo: "conan-local",
    clientId: "myConanClient",
        // Optional - Adding this argument will make the conan client not to raise an error. If an existing remote exists with the provided name.
        force: true,
        // Optional - Adding this argument will make the conan client skip the validation of SSL certificates.
        verifySSL: false
)
OK. We're ready to start running Conan commands. You'll need to be familiar with the Conan commands syntax, exposed by the Conan Client to run the commands. You can read about the commands syntax in the Conan documentation.
Let's run the first command:
rtConanRun (
    clientId: "myConanClient",
    command: "install . --build missing"
)
The next thing we want to do is to use the conan remote we created. For example, let's upload our artifacts to the conan remote. Notice how we use the ID of the remote we created earlier, which is myRemoteName:
rtConanRun (
    clientId: "myConanClient",
    command: "upload * --all -r myRemoteName --confirm"
)
We can now publish the the buildInfo to Artifactory, as described in the following section:
rtPublishBuildInfo (
    serverId: "Artifactory-1"
)
Docker Builds with Artifactory - Declarative Pipeline Syntax
Tip
We recommend using the integration with the JFrog Jenkins Plugin, rather than using the following DSL.
The Jenkins Artifactory Plugin supports a Pipeline DSL that allows pulling and pushing docker images from and to Artifactory. while collecting and publishing build-info to Artifactory. To setup your Jenkins build agents to collect build-info for your Docker builds, see setup instructions.
Work with Docker Daemon Directly - Declarative Pipeline Syntax
The Jenkins Artifactory Plugin supports working with the docker daemon directly through its REST API. Please make sure ti set up Jenkins to work with docker and Artifactory as mentioned in the previous section.
Next, let's create an Artifactory server instance as shown blow, or configure it through Manage | Configure System.
rtServer (
    id: 'Artifactory-1',
    url: 'http://my-artifactory-domain/artifactory',
    credentialsId: 'my-credentials-id'
)
Next, here's how you pull a docker image from Artifactory.
Pulling Docker Images from Artifactory
rtDockerPull(
    serverId: 'Artifactory-1',
    image: ARTIFACTORY_DOCKER_REGISTRY + '/hello-world:latest',
    // Host:
    // On OSX: "tcp://127.0.0.1:1234"
    // On Linux can be omitted or null
    host: HOST_NAME,
    sourceRepo: 'docker-remote',
    // If the build name and build number are not set here, the current job name and number will be used:
    buildName: 'my-build-name',
    buildNumber: '17',
    // Optional - Only if this build is associated with a project in Artifactory, set the project key as follows.
    project: 'my-project-key',
        // Jenkins spawns a new java process during this step's execution.
        // You have the option of passing any java args to this new process.
        javaArgs: '-agentlib:jdwp=transport=dt_socket,server=y,suspend=n,address=*:5005'
)
Here's how you push an image to Artifactory
Pushing Docker Images to Artifactory
rtDockerPush(
    serverId: 'Artifactory-1',
    image: ARTIFACTORY_DOCKER_REGISTRY + '/hello-world:latest',
    // Host:
    // On OSX: 'tcp://127.0.0.1:1234'
    // On Linux can be omitted or null
    host: HOST_NAME,
    targetRepo: 'docker-local',
    // Attach custom properties to the published artifacts:
    properties: 'project-name=docker1;status=stable',
    // If the build name and build number are not set here, the current job name and number will be used:
    buildName: 'my-build-name',
    buildNumber: '17',
    // Optional - Only if this build is associated with a project in Artifactory, set the project key as follows.
    project: 'my-project-key',
        // Jenkins spawns a new java process during this step's execution.
        // You have the option of passing any java args to this new process.
        javaArgs: '-agentlib:jdwp=transport=dt_socket,server=y,suspend=n,address=*:5005'
)
And finally, you have the option of publishing the build-info to Artifactory as follows.
rtPublishBuildInfo (
    serverId: 'Artifactory-1',
    // If the build name and build number are not set here, the current job name and number will be used. Make sure to use the same value used in the rtDockerPull and/or rtDockerPush steps.
    buildName: 'my-build-name',
    buildNumber: '17',
    // Optional - Only if this build is associated with a project in Artifactory, set the project key as follows.
    project: 'my-project-key',
)
Use Kaniko for Docker Images - Declarative Pipeline Syntax
The rtCreateDockerBuild step allows collecting build-info for docker images that were published to Artifactory using Kaniko. See our kaniko project example on GitHub to learn how to do this.
Use Jib for Docker Images - Declarative Pipeline Syntax
The rtCreateDockerBuild step allows collecting build-info for docker images that were published to Artifactory using the JIB Maven Plugin. See our maven-jib-example on GitHub to learn how to do this. Since this example also runs maven using the Artifactory pipeline APIs, we also recommend referring to the Maven Builds with Artifactory section included in this documentation page.
Scan Builds with JFrog Xray - Declarative Pipeline Syntax
The Jenkins Artifactory Plugin is integrated with JFrog Xray through JFrog Artifactory allowing you to have build artifacts scanned for vulnerabilities and other issues. If issues or vulnerabilities are found, you may choose to fail a build. This integration requires JFrog Artifactory v4.16 and above and JFrog Xray v1.6 and above.
You may scan any build that has been published to Artifactory. It does not matter when the build was published, as long as it was published before triggering the scan by JFrog Xray.
The following instructions show you how to configure your Pipeline script to have a build scanned.
rtServer (
    id: 'Artifactory-1',
    url: 'http://my-artifactory-domain/artifactory',
    credentialsId: 'my-credentials-id'
)

xrayScan (
    serverId: 'Artifactory-1',
        // If the build name and build number are not set here, the current job name and number will be used:
        buildName: 'my-build-name',
        buildNumber: '17',
    // Optional - Only if this build is associated with a project in Artifactory, set the project key as follows.
    project: 'my-project-key',
        // If the build is found vulnerable, the job will fail by default. If you do not wish it to fail:
        failBuild: false
)
Manage Release Bundles - Declarative Pipeline Syntax
The Jenkins Artifactory Plugin exposes a set of pipeline APIs for managing and distributing Release Bundles. These APIs require version 2.0 or higher of JFrog Distribution. These APIs work with JFrog Distribution's REST endpoint, and not with Artifactory REST endpoint. It is therefore recommended to verify that JFrog Distribution is accessible from Jenkins through Jenkins | Manage | Configure System. The serverId value in all examples in this section should be replaced with the JFrog Platform ID you configured.
To make it easier to get started using the JFrog Distribution pipeline APIs, you can use the jfrog-distribution-example available here.
Create or Update Unsigned Release Bundles - Declarative Pipeline Syntax
The dsCreateReleaseBundle and dsUpdateReleaseBundle steps create and update a release bundle on JFrog Distribution. The steps accept the configured JFrog Platform ID as well as the release bundle name and release bundle version to be created. The steps also accept a File Spec, which defines the files in Artifactory to be bundled into the release bundle.
Create a release bundle
dsCreateReleaseBundle(
    serverId: "jfrog-instance-1",
    name: "example-release-bundle",
    version: "1",
    spec: """{
        "files": [{
            "pattern": "libs-release-local/ArtifactoryPipeline.zip"
        }]
    }""",
        // The default is "plain_text". The syntax for the release notes. Can be one of 'markdown', 'asciidoc', or 'plain_text'.
    releaseNotesSyntax: "markdown",
        // Optional. If set to true, automatically signs the release bundle version.
    signImmediately: true,
    // Optional. Path to a file describing the release notes for the release bundle version.
        releaseNotesPath: "path/to/release-notes",
    // Optional. The passphrase for the signing key.
        gpgPassphrase: "abc",
    // Optional. A repository name at the source Artifactory instance, to store release bundle artifacts in. If not provided, Artifactory will use the default one.
        storingRepo: "release-bundles-1",
    // Optional.
        description: "Some desc",
    // Optional. Path to a file with the File Spec content.
        specPath: "path/to/filespec.json",
    // Optional. Set to true to disable communication with JFrog Distribution.
        dryRun: true
)
Update a release bundle
dsUpdateReleaseBundle(
    serverId: "jfrog-instance-1",
    name: "example-release-bundle",
    version: "1",
    spec: """{
        "files": [{
            "pattern": "libs-release-local/ArtifactoryPipeline.zip"
        }]
    }""",
        // The default is "plain_text". The syntax for the release notes. Can be one of 'markdown', 'asciidoc', or 'plain_text'.
    releaseNotesSyntax: "",
        // Optional. If set to true, automatically signs the release bundle version.
    signImmediately: true,
    // Optional. Path to a file describing the release notes for the release bundle version.
        releaseNotesPath: "path/to/release-notes",
    // Optional. The passphrase for the signing key.
        gpgPassphrase: "abc",
    // Optional. A repository name at the source Artifactory instance, to store release bundle artifacts in. If not provided, Artifactory will use the default one.
        storingRepo: "release-bundles-1",
    //Optional.
        description: "Some desc",
    // Optional. Path to a file with the File Spec content.
        specPath: "path/to/filespec.json",
    // Optional. Set to true to disable communication with JFrog Distribution.
        dryRun: true
)
Sign Release Bundles - Declarative Pipeline Syntax
Release bundles must be signed before they can be distributed. Here's how you sign a release bundle.
Sign a release bundle
dsSignReleaseBundle(
    serverId: "jfrog-instance-1",
    name: "example-release-bundle",
    version: "1",
        // Optional GPG passphrase
        gpgPassphrase: "abc",
        // Optional repository name at the source Artifactory instance, to store release bundle artifacts in. If not provided, Artifactory will use the default one.
        storingRepo: "release-bundles-1"
)
Distributing Release Bundles
Here's how you distribute a signed release bundle.
Distribute a release bundle
dsDeleteReleaseBundle(
    serverId: "jfrog-instance-1",
    name: "example-release-bundle",
    version: "1",
        // Optional distribution rules
    distRules: """{
            "distribution_rules": [
            {
                "site_name": "*",
                "city_name": "*",
                "country_codes": ["*"]
            }
            ]
        }""",
        // Optional country codes. Cannot be used together with 'distRules'
        countryCodes: ["001", "002"],
        // Optional site name. Cannot be used together with 'distRules'
        siteName: "my-site",
        // Optional city name. Cannot be used together with 'distRules'
        cityName: "New York",
        // Optional. If set to true, the response will be returned only after the distribution is completed.
    sync: true,
        // Optional. Set to true to disable communication with JFrog Distribution.
        dryRun: true
}
Delete Release Bundles - Declarative Pipeline Syntax
Here's how you delete a release bundle.
dsDeleteReleaseBundle(
    serverId: "jfrog-instance-1",
    name: "example-release-bundle",
    version: "1",
        // Optional distribution rules
    distRules: """{
            "distribution_rules": [
            {
                "site_name": "*",
                "city_name": "*",
                "country_codes": ["*"]
            }
            ]
        }"""
    ),
        // Optional country codes. Cannot be used together with 'distRules')
        countryCodes: ["001", "002"]
        // Optional site name. Cannot be used together with 'distRules')
        siteName: "my-site",
        // Optional city name. Cannot be used together with 'distRules')
        cityName: "New York",
        // Optional. If set to true, the response will be returned only after the deletion is completed.
    sync: true,
        // Optional. If set to true, the release bundle will also be deleted on the source Artifactory instance, and not only on the edge node.
    deleteFromDist: true,
        // Optional. Set to true to disable communication with JFrog Distribution.
        dryRun: true
}
Build Triggers - Declarative Pipeline Syntax
The Artifactory Trigger allows a Jenkins job to be automatically triggered when files are added or modified in a specific Artifactory path. The trigger periodically polls Artifactory to check if the job should be triggered. You can read more about it here.
You have the option of defining the Artifactory Trigger from within your pipeline. Here's how you do it:
First, create an Artifactory server instance, as described in the Creating an Artifactory Server Instance section.
Next, define the trigger as shown here:
rtBuildTrigger(
    serverId: "ARTIFACTORY_SERVER",
    spec: "*/10 * * * *",
    paths: "generic-libs-local/builds/starship"
)
When a job is triggered following deployments to Artifactory, you can store the URL of the file in Artifactory which triggered the job in an environment variable. Here's how you do it:
environment {
    RT_TRIGGER_URL = "${currentBuild.getBuildCauses('org.jfrog.hudson.trigger.ArtifactoryCause')[0]?.url}"
}
Scripted Pipeline Syntax
Pipeline jobs simplify building continuous delivery workflows with Jenkins by creating a script that defines the steps of your build. For those not familiar with Jenkins Pipeline, please refer to the Pipeline Tutorial or the Getting Started With Pipeline documentation.
The Jenkins Artifactory Plugin supports Artifactory operations pipeline API. You have the added option of downloading dependencies, uploading artifacts, and publishing build-info to Artifactory from a pipeline script.
This page describes how to use scripted pipeline syntax with Artifactory.
Tip
Declarative syntax is also supported. Read more about it here.
The Jenkins Pipeline Examples can help get you started creating your pipeline jobs with Artifactory.
Integration Benefits JFrog Artifactory and Jenkins-CI
Create an Artifactory Server Instance - Scripted Pipeline Syntax
To upload or download files to and from your Artifactory server, you need to create an Artifactory server instance in your Pipeline script.
If your Artifactory server is already defined in Jenkins, you only need its server ID which can be obtained under Manage | Configure System.
Then, to create your Artifactory server instance, add the following line to your script:
def server = Artifactory.server 'my-server-id'If your Artifactory is not defined in Jenkins you can still create it as follows:
def server = Artifactory.newServer url: 'artifactory-url', username: 'username', password: 'password'You can also user Jenkins Credential ID instead of username and password:
def server = Artifactory.newServer url: 'artifactory-url', credentialsId: 'ccrreeddeennttiiaall'You can modify the server object using the following methods:
// If Jenkins is configured to use an http proxy, you can bypass the proxy when using this Artifactory server:
server.bypassProxy = true
// If you're using username and password:
server.username = 'new-user-name'
server.password = 'new-password'
// If you're using Credentials ID:
server.credentialsId = 'ccrreeddeennttiiaall'
// Configure the connection timeout (in seconds).
// The default value (if not configured) is 300 seconds:
server.connection.timeout = 300Use variables
We recommend using variables rather than plain text to specify the Artifactory server details.
Upload and Download Files - Scripted Pipeline Syntax
To upload or download files you first need to create a spec which is a JSON file that specifies which files should be uploaded or downloaded and the target path.For example:def downloadSpec = """{
"files": [
{
"pattern": "bazinga-repo/*.zip",
"target": "bazinga/"
}
]
}"""The above spec specifies that all ZIP files in thebazinga-repo Artifactory repository should be downloaded into thebazingadirectory on your Jenkins agent file system."files" is an array
Since the "files" element is an array, you can specify several patterns and corresponding targets in a single download spec.
To download the files, add the following line to your script:server.download spec: downloadSpecUploading files is very similar. The following example uploads all ZIP files that includefroggyin their names into thefroggy-filesfolder in thebazinga-repoArtifactory repository.def uploadSpec = """{
"files": [
{
"pattern": "bazinga/*froggy*.zip",
"target": "bazinga-repo/froggy-files/"
}
]
}"""
server.upload spec: uploadSpecYou can read about using File Specs for downloading and uploading files here.If you'd like the build to fail, in case no files are uploaded or downloaded, add the
failNoOp
argume to the
upload
or
download
methods as follows:server.download spec: downloadSpec, failNoOp: true
server.upload spec: uploadSpec, failNoOp: trueSet and Delete Properties on Files in Artifactory - Scripted Pipeline Syntax
When uploading files to Artifactory using the server.upload method, you have the option of setting properties on the files. The properties are defined as part of the File Spec sent to the method. These properties can be later used to filter and download those files.
In some cases, you may want want to set properties on files that are already in Artifactory. Here properties to be set are sent outside the File Spec. To define which file to set the properties, a File Spec is used. Here's an example:
def setPropsSpec = """{
 "files": [
  {
       "pattern": "my-froggy-local-repo/dir/*.zip",
       "props": "filter-by-this-prop=yes"
    }
 ]
}"""


server.setProps spec: setPropsSpec, props: “p1=v1;p2=v2”
In the above example, the p1 and p2 properties will be set with the v1 and v2 values respectively. The properties will be set on all the zip files inside the dir directory under the my-froggy-local-repo repository. Only files which already have the filter-by-this-prop property set to yes will be affected.
The failNoOp argument is optional. Setting it to true will cause the job to fail, if no properties have been set. Here's how you use it:
server.setProps spec: setPropsSpec, props: “p1=v1;p2=v2”, failNoOp: trueThe server.deleteProps method can be used to delete properties from files in Artifactory, Like the server.setProps method, it also uses a File Spec. The only difference between the two methods, is that for deleteProps, we specify only the names of the properties to delete. The names are comma separated. The properties values should not be specified. The failNoOp argument is optional. Setting it to true will cause the job to fail, if no properties have been deleted.
Here's an example:
server.deleteProps spec: deletePropsSpec, props: “p1,p2,p3”, failNoOp: truePublish Build-Info to Artifactory - Scripted Pipeline Syntax
If you're not yet familiar with the build-info entity, read about it here.
Files that are downloaded by the server.download are automatically registered as the current build's dependencies, while files that are uploaded by the server.upload are registered as the build artifacts. The dependencies and artifacts are recorded locally(Ex: Jenkins environment) using the respective buildinfo objects and can be later published as build-info to Artifactory. See the examples below:
def buildInfo1 = server.download downloadSpec    // The server.download method downloads the artifacts from Artifactory using download spec and adds them as dependencies to the build-info object created in the build client.
def buildInfo2 = server.upload uploadSpec        // The server.upload method adds artifacts to the build-info object created in the build client.
buildInfo1.append buildInfo2                     // Appending the buildInfo2 object content to buildInfo1 object.
server.publishBuildInfo buildInfo1               // Publishing the buildInfo1 object to Artifactory server.
def buildInfo = Artifactory.newBuildInfo()
server.download spec: downloadSpec, buildInfo: buildInfo
server.upload spec: uploadSpec, buildInfo: buildInfo
server.publishBuildInfo buildInfoYou also have the option of customising the build-info module names, used for the download and upload operations. Here's how you do it:
def buildInfo1 = server.download spec: downloadSpec, module: 'my-custom-build-info-module-name'
def buildInfo2 = server.upload spec: uploadSpec, module: 'my-custom-build-info-module-name'
Trigger Build Retention - Scripted Pipeline Syntax
To trigger build retention when publishing build-info to Artifactory, use the following method:
buildInfo.retention maxBuilds: 10buildInfo.retention maxDays: 7To have the build retention also delete the build artifacts, add the deleteBuildArtifacts with true value as shown below:
buildInfo.retention maxBuilds: 10, maxDays: 7, doNotDiscardBuilds: ["3", "4"], deleteBuildArtifacts: trueIt is possible to trigger an asynchronous build retention. To do this, add the async argument with true as shown below:
buildInfo.retention maxBuilds: 10, deleteBuildArtifacts: true, async: trueGet Dependencies and Artifacts from the Build-Info - Scripted Pipeline Syntax
The build-info instance stores the build-info locally. It can be later published to Artifactory. As shown above, the server.upload method adds artifacts to the build-info and the server.download method adds dependencies to the build-info.
You have the option of getting the list of dependencies and artifacts stored in the build-info instance. You can do this at any time, before or after the build-info is published to Artifactory. In the following example, ww first check if there are any dependencies stored in the build-info, and if there are, we access the properties of one of the dependencies. We then do the same for artifacts.
if (buildInfo.getDependencies().size() > 0) {
        def localPath = buildInfo.getDependencies()[0].getLocalPath()
        def remotePath = buildInfo.getDependencies()[0].getRemotePath()
        def md5 = buildInfo.getDependencies()[0].getMd5()
        def sha1 = buildInfo.getDependencies()[0].getSha1()
}

if (buildInfo.getArtifacts().size() > 0) {
        def localPath = buildInfo.getArtifacts()[0].getLocalPath()
        def remotePath = buildInfo.getArtifacts()[0].getRemotePath()
        def md5 = buildInfo.getArtifacts()[0].getMd5()
        def sha1 = buildInfo.getArtifacts()[0].getSha1()
}
Modify the Default Build Name and Build Number - Scripted Pipeline Syntax
You can modify the default build name and build number set by Jenkins. Here's how you do it:
def buildInfo = Artifactory.newBuildInfo()
buildInfo.name = 'super-frog'
buildInfo.number = 'v1.2.3'
...
server.publishBuildInfo buildInfoNote
If you're setting the build name or number as shown above, it is important to do so before you're using this buildInfo instance for uploading files.
Here's the reason for this: The server.upload method also tags the uploaded files with the build name and build number (using the build.name and build.number properties). Setting a new build name or number after the files are already uploaded to Artifactory, will not update the properties attached to the files.
Set the Build-Info Project - Scripted Pipeline Syntax
If the build-info should be published as part of a specific JFrog project, you should set the project key on the build-info instance before it is published to Artifactory. Here's how you do this:
def buildInfo = Artifactory.newBuildInfo()
buildInfo.project = 'my-jfrog-project-key'
...
server.publishBuildInfo buildInfo
Capturing Environment Variables
To set the Build-Info object to automatically capture environment variables while downloading and uploading files, add the following to your script:
def buildInfo = Artifactory.newBuildInfo()
buildInfo.env.capture = true
By default, environment variables names which include "password", "psw", "secret", "token", or "key" (case insensitive) are excluded and will not be published to Artifactory.
You can add more include/exclude patterns with wildcards as follows:
def buildInfo = Artifactory.newBuildInfo()
buildInfo.env.filter.addInclude("*a*")
buildInfo.env.filter.addExclude("DONT_COLLECT*")
Here's how you reset to the include/exclude patterns default values:
buildInfo.env.filter.reset()You can also completely clear the include/exclude patterns:
buildInfo.env.filter.clear()To collect environment variables at any point in the script, use:
buildInfo.env.collect()You can get the value of an environment variable collected as follows:
value = buildInfo.env.vars['env-var-name']Collect Build Issues - Scripted Pipeline Syntax
The build-info can include the issues which were handled as part of the build. The list of issues is automatically collected by Jenkins from the git commit messages. This requires the project developers to use a consistent commit message format, which includes the issue ID and issue summary, for example:
HAP-1364 - Replace tabs with spaces
The list of issues can be then viewed in the Builds UI in Artifactory, along with a link to the issue in the issues tracking system.
The information required for collecting the issues is provided through a JSON configuration. This configuration can be provided as a file or as a JSON string.
Here's an example for issues collection configuration.
{
    "version": 1,
    "issues": {
        "trackerName": "JIRA",
        "regexp": "(.+-[0-9]+)\\s-\\s(.+)",
        "keyGroupIndex": 1,
        "summaryGroupIndex": 2,
        "trackerUrl": "http://my-jira.com/issues",
        "aggregate": "true",
        "aggregationStatus": "RELEASED"
    }
}
Configuration file properties:
Property name | Description |
|---|---|
Version | The schema version is intended for internal use. Do not change! |
trackerName | The name (type) of the issue tracking system. For example, JIRA. This property can take any value. |
trackerUrl | The issue tracking URL. This value is used for constructing a direct link to the issues in the Artifactory build UI. |
keyGroupIndex | The capturing group index in the regular expression used for retrieving the issue key. In the example above, setting the index to "1" retrieves HAP-1364 from this commit message: HAP-1364 - Replace tabs with spaces |
summaryGroupIndex | The capturing group index in the regular expression for retrieving the issue summary. In the example above, setting the index to "2" retrieves the sample issue from this commit message: HAP-1364 - Replace tabs with spaces |
aggregate | Set to true, if you wish all builds to include issues from previous builds. |
aggregationStatus | If aggregate is set to true, this property indicates how far in time should the issues be aggregated. In the above example, issues will be aggregated from previous builds, until a build with a RELEASE status is found. This status can be set when a build is promoted in Artifactory. |
regexp | A regular expression used for matching the git commit messages. The expression should include two capturing groups - for the issue key (ID) and the issue summary. In the example above, the regular expression matches the commit messages as displayed in the following example: HAP-1364 - Replace tabs with spaces |
Here's how you set issues collection in the pipeline script.
server = Artifactory.server 'my-server-id'

config = """{
    "version": 1,
    "issues": {
        "trackerName": "JIRA",
        "regexp": "(.+-[0-9]+)\\s-\\s(.+)",
        "keyGroupIndex": 1,
        "summaryGroupIndex": 2,
        "trackerUrl": "http://my-jira.com/issues",
        "aggregate": "true",
        "aggregationStatus": "RELEASED"
    }
}"""

buildInfo.issues.collect(server, config)
server.publishBuildInfo buildInfoNote
To help you get started, we recommend using the Github Examples.
Aggregate Builds - Scripted Pipeline Syntax
The build-info published to Artifactory can include multiple modules representing different build steps. As shown earlier in this section, you just need to pass the same buildInfo instance to all the methods that need it (server.upload for example).
What happens however if your build process runs on multiple machines or it is spread across different time periods? How do you aggregate all the build steps into one build-info?
You have the option of creating and publishing a separate build-info for each segment of the build process, and then aggregating all those published builds into one build-info. The end result is one build-info which references other, previously published build-infos.
In the following example, our pipeline script publishes two build-info instances to Artifactory:
def buildInfo1 = Artifactory.newBuildInfo()
buildInfo1.name = 'my-app-linux'
buildInfo1.number = '1'
server.publishBuildInfo buildInfo1

def buildInfo2 = Artifactory.newBuildInfo()
buildInfo2.name = 'my-app-windows'
buildInfo2.number = '1'
server.publishBuildInfo buildInfo2
At this point, we have two build-infos stored in Artifactory. Now let's create our final build-info, which references the previous two.
def finalBuildInfo = Artifactory.newBuildInfo()
server.buildAppend(finalBuildInfo, 'my-app-linux', '1')
server.buildAppend(finalBuildInfo, 'my-app-windows', "1")
server.publishBuildInfo finalBuildInfo
'finalBuildInfo' includes two modules, which reference'my-app-linux' and 'my-app-windows'.
Note
Build Promotion and Build scanning with Xray are currently not supporting aggregated builds.
Promote Builds in Artifactory - Scripted Pipeline Syntax
To promote a build between repositories in Artifactory, define the promotion parameters in a promotionConfig object and promote that. For example:
    def promotionConfig = [
        // Mandatory parameters
        'targetRepo'         : 'libs-prod-ready-local',

        // Optional parameters

                // The build name and build number to promote. If not specified, the Jenkins job's build name and build number are used
        'buildName'          : buildInfo.name,
        'buildNumber'        : buildInfo.number,
        // Only if this build is associated with a project in Artifactory, set the project key as follows.
        'project': 'my-project-key',
                // Comment and Status to be displayed in the Build History tab in Artifactory
        'comment'            : 'this is the promotion comment',
        'status'             : 'Released',
                // Specifies the source repository for build artifacts.
        'sourceRepo'         : 'libs-staging-local',
                // Indicates whether to promote the build dependencies, in addition to the artifacts. False by default
        'includeDependencies': true,
                // Indicates whether to copy the files. Move is the default
        'copy'               : true,
        // Indicates whether to fail the promotion process in case of failing to move or copy one of the files. False by default.
        'failFast'           : true
    ]

    // Promote build
    server.promote promotionConfig
Allow Interactive Promotion for Published Builds - Scripted Pipeline Syntax
The 'Promoting Builds in Artifactory' section in this article describes how your Pipeline script can promote builds in Artifactory. In some cases however, you'd like the build promotion to be performed after the build finished. You can configure your Pipeline job to expose some or all the builds it publishes to Artifactory, so that they can be later promoted interactively using a GUI.
When the build finishes, the promotion window will be accessible by clicking on the promotion icon, next to the build run.
Here's how you do this.
First you need to create a 'promotionConfig' instance, the same way it is shown in the 'Promoting Builds in Artifactory' section.
Next, you can use it, to expose a build for interactive promotion as follows:
Artifactory.addInteractivePromotion server: server, promotionConfig: promotionConfig, displayName: "Promote me please"You can add as many builds as you like, by using the method multiple times. All the builds added will be displayed in the promotion window.
The 'addInteractivePromotion' method expects the following arguments:
- "server" is the Artifactory on which the build promotions is done. You can create the server instance as described in the beginning of this article.
- "promotionConfig" includes the promotion details. The "Promoting Builds in Artifactory" section describes how to create a promotionConfig instance.
- "displayName" is an optional argument. If you add it, the promotion window will display it instead of the build name and number.
Maven Builds with Artifactory - Scripted Pipeline Syntax
Maven builds can resolve dependencies, deploy artifacts and publish build-info to Artifactory.
Maven Compatibility
- The minimum Maven version supported is 3.3.9
- The deployment to Artifacts is triggered both by the deploy and install phases.
To run Maven builds with Artifactory from your Pipeline script, you first need to create an Artifactory server instance, as described at the beginning of this article.
Here's an example:
def server = Artifactory.server 'my-server-id'The next step is to create an Artifactory Maven Build instance:
def rtMaven = Artifactory.newMavenBuild()Now let's define where the Maven build should download its dependencies from. Let's say you want the release dependencies to be resolved from the 'libs-release' repository and the snapshot dependencies from the 'libs-snapshot' repository. Both repositories are located on the Artifactory server instance you defined above. Here's how you define this, using the Artifactory Maven Build instance we created:
rtMaven.resolver server: server, releaseRepo: 'libs-release', snapshotRepo: 'libs-snapshot'Now let's define where our build artifacts should be deployed to. Once again, we define the Artifactory server and repositories on the 'rtMaven' instance:
rtMaven.deployer server: server, releaseRepo: 'libs-release-local', snapshotRepo: 'libs-snapshot-local'By default, all the build artifacts are deployed to Artifactory. In case you want to deploy only some artifacts, you can filter them based on their names, using the 'addInclude' method. In the following example, we are deploying only artifacts with names that start with 'frog'
rtMaven.deployer.artifactDeploymentPatterns.addInclude("frog*")You can also exclude artifacts from being deployed. In the following example, we are deploying all artifacts, except for those that are zip files:
rtMaven.deployer.artifactDeploymentPatterns.addExclude("*.zip")And to make things more interesting, you can combine both methods. For example, to deploy all artifacts with names that start with 'frog', but are not zip files, do the following:
rtMaven.deployer.artifactDeploymentPatterns.addInclude("frog*").addExclude("*.zip")If you'd like to add custom properties to the deployed artifacts, you can do that as follows:
rtMaven.deployer.addProperty("status", "in-qa").addProperty("compatibility", "1", "2", "3")By default, 3 threads will be used for uploading the maven artifacts. You can modify the number of threads used as follows:
rtMaven.deployer.threads = 6In some cases, you want to disable artifacts deployment to Artifactory or make the deployment conditional. Here's how you do it:
rtMaven.deployer.deployArtifacts = falseIn case you'd like to use the Maven Wrapper for this build, add this:
rtMaven.useWrapper = trueTo select a Maven installation for our build, we should define a Maven Tool through Jenkins Manage, and then, set the tool name as follows:
rtMaven.tool = 'maven tool name'Instead of using rtMaven.tool, you can set the path to the Maven installation directory using the MAVEN_HOME environment variable as follows:
env.MAVEN_HOME = '/tools/apache-maven-3.3.9'Here's how you define Maven options for your build:
rtMaven.opts = '-Xms1024m -Xmx4096m'In case you'd like Maven to use a different JDK than your build agent's default, no problem.
Simply set the JAVA_HOME environment variable to the desired JDK path (the path to the directory above the bin directory, which includes the java executable).
Here's you do it:
env.JAVA_HOME = 'full/path/to/JDK'OK, we're ready to run our build. Here's how we define the pom file path (relative to the workspace) and the Maven goals. The deployment to Artifactory is performed during the 'install' phase:
def buildInfo = rtMaven.run pom: 'maven-example/pom.xml', goals: 'clean install'The above method runs the Maven build. Notice that the method returns a buildInfo instance, which can be later published to Artifactory.
In some cases though, you'd like to pass an existing buildInfo instance to be used by the build. This can come in handy is when you want to set custom build name or build number on the build-info instance, or when you'd like to aggregate multiple builds into the same build-info instance. Here's how you pass an existing build-info instance to the rtMaven.run method:
rtMaven.run pom: 'maven-example/pom.xml', goals: 'clean install', buildInfo: existingBuildInfoBy default, the build artifacts will be deployed to Artifactory, unless rtMaven.deployer.deployArtifacts property was set to false. This can come in handy in two cases:
- You do not wish to publish the artifacts.
- You'd like to publish the artifacts later down the road. Here's how you can publish the artifacts at a later stage:
rtMaven.deployer.deployArtifacts buildInfoMake sure to use the same buildInfo instance you received from the rtMaven.run method. Also make sure to run the above method on the same agent that ran the rtMaven.run method, because the artifacts were built and stored on the file-system of this agent.
By default, Maven uses the local Maven repository inside the .m2 directory under the user home. In case you'd like Maven to create the local repository in your job's workspace, add the -Dmaven.repo.local=.m2 system property to the goals value as shown here:
def buildInfo = rtMaven.run pom: 'maven-example/pom.xml', goals: 'clean install -Dmaven.repo.local=.m2'What about the build-info?
The build-info has not yet been published to Artifactory, but it is stored locally in the 'buildInfo' instance returned by the 'run' method. You can now publish it to Artifactory as follows:
server.publishBuildInfo buildInfoYou can also merge multiple buildInfo instances into one buildInfo instance and publish it to Artifactory as one build, as described in the Publishing Build-Info to Artifactory section in this article.
Gradle Builds with Artifactory - Scripted Pipeline Syntax
Gradle builds can resolve dependencies, deploy artifacts and publish build-info to Artifactory.
Gradle Compatibility
The minimum Gradle version supported is 4.10
To run Gradle builds with Artifactory from your Pipeline script, you first need to create an Artifactory server instance, as described at the beginning of this article.
Here's an example:
def server = Artifactory.server 'my-server-id'The next step is to create an Artifactory Gradle Build instance:
def rtGradle = Artifactory.newGradleBuild()Now let's define where the Gradle build should download its dependencies from. Let's say you want the dependencies to be resolved from the 'libs-release' repository, located on the Artifactory server instance you defined above. Here's how you define this, using the Artifactory Gradle Build instance we created:
rtGradle.resolver server: server, repo: 'libs-release'Now let's define where our build artifacts should be deployed to. Once again, we define the Artifactory server and repositories on the 'rtGradle' instance:
rtGradle.deployer server: server, repo: 'libs-release-local'If you're using gradle to build a project, which produces maven artifacts, you also have the option of defining two deployment repositories - one repository will be used for snapshot artifacts and one for release artifacts. Here's how you define it:
rtGradle.deployer server: server, releaseRepo: 'libs-release-local', snapshotRepo: 'libs-snapshot-local'Gradle allows customizing the list of deployed artifacts by defining publications as part fo the Gradle build script. Gradle publications are used to group artifacts together. You have the option of defining which of the defined publications Jenkins should use. Only the artifacts grouped by these publications will be deployed to Artifactory. If you do not define the publications, a default publication, which includes the list of the produced artifacts by a java project will be used. Here's how you define the list of publications:
rtGradle.deployer.publications.add("mavenJava").add("ivyJava")If you'd like to deploy the artifacts from all the publications defined in the gradle script, you can set the "ALL_PUBLICATIONS" string as follows.
rtGradle.deployer.publications.add("ALL_PUBLICATIONS")By default, all the build artifacts are deployed to Artifactory. In case you want to deploy only some artifacts, you can filter them based on their names, using the 'addInclude' method. In the following example, we are deploying only artifacts with names that start with 'frog'
rtGradle.deployer.artifactDeploymentPatterns.addInclude("frog*")You can also exclude artifacts from being deployed. In the following example, we are deploying all artifacts, except for those that are zip files:
rtGradle.deployer.artifactDeploymentPatterns.addExclude("*.zip")And to make things more interesting, you can combine both methods. For example, to deploy all artifacts with names that start with 'frog', but are not zip files, do the following:
rtGradle.deployer.artifactDeploymentPatterns.addInclude("frog*").addExclude("*.zip")If you'd like to add custom properties to the deployed artifacts, you can do that as follows:
rtGradle.deployer.addProperty("status", "in-qa").addProperty("compatibility", "1", "2", "3")By default, 3 threads will be used for uploading the artifacts to Artifactory. You can modify the number of threads used as follows:
rtGradle.deployer.threads = 6In some cases, you want to disable artifacts deployment to Artifactory or make the deployment conditional. Here's how you do it:
rtGradle.deployer.deployArtifacts = falseIn case the "com.jfrog.artifactory" Gradle Plugin is already applied in your Gradle script, we need to let Jenkins know it shouldn't apply it. Here's how we do it:
rtGradle.usesPlugin = trueIn case you'd like to use the Gradle Wrapper for this build, add this:
rtGradle.useWrapper = trueIf you don't want to use the Gradle Wrapper, and set a Gradle installation instead, you should define a Gradle Tool through Jenkins Manage, and then, set the tool name as follows:
rtGradle.tool = 'gradle tool name'In case you'd like Gradle to use a different JDK than your build agent's default, no problem.
Simply set the JAVA_HOME environment variable to the desired JDK path (the path to the directory above the bin directory, which includes the java executable).
Here's you do it:
env.JAVA_HOME = 'path to JDK'OK, looks like we're ready to run our Gradle build. Here's how we define the build.gradle file path (relative to the workspace) and the Gradle tasks. The deployment to Artifactory is performed as part of the 'artifactoryPublish' task:
def buildInfo = rtGradle.run rootDir: "projectDir/", buildFile: 'build.gradle', tasks: 'clean artifactoryPublish'The above method runs the Gradle build. Notice that the method returns a buildInfo instance, which can be later published to Artifactory.
In some cases though, you'd like to pass an existing buildInfo instance to be used by the build. This can come in handy is when you want to set custom build name or build number on the build-info instance, or when you'd like to aggregate multiple builds into the same build-info instance. Here's how you pass an existing build-info instance to the rtGradle.run method:
rtGradle.run rootDir: "projectDir/", buildFile: 'build.gradle', tasks: 'clean artifactoryPublish', buildInfo: existingBuildInfoBy default, the build artifacts will be deployed to Artifactory, unless the rtGradle.deployer.deployArtifacts property was set to false. This can come in handy in two cases:
- You do not wish to publish the artifacts.
- You'd like to publish the artifacts later down the road. Here's how you can publish the artifacts at a later stage:
rtGradle.deployer.deployArtifacts buildInfoMake sure to use the same buildInfo instance you received from the rtGradle.run method. Also make sure to run the above method on the same agent that ran the rtGradle.run method, because the artifacts were built and stored on the file-system of this agent.
What about the build-info?
The build-info has not yet been published to Artifactory, but it is stored locally in the 'buildInfo' instance returned by the 'run' method. You can now publish it to Artifactory as follows:
server.publishBuildInfo buildInfoYou can also merge multiple buildInfo instances into one buildInfo instance and publish it to Artifactory as one build, as described in the Publishing Build-Info to Artifactory section in this article.
That's it! We're all set.
The rtGradle instance supports additional configuration APIs. You can use these APIs as follows:
    def rtGradle = Artifactory.newGradleBuild()
    // Deploy Maven descriptors to Artifactory:
    rtGradle.deployer.deployMavenDescriptors = true
    // Deploy Ivy descriptors (pom.xml files) to Artifactory:
    rtGradle.deployer.deployIvyDescriptors = true

    // The following properties are used for Ivy publication configuration.
    // The values below are the defaults.

    // Set the deployed Ivy descriptor pattern:
    rtGradle.deployer.ivyPattern = '[organisation]/[module]/ivy-[revision].xml'
    // Set the deployed Ivy artifacts pattern:
    rtGradle.deployer.artifactPattern = '[organisation]/[module]/[revision]/[artifact]-[revision](-[classifier]).[ext]'
    // Set mavenCompatible to true, if you wish to replace dots with slashes in the Ivy layout path, to match the Maven layout:
rtGradle.deployer.mavenCompatible = trueNote
You also have the option of defining default values in the Gradle build script. Read more about it here.
Maven Release Management with Artifactory - Scripted Pipeline Syntax
With the Artifactory Pipeline DSL you can easily manage and run a release build for your Maven project by following the instructions below:
First, clone the code from your source control:
git url: 'https://github.com/eyalbe4/project-examples.git'If the pom file has a snapshot version, Maven will create snapshot artifacts, because the pom files include a snapshot version (for example, 1.0.0-SNAPSHOT).
Since you want your build to create release artifacts, you need to change the version in the pom file to 1.0.0.
To do that, create a mavenDescriptor instance, and set the version to 1.0.0:
def descriptor = Artifactory.mavenDescriptor()
descriptor.version = '1.0.0'
If the project's pom file is not located at the root of the cloned project, but inside a sub-directory, add it to the mavenDescriptor instance:
descriptor.pomFile = 'maven-example/pom.xml'In most cases, you want to verify that your release build does not include snapshot dependencies. The are two ways to do that.
The first way, is to configure the descriptor to fail the build if snapshot dependencies are found in the pom files. In this case, the job will fail before the new version is set to the pom files.
Here's how you configure this:
descriptor.failOnSnapshot = trueThe second way to verify this is by using the hasSnapshots method, which returns a boolean true value if snapshot dependencies are found:
 def snapshots = descriptor.hasSnapshots()
 if (snapshots) {
     ....
 }
That's it. Using the mavenDescriptor as it is now will change the version inside the root pom file. In addition, if the project includes sub-modules with pom files, which include a version, it will change them as well.
Sometimes however, some sub-modules should use different release versions. For example, suppose there's one module whose version should change to 1.0.1, instead of 1.0.0. The other modules should still have their versions changed to 1.0.0. Here's how to do that:
descriptor.setVersion "the.group.id:the.artifact.id", "1.0.1"The above setVersion method receives two arguments: the module name and its new release version. The module name is composed of the group ID and the artifact ID with a colon between them.
Now you can transform the pom files to include the new versions:
descriptor.transform()The transform method changed the versions on the local pom files.
You can now build the code and deploy the release Maven artifacts to Artifactory as described in the in this article.
The next step is to commit the changes made to the pom files to the source control, and also tag the new release version in the source control repository. If you're using git, you can use the git client installed on your build agent and run a few shell commands from inside the Pipeline script to do that.
The last thing you'll probably want to do is to change the pom files version to the next development version and commit the changes. You can do that again by using a mavenDescriptor instance.
Python Builds with Artifactory - Scripted Pipeline Syntax
Tip
We recommend using the integration with the JFrog Jenkins Plugin, rather than using the following DSL.
Python builds can resolve dependencies, deploy artifacts and publish build-info to Artifactory. To run Python builds with Artifactory start by following these steps, to make sure your Jenkins agent is ready:
- Make sure Python is installed on the build agent and that the python command is in the PATH.
- Install pip. You can use the Pip Documentation and also Installing packages using pip and virtual environments.
- Make sure wheel and setuptools are installed. You can use the Installing Packages Documentation.
- Validate that the build agent is ready by running the following commands from the terminal:
Output Python version:
> python --version

Output pip version:
> pip --version

Verify wheel is installed:
> wheel -h

Verify setuptools is installed:
> pip show setuptools

Verify that virtual-environment is activated:
> echo $VIRTUAL_ENV
In your Pipeline script, you first need to create an Artifactory server instance, as described in the Creating an Artifactory Server Instance section.
Here's an example:
def server = Artifactory.server 'my-server-id'The next step is to create an Artifactory a Pip Build instance:
def rtPip = Artifactory.newPipBuild()Now let's define where the build should download its dependencies from. We set the Artifactory server instance we created earlier and the repository name on the resolver:
rtPip.resolver repo: 'pypi-virtual', server: serverIt is mostly recommended to run pip commands inside a virtual environment, to achieve isolation for the pip build. To follow this recommendation, create a shell command which sets up a virtual environment. Let's save this shell command in a variable, we'll soon use:
def virtual_env_activation = "source /Users/myUser/venv-example/bin/activate"Now we can download our project's dependencies as follows:
def buildInfo = rtPip.install args: "-r python-example/requirements.txt", envActivation: virtual_env_activationYou'll need to adjust value of the_args_argument in the above command, to match your Python project. Notice that we sent the command for activating the virtual env as the value of the _envActivation_argument. This argument is optional.
The above method returns a buildInfo instance. If we already have a buildInfo instance we'd like to reuse, we can alternatively send the buildInfo as an argument as shown below. Read thePublishing Build-Info to Artifactory section for more details.
rtPip.install buildInfo: buildInfo, args: "-r python-example/requirements.txt", envActivation: virtual_env_activationJenkins spawns a new java process during this step's execution.
You have the option of passing any java args to this new process, by passing the javaArgs argument:
def buildInfo = rtPip.install args: "-r python-example/requirements.txt", javaArgs: '-agentlib:jdwp=transport=dt_socket,server=y,suspend=n,address=*:5005'In most cases, your build also produces artifacts. The artifacts produced can be deployed to Artifactory using the server.upload method, as described in the Uploading and Downloading Files section in this article.
You can now publish the build-info to Artifactory as described in the Publishing Build-Info to Artifactory section
Examples
It is highly recommended to use these example projects as a reference, when setting up yout first pip build.
NuGet and .NET Core Builds with Artifactory - Scripted Pipeline Syntax
Tip
We recommend using the integration with the JFrog Jenkins Plugin, rather than using the following DSL.
The Artifactory Plugin's integration with the NuGet and .NET Core clients allow build resolve dependencies, deploy artifacts and publish build-info to Artifactory.
Note
Depending on the client you'd like to use, please make sure either the nuget or dotnet clients are included in the build agent's PATH.
To run NuGet or .NET Core builds with Artifactory from your Pipeline script, you first need to create an Artifactory server instance, as described in the Creating an Artifactory Server Instance section.
Here's an example:
def server = Artifactory.server 'my-server-id'The next step is to create a NuGet or .NET Core Build instance:
def rtBuild = Artifactory.newDotnetBuild()

// OR

def rtBuild = Artifactory.newNugetBuild()
By default, the build uses NuGet API protocol v2. If you'd like to use v3, set it on the build instance as follows.
rtBuild.setApiProtocol 'v3'Now let's define where the build should download its dependencies from. We set the Artifactory server instance we created earlier and the repository name on the resolver:
rtBuild.resolver repo: 'nuget-remote', server: serverNow we can download our project's NuGet dependencies, using either the NuGet or .NET Core clients:
def buildInfo = rtBuild.run args: 'restore ./src/GraphQL.sln'The above method returns a buildInfo instance. If we already have a buildInfo instance we'd like to reuse, we can alternatively send the buildInfo as an argument as shown below. Read thePublishing Build-Info to Artifactory section for more details.
rtBuild.run buildInfo: buildInfo, args: 'restore ./src/GraphQL.sln'You also have the option of customising the build-info module name associated with this build. You do this as follows:
def buildInfo = rtBuild.run args: 'restore ./src/GraphQL.sln', module: 'my-build-info-module-name'Jenkins spawns a new java process during this step's execution.
You have the option of passing any java args to this new process, by passing the javaArgs argument:
def buildInfo = rtBuild.run args: 'restore ./src/GraphQL.sln', javaArgs: '-agentlib:jdwp=transport=dt_socket,server=y,suspend=n,address=*:5005'In most cases, your build also produces artifacts. The artifacts can be NuGet packages, DLL files or any other type of artifact. The artifacts produced can be deployed to Artifactory using the server.upload method, as described in the Uploading and Downloading Files section in this article.
You can now publish the build-info to Artifactory as described in the Publishing Build-Info to Artifactory section
NPM Builds with Artifactory - Scripted Pipeline Syntax
NPM builds can resolve dependencies, deploy artifacts and publish build-info to Artifactory. To run NPM builds with Artifactory from your Pipeline script, you first need to create an Artifactory server instance, as described in the Creating an Artifactory Server Instance section.
Here's an example:
def server = Artifactory.server 'my-server-id'The next step is to create an Artifactory NPM Build instance:
def rtNpm = Artifactory.newNpmBuild()Now let's define where the NPM build should download its dependencies from. We set the Artifactory server instance we created earlier and the repository name on the resolver:
rtNpm.resolver server: server, repo: 'npm-virtual'The build uses the npm executable to install (download the dependencies) and publish. By default, Jenkins uses the npm executable present in the agent's PATH. You can also reference a tool defined in Jenkins, and set the script to use it as follows:
// Set the name of a tool defined in Jenkins configuration
rtNpm.tool = 'nodejs-tool-name'
// or set the tool as an environment variable
env.NODEJS_HOME = "${tool 'nodejs-tool-name'}"
// or set a path to the NodeJS home directory (not the npm executable)
env.NODEJS_HOME = 'full/path/to/the/nodeJS/home'
// or
nodejs(nodeJSInstallationName: 'nodejs-tool-name') {
        // Only in this code scope, the npm defined by 'nodejs-tool-name' is used.
}
Now we can download our project's npm dependencies. The following method runs npm install behind the scenes:
def buildInfo = rtNpm.install path: 'npm-example'You can also add npm flags or arguments as follows:
def buildInfo = rtNpm.install path: 'npm-example', args: '--verbose'The npm ci command is also supported the same way:
def buildInfo = rtNpm.ci path: 'npm-example'The above methods return a buildInfo instance. If we already have a buildInfo instance we'd like to reuse, we can alternatively send the buildInfo as an argument as shown below. Read thePublishing Build-Info to Artifactory section for more details.
rtNpm.install path: 'npm-example', buildInfo: my-build-infoYou also have the option of customising the build-info module name associated with this build. You do this as follows:
def buildInfo = rtNpm.install path: 'npm-example', module: 'my-build-info-module-name'Jenkins spawns a new java process during this step's execution.
You have the option of passing any java args to this new process, by passing the javaArgs argument:
def buildInfo = rtNpm.install path: 'npm-example', javaArgs: '-agentlib:jdwp=transport=dt_socket,server=y,suspend=n,address=*:5005'The action of publishing the NPM package to Artifactory is very similar. We start by defining the deployer:
rtNpm.deployer server: server, repo: 'npm-local'The following method will do two things: package the code (by running npm pack) and publish it to Artifactory:
def buildInfo = rtNpm.publish path: 'npm-example'Similarly to the install method, the following is also supported:
rtNpm.publish path: 'npm-example', buildInfo: my-build-infoYou also have the option of customising the build-info module name associated with this operation. You do this as follows:
def buildInfo = rtNpm.publish path: 'npm-example', module: 'my-build-info-module-name'Jenkins spawns a new java process during this step's execution.
You have the option of passing any java args to this new process, by passing the javaArgs argument:
def buildInfo = rtNpm.publish path: 'npm-example', javaArgs: '-agentlib:jdwp=transport=dt_socket,server=y,suspend=n,address=*:5005'You can now publish the build-info to Artifactory as described in the Publishing Build-Info to Artifactory section
Go Builds with Artifactory - Scripted Pipeline Syntax
While building your Go projects, Jenkins can resolve dependencies, deploy artifacts and publish build-info to Artifactory.
Note
Please make sure that the go client is included in the build agent's PATH.
To run Go builds with Artifactory from your Pipeline script, you first need to create an Artifactory server instance, as described in the Creating an Artifactory Server Instance section.
Here's an example:
def server = Artifactory.server 'my-server-id'The next step is to create an Artifactory Go Build instance:
def rtGo = Artifactory.newGoBuild()Now let's define where the Go build should download its dependencies from. We set the Artifactory server instance we created earlier and the repository name on the resolver:
rtGo.resolver server: server, repo: 'go-virtual'Now let's build the project. Here's how we do it:
def buildInfo = rtGo.run path: 'path/to/the/project/root', args: 'build'Note
Please make sure that the go client is included in the build agent's PATH.
The above method returns a buildInfo instance. If we already have a buildInfo instance we'd like to reuse, we can alternatively send the buildInfo as an argument as shown below. Read the Publishing Build-Info to Artifactory section for more details.
rtGo.run path: 'path/to/the/project/root', args: 'build', buildInfo: my-build-infoYou also have the option of customising the build-info module name associated with this build. You do this as follows:
def buildinfo = rtGo.run path: 'path/to/the/project/root', args: 'build', module: 'my-build-info-module-name'Now that the project is built, you can pack and publish it to Artifactory as a Go package. We start by defining the deployer:
rtGo.deployer server: server, repo: 'go-local'The following method will do two things: package the code and publish it to Artifactory:
def buildInfo = rtGo.publish path: 'golang-example/hello', version: '1.0.0'If you already have a buildInfo instance configured, you can pass it as an argument as follows:
rtGo.publish buildInfo: buildInfo, path: 'path/to/the/project/root', version: '1.0.0'You also have the option of customising the build-info module name associated with this build. You do this as follows:
def buildinfo = rtGo.publish path: 'path/to/the/project/root', version: '1.0.0', module: 'my-build-info-module-name'You can now publish the build-info to Artifactory as described in the Publishing Build-Info to Artifactory section
Conan Builds with Artifactory - Scripted Pipeline Syntax
Conan is a C/C++ Package Manager. The Artifactory Pipeline DSL includes APIs that make it easy for you to run Conan builds, using the Conan Client installed on your build agents. Here's what you need to do before you create your first Conan build job with Jenkins:
1, Install the latest Conan Client on your Jenkins build agent. Refer to the Conan documentation for installation instructions.
-
Add the Conan Client executable to the PATH environment variable on your build agent, to make sure Jenkins is able to use the client.
-
Create a Conan repository in Artifactory as described in the Conan Repositories Artifactory documentation.
OK. Let's start coding your first Conan Pipeline script.
We'll start by creating an Artifactory server instance, as described at the beginning of this article.
Here's an example:
def server = Artifactory.server 'my-server-id'Now let's create a Conan Client instance
def conanClient = Artifactory.newConanClient()When creating the Conan client, you can also specify the Conan user home directory as shown below:
def conanClient = Artifactory.newConanClient userHome: "conan/my-conan-user-home"We can now configure our new conanClient instance by adding an Artifactory repository to it. In our example, we're adding the 'conan-local' repository, located in the Artifactory server, referenced by the server instance we obtained:
|
|---|
The above method also accepts the the following optional arguments:
force: true - Adding this argument will make the conan client not to raise an error. If an existing remote exists with the provided name.
verifySSL: false - Adding this argument will make the conan client skip the validation of SSL certificates.
As you can see in the above example, the conanClient.remote.add method returns a string variable - remoteName. What is this 'remoteName' variable? What is it for?
Well, a 'Conan remote' is a repository, which can be used to download dependencies from and upload artifacts to. When we added the 'conan-local' Artifactory repository to our Conan Client, we actually added a Conan remote. The 'remoteName' variable contains the name of the new Conan remote we added.
OK. We're ready to start running Conan commands. You'll need to be familiar with the Conan commands syntax, exposed by the Conan Client to run the commands. You can read about the commands syntax in the Conan documentation.
Let's run the first command:
|
|---|
The 'conanClient.run' method returns a buildInfo instance, that we can later publish to Artifactory. If you already have a buildInfo instance, and you'd like the 'conanClient.run' method to aggregate the build-info to it, you can also send the buildInfo instance to the run command as and an argument as shown below:
|
|---|
The next thing we want to do is to use the Conan remote we created. For example, let's upload our artifacts to the Conan remote. Notice how we use the 'remoteName' variable we got earlier, when building the Conan command:
|
|---|
We can now publish the the buildInfo to Artifactory. For example:
|
|---|
Docker Builds with Artifactory - Scripted Pipeline Syntax
Tip
We recommend using the integration with the JFrog Jenkins Plugin, rather than using the following DSL.
The Jenkins Artifactory Plugin supports a Pipeline DSL that allows collecting and publishing build-info to Artifactory for your Docker builds. To setup your Jenkins build agents to collect build-info for your Docker builds, see the setup instructions.
Work with Docker Daemon Directly - Scripted Pipeline Syntax
The Jenkins Artifactory Plugin supports working with the docker daemon directly through its REST API. Ensure that you set up Jenkins to work with Docker and Artifactory as mentioned in the previous section.
    // Create an Artifactory server instance, as described above in this article:
    def server = Artifactory.server 'my-server-id'

    // Create an Artifactory Docker instance. The instance stores the Artifactory credentials and the Docker daemon host address.
        // If the docker daemon host is not specified, "/var/run/docker.sock" is used as a default value (the host argument should not be specified in this case).
    def rtDocker = Artifactory.docker server: server, host: "tcp://<daemon IP>:<daemon port>"

        // Jenkins spawns a new java process during this step's execution.
        // You have the option of passing any java args to this new process when creating the rtDocker instance.
        // Here's how you do this:
        // def rtDocker = Artifactory.docker server: server, javaArgs: '-agentlib:jdwp=transport=dt_socket,server=y,suspend=n,address=*:5005'

        // Pull a docker image from Artifactory.
        def buildInfo = rtDocker.pull '<artifactory-docker-registry-url>/hello-world:latest', '<source-artifactory-repository>'
        // If you already have a buildInfo instance, you can pass it as an argument to the rtDocker.pull method as follows:
        // rtDocker.pull '<artifactory-docker-registry-url>/hello-world:latest', '<source-artifactory-repository>', buildInfo

    // Attach custom properties to the published artifacts:
    rtDocker.addProperty("project-name", "docker1").addProperty("status", "stable")

    // Push a docker image to Artifactory (here we're pushing hello-world:latest). The push method also expects
    // Artifactory repository name (<target-artifactory-repository>).
    // Please make sure that <artifactoryDockerRegistry> is configured to reference the <target-artifactory-repository> Artifactory repository. In case it references a different repository, your build will fail with "Could not find manifest.json in Artifactory..." following the push.
    def buildInfo = rtDocker.push '<artifactory-docker-registry-url>/hello-world:latest', '<target-artifactory-repository>'
        // If you already have a buildInfo instance, you can pass it as an argument to the rtDocker.push method as follows:
        // rtDocker.push '<artifactory-docker-registry-url>/hello-world:latest', '<target-artifactory-repository>', buildInfo

    // Publish the build-info to Artifactory:
    server.publishBuildInfo buildInfo
Use Kaniko - Scripted Pipeline Syntax
The rtDocker.createDockerBuild method allows collecting build-info for docker images that were published to Artifactory using Kaniko. See our kaniko project example on GitHub to learn how to do this.
Use Jib - Scripted Pipeline Syntax
The rtDocker.createDockerBuild method allows collecting build-info for docker images that were published to Artifactory using the JIB Maven Plugin. See our maven-jib-example on GitHub to learn how to do this. Since this example also runs maven using the Artifactory pipeline APIs, we also recommend referring to the Maven Builds with Artifactory section included in this documentation page.
Scan Builds with JFrog Xray - Scripted Pipeline Syntax
From version 2.9.0, Jenkins Artifactory Plugin is integrated with JFrog Xray through JFrog Artifactory allowing you to have build artifacts scanned for vulnerabilities and other issues. If issues or vulnerabilities are found, you may choose to fail a build job or perform other actions according to the Pipeline script you write. This integration requires JFrog Artifactory v4.16 and above and JFrog Xray v1.6 and above.
You may scan any build that has been published to Artifactory. It does not matter when the build was published, as long as it was published before triggering the scan by JFrog Xray.
The following instructions show you how to configure your Pipeline script to have a build scanned.
First, for Xray to scan builds, you need to configure a Watch with the right filters that specify which artifacts and vulnerabilities should trigger an alert, and set a Fail Build Job Action for that Watch.
Now you can configure your Jenkins Pipeline job to scan the build.. Start by creating a scanConfig instance with the build name and build number you wish to scan:
  def scanConfig = [
      'buildName'     : 'my-build-name',
      'buildNumber'   : '17',
      // Only if this build is associated with a project in Artifactory, set the project key as follows.
      'project'       : 'my-project-key'
    ]
If you're scanning a build which has already been published to Artifactory in the same job, you can use the build name and build number stored on the buildInfo instance you used to publish the build. For example:
  server.publishBuildInfo buildInfo
  def scanConfig = [
      'buildName'      : buildInfo.name,
      'buildNumber'    : buildInfo.number,
      // Only if this build is associated with a project in Artifactory, set the project key as follows.
      'project'.       : 'my-project-key'
    ]
Before you trigger the scan, there's one more thing you need to be aware of. By default, if the Xray scan finds vulnerabilities or issues in the build that trigger an alert, the build job will fail. If you don't want the build job to fail, you can add the 'failBuild' property to the scanConfig instance and set it to 'false' as shown here:
  def scanConfig = [
      'buildName'      : buildInfo.name,
      'buildNumber'    : buildInfo.number,
       // Only if this build is associated with a project in Artifactory, set the project key as follows.
      'project'        : 'my-project-key',
      'failBuild'      : false
    ]
OK, we're ready to initiate the scan. The scan should be initiated on the same Artifactory server instance, to which the build was published:
def scanResult = server.xrayScan scanConfigThat's it. The build will now be scanned. If the scan is not configured to fail the build job, you can use the scanResult instance returned from the xrayScan method to see some details about the scan.
For example, to print the result to the log, you could use the following code snippet:
echo scanResult as StringFor more details on the integration with JFrog Xray and JFrog Artifactory to scan builds for issues and vulnerabilities, see CI/CD Integration in the JFrog Xray documentation.
Manage Release Bundles - Scripted Pipeline Syntax
The Jenkins Artifactory Plugin exposes a set of pipeline APIs for managing and distributing Release Bundles. These APIs require version 2.0 or higher of JFrog Distribution. These APIs work with JFrog Distribution's REST endpoint, and not with Artifactory REST endpoint. It is therefore recommended to verify that JFrog Distribution is accessible from Jenkins through Jenkins | Manage | Configure System. The serverId value in all examples in this section should be replaced with the JFrog Platform ID you configured.
To make it easier to get started using the JFrog Distribution pipeline APIs, you can use the jfrog-distribution-example available here.
To use the APIs, you first need obtain a distribution instance using the ID configured in Jenkins | Manage | Configure System. Here's how you do this.
def jfrogInstance = JFrog.instance 'jfrog-instance-1'
def dsServer = jfrogInstance.distribution
Create and Update Release Bundles - Scripted Pipeline Syntax
The createReleaseBundle and updateReleaseBundle methods create and update a release bundle on JFrog Distribution. The methods accept the release bundle name and release bundle version to be created. The methods also accept a File Spec, which defines the files in Artifactory to be bundled into the release bundle. Let's start by creating the File Spec as follows.
def fileSpec = """{
    "files": [{
        "pattern": "libs-repo/release/*.zip"
    }]
}"""
Now let's create the release bundle as follows.
dsServer.createReleaseBundle name: 'release-bundle-1', version: '1.0.0', spec: fileSoecThe above createReleaseBundle method supports additional optional arguments as shown below.
dsServer.createReleaseBundle
        version: '1.0.0',
        spec: fileSoec
        // The default is "plain_text". The syntax for the release notes. Can be one of 'markdown', 'asciidoc', or 'plain_text'.
    releaseNotesSyntax: "markdown",
    // Optional. If set to true, automatically signs the release bundle version.
    signImmediately: true,
    // Optional. Path to a file describing the release notes for the release bundle version.
    releaseNotesPath: "path/to/release-notes",
    // Optional. The passphrase for the signing key.
    gpgPassphrase: "abc",
    // Optional. A repository name at the source Artifactory instance, to store release bundle artifacts in. If not provided, Artifactory will use the default one.
    storingRepo: "release-bundles-1",
    // Optional.
    description: "Some desc",
    // Optional. Path to a file with the File Spec content.
    specPath: "path/to/filespec.json",
    // Optional. Set to true to disable communication with JFrog Distribution.
    dryRun: true
The updateReleaseBundle method accepts the exact same arguments as the createReleaseBundle method.
Sign Release Bundles - Scripted Pipeline Syntax
Release bundles must be signed before they can be distributed. Here's how you sign a release bundle.
dsServer.createReleaseBundle
    name: "example-release-bundle",
    version: "1",
    // Optional GPG passphrase
    gpgPassphrase: "abc",
    // Optional repository name at the source Artifactory instance, to store release bundle artifacts in. If not provided, Artifactory will use the default one.
    storingRepo: "release-bundles-1"
Distribute Release Bundles - Scripted Pipeline Syntax
To better control where the release bundle will be distributed to, you have the option of defining the distribution rules as follows.
def rules = """{
    "distribution_rules": [
    {
        "site_name": "*",
        "city_name": "*",
        "country_codes": ["*"]
    }
    ]
}"""
After making sure the release bundle is signed, you can distribute it as follows, by optionally using distribution rules.
dsServer.createReleaseBundle
    name: "example-release-bundle",
    version: "1",
    // Optional distribution rules
    distRules: rules,
    // Optional country codes. Cannot be used together with 'distRules'
    countryCodes: ["001", "002"]
    // Optional site name. Cannot be used together with 'distRules'
    siteName: "my-site",
    // Optional city name. Cannot be used together with 'distRules'
    cityName: "New York",
    // Optional. If set to true, the response will be returned only after the distribution is completed.
    sync: true,
    // Optional. Set to true to disable communication with JFrog Distribution.
    dryRun: true
Delete Release Bundles - Scripted Pipeline Syntax
Here's how you delete a release bundle.
dsServer.deleteReleaseBundle
    name: "example-release-bundle",
    version: "1",
    // Optional distribution rules
    distRules: rules,
    // Optional country codes. Cannot be used together with 'distRules'
    countryCodes: ["001", "002"]
    // Optional site name. Cannot be used together with 'distRules'
    siteName: "my-site",
    // Optional city name. Cannot be used together with 'distRules'
    cityName: "New York",
    // Optional. If set to true, the response will be returned only after the deletion is completed.
    sync: true,
    // Optional. Set to true to disable communication with JFrog Distribution.
    dryRun: true
Build Triggers - Scripted Pipeline Syntax
The Artifactory Trigger allows a Jenkins job to be automatically triggered when files are added or modified in a specific Artifactory path. The trigger periodically polls Artifactory to check if the job should be triggered. You can read more about it here.
You have the option of defining the Artifactory Trigger from within your pipeline. Here's how you do it:
Start by creating an Artifactory server instance, as described at the beginning of this article.
Here's an example:
def server = Artifactory.server 'my-server-id'Next, set the trigger as follows:
server.setBuildTrigger spec: "*/10 * * * *", paths: "generic-libs-local/builds/starship"When a job is triggered following deployments to Artifactory, you can get the URL of the file in Artifactory which triggered the job. Here's how you get it:
def url = currentBuild.getBuildCauses('org.jfrog.hudson.trigger.ArtifactoryCause')[0]?.urlIf the cause of the job triggering is different, the url value will be empty.
Work with Jenkins and Maven Build
The Jenkins Artifactory Plugin supports Maven build jobs, allowing your build jobs deploy artifacts and resolve dependencies to and from Artifactory, and then have them linked to the build job that created them.
As described below, using the Maven Gradle Plugin, you can create a freestyle job with the Artifactory Gradle integration.
JFrog Artifactory and Maven Integration BenefitsCompatibility
- JDK compatibility: from version 3.0.0, the plugin no longer supports building with JDK 7
- Gradle Compatibility: From version 4.10
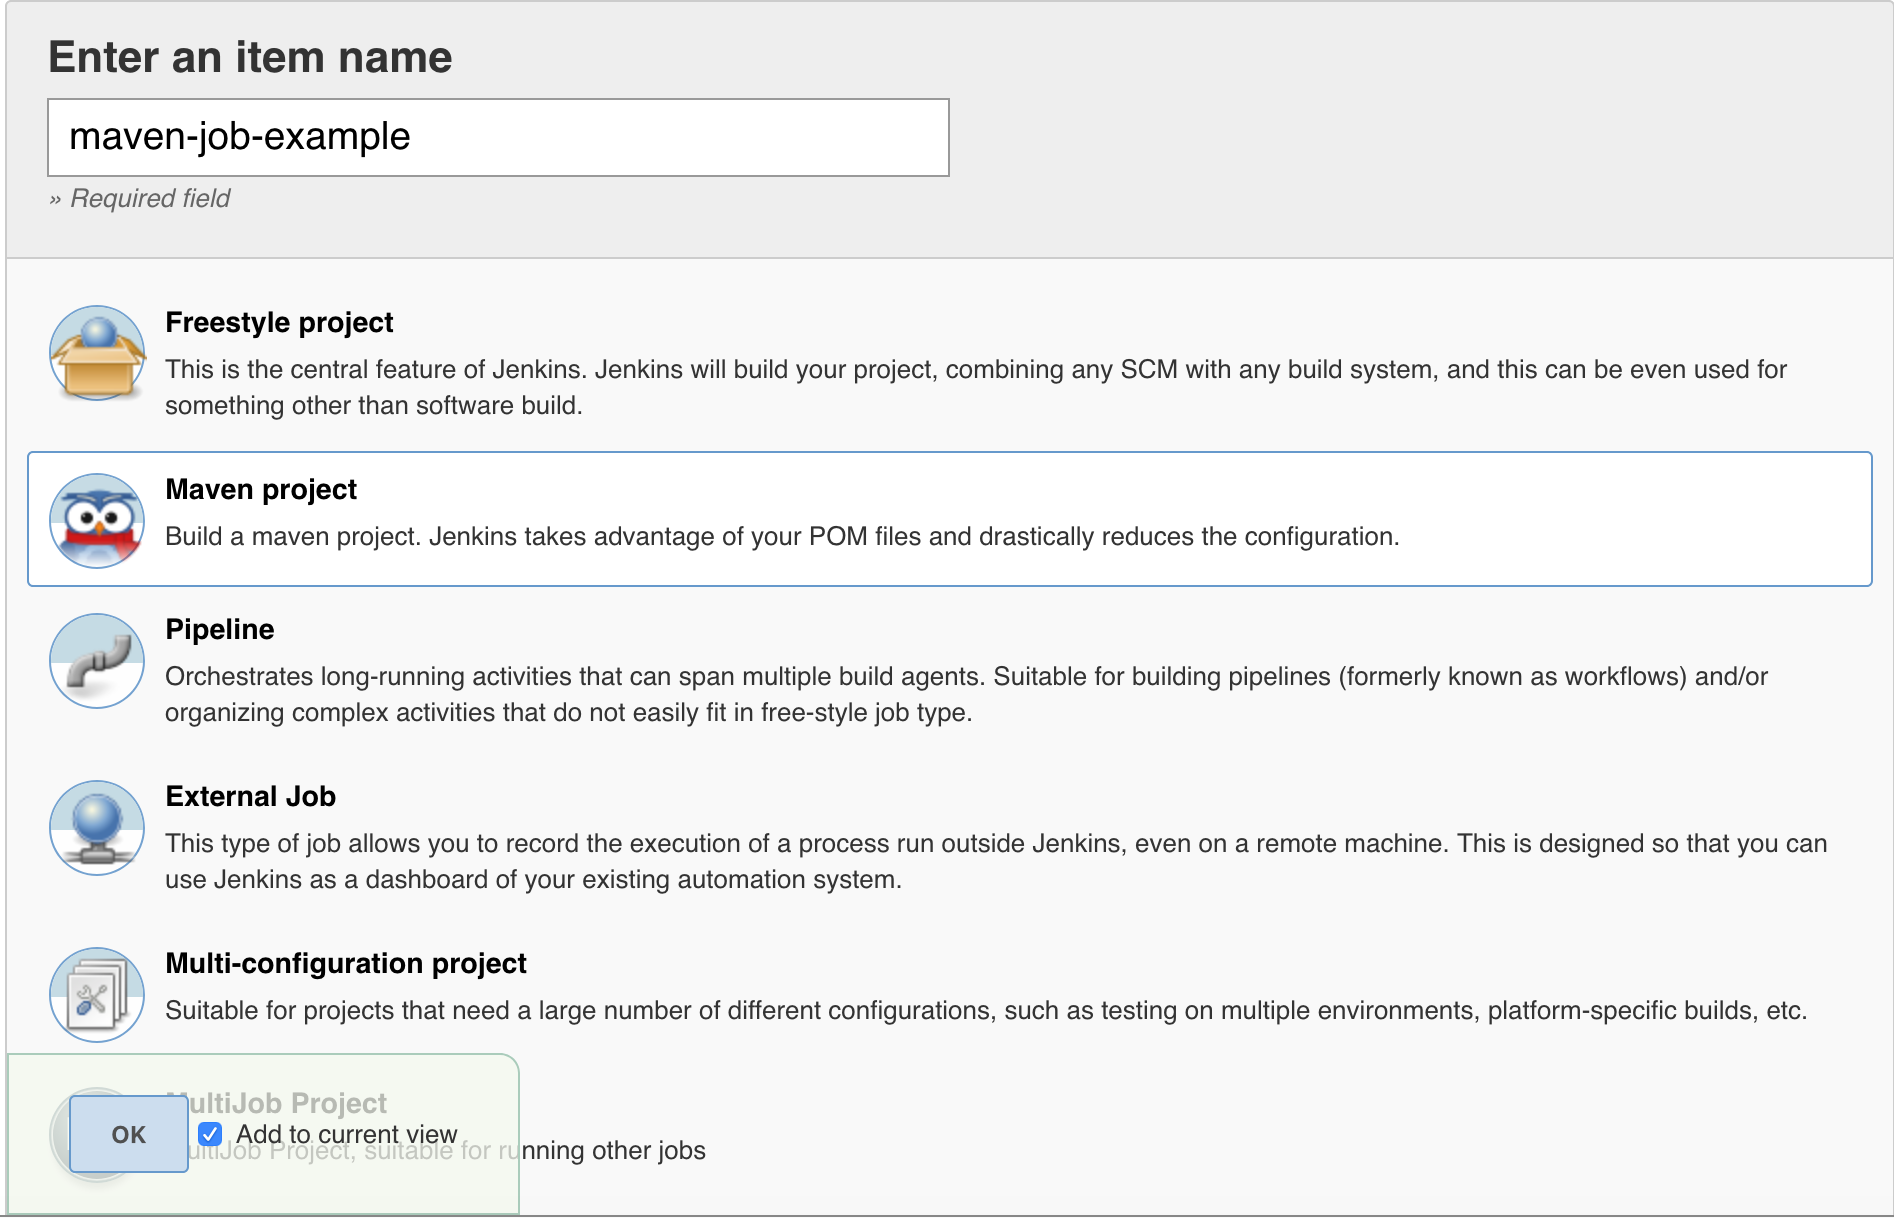
Gradle Builds and the Jenkins Artifactory Plugin
The Jenkins Artifactory Plugin supports Gradle build jobs, allowing your build jobs deploy artifacts and resolve dependencies to and from Artifactory, and then have them linked to the build job that created them.
As described below, using the Jenkins Gradle Plugin, you can create a freestyle job with the Artifactory Gradle integration.
To help you get started, you can use gradle-example-ci-server as a sample project you can build from your Jenkins Gradle job.
Compatibility
- JDK compatibility: from version 3.0.0, the plugin no longer supports building with JDK 7
- Gradle Compatibility: From version 4.10
Integration Benefits JFrog Artifactory and Gradle

Configure Gradle Builds when working with the Jenkins Artifactory Plugin
Deploy Artifacts to Artifactory
Once you have at least one Artifactory server configured, you can add the deployment details in your Gradle build.
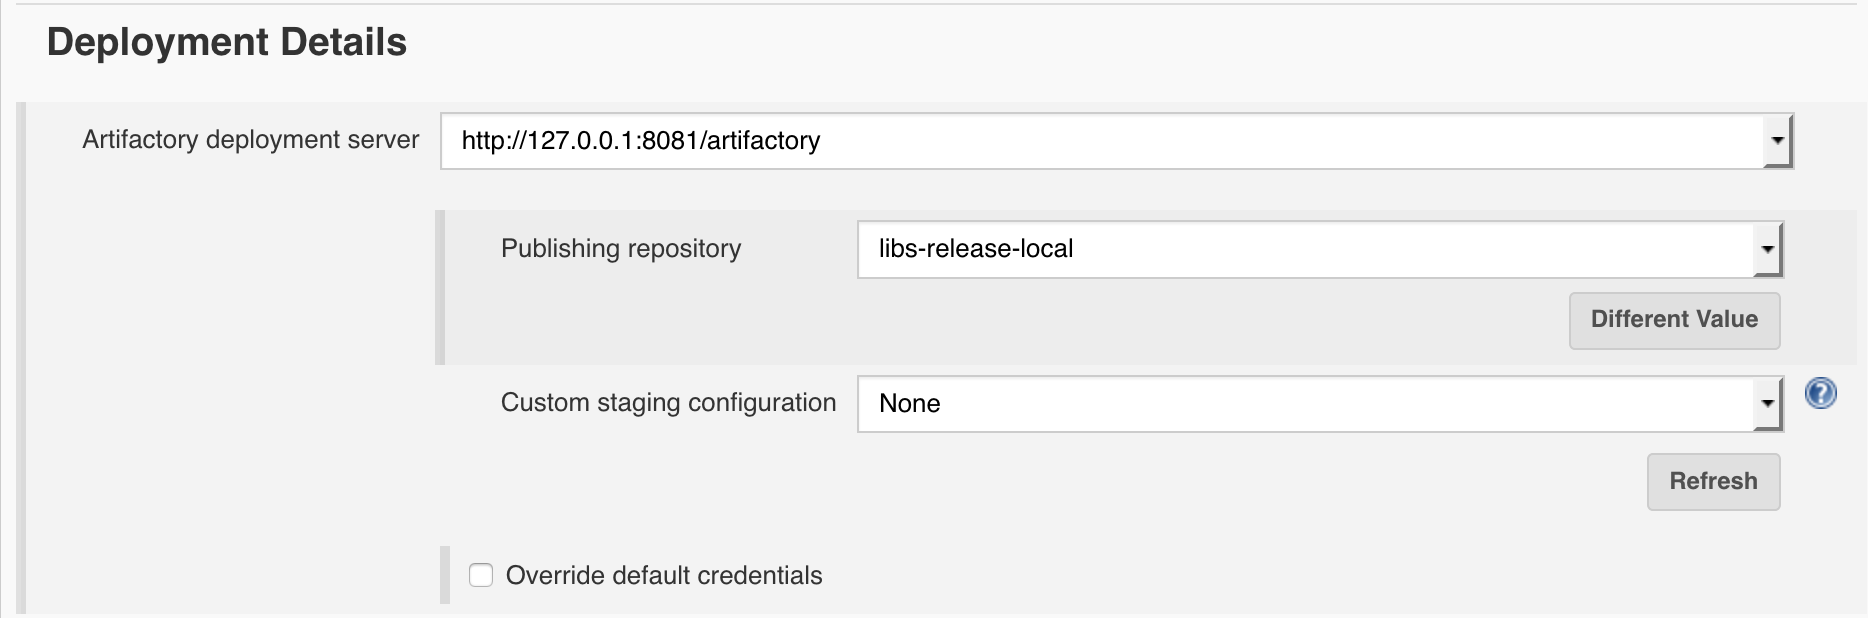
| Field | Description |
|---|---|
| Artifactory deployment server | Artifactory server as defined in the Artifactory plugin configuration. The selected server will be used for artifacts resolution and build info deployment. |
| Publishing repository | Repository to deploy artifacts to. Using the text mode will enable you to also use placeholders for environment variable which will be replaced with your environment value at build time. |
| Custom staging configuration | Select a named staging configuration defined by an Artifactory User Plugin or select "None" to use the default staging settings. |
| Override default credentials | Override default credentials. |
Ivy-Ant Build options for the Jenkins Artifactory Plugin
The build Goals and options should be set to clean install.
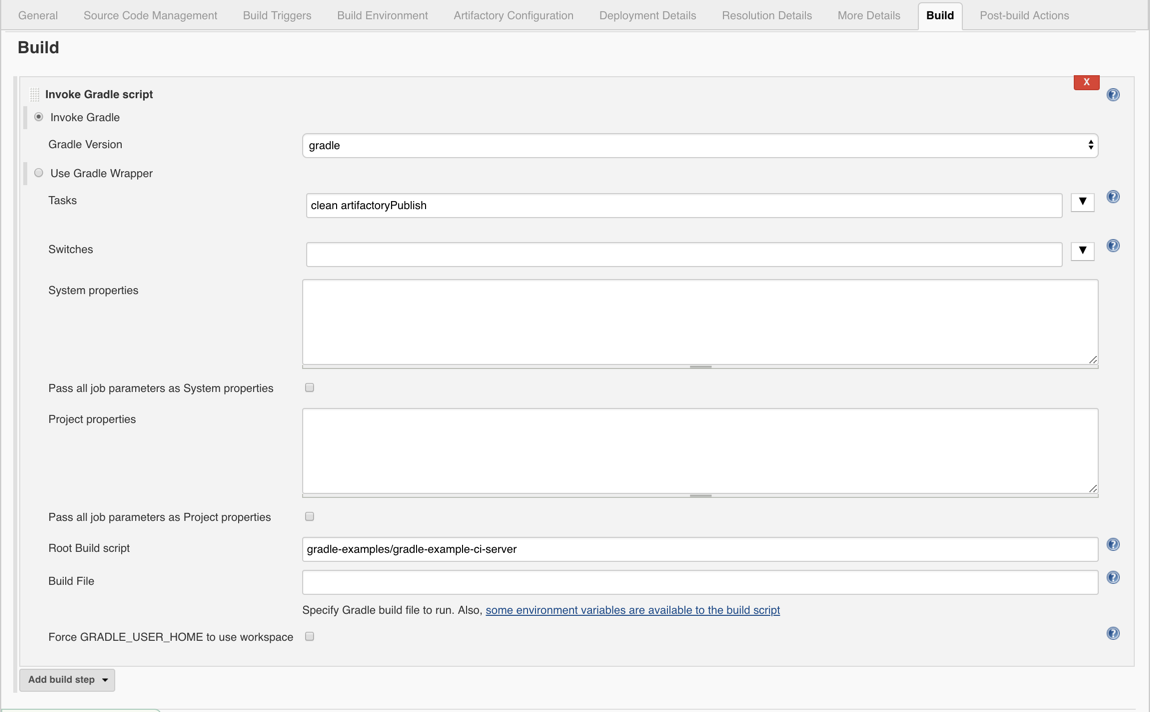
| Field | Description |
|---|---|
| Gradle Version | The Maven version. |
| Tasks | Specify the Gradle task to be invoked. The **artifactoryPublish **task will build your Gradle project and publish your artifacts to Artifactory.. |
Resolve Artifacts from Artifactory Configure Gradle Builds when working with the Jenkins Artifactory Plugin
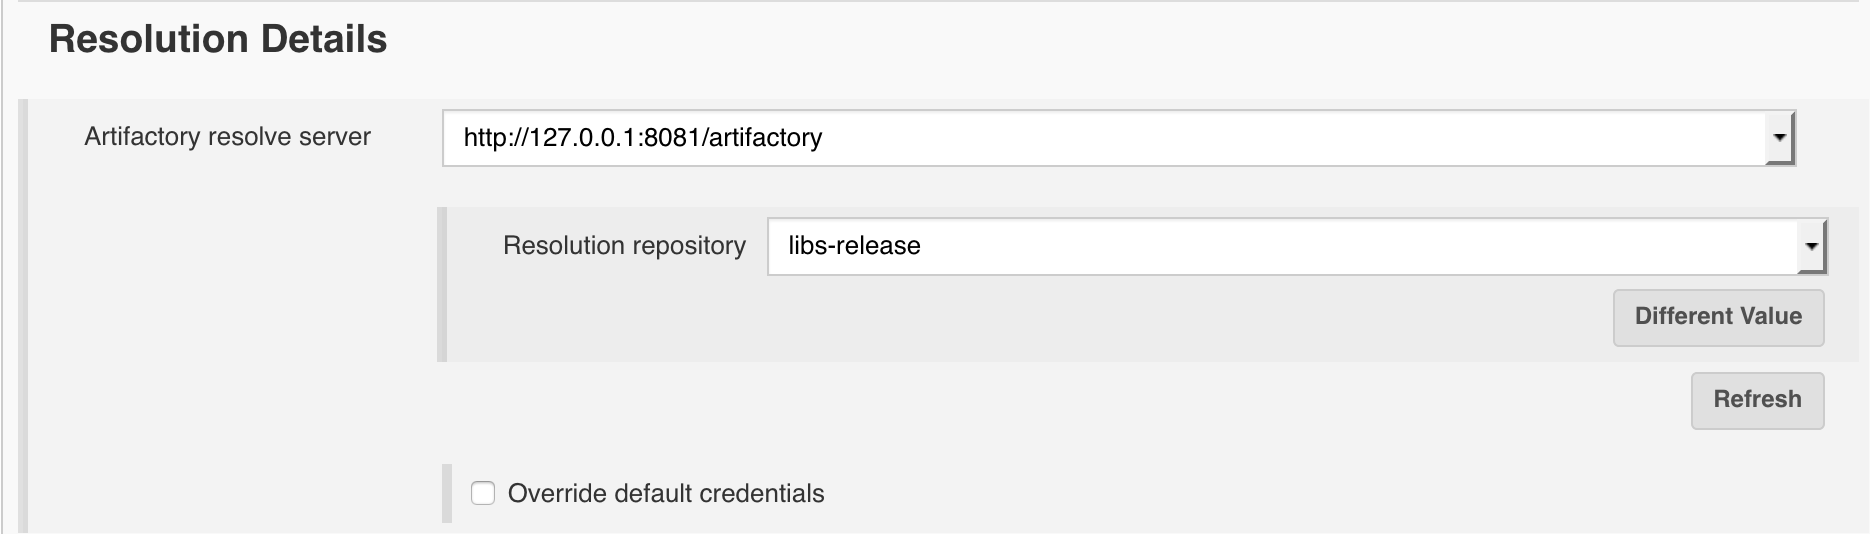
| Field | Description |
|---|---|
| Artifactory resolve server | Artifactory server as defined in the Artifactory plugin configuration. The selected server will be used for artifacts resolution and build info deployment. |
| Resolution repository | Repository used to download artifacts from. |
| Override default credentials | Override default credentials. |
Configure Jobs Configure Gradle Builds when working with the Jenkins Artifactory Plugin
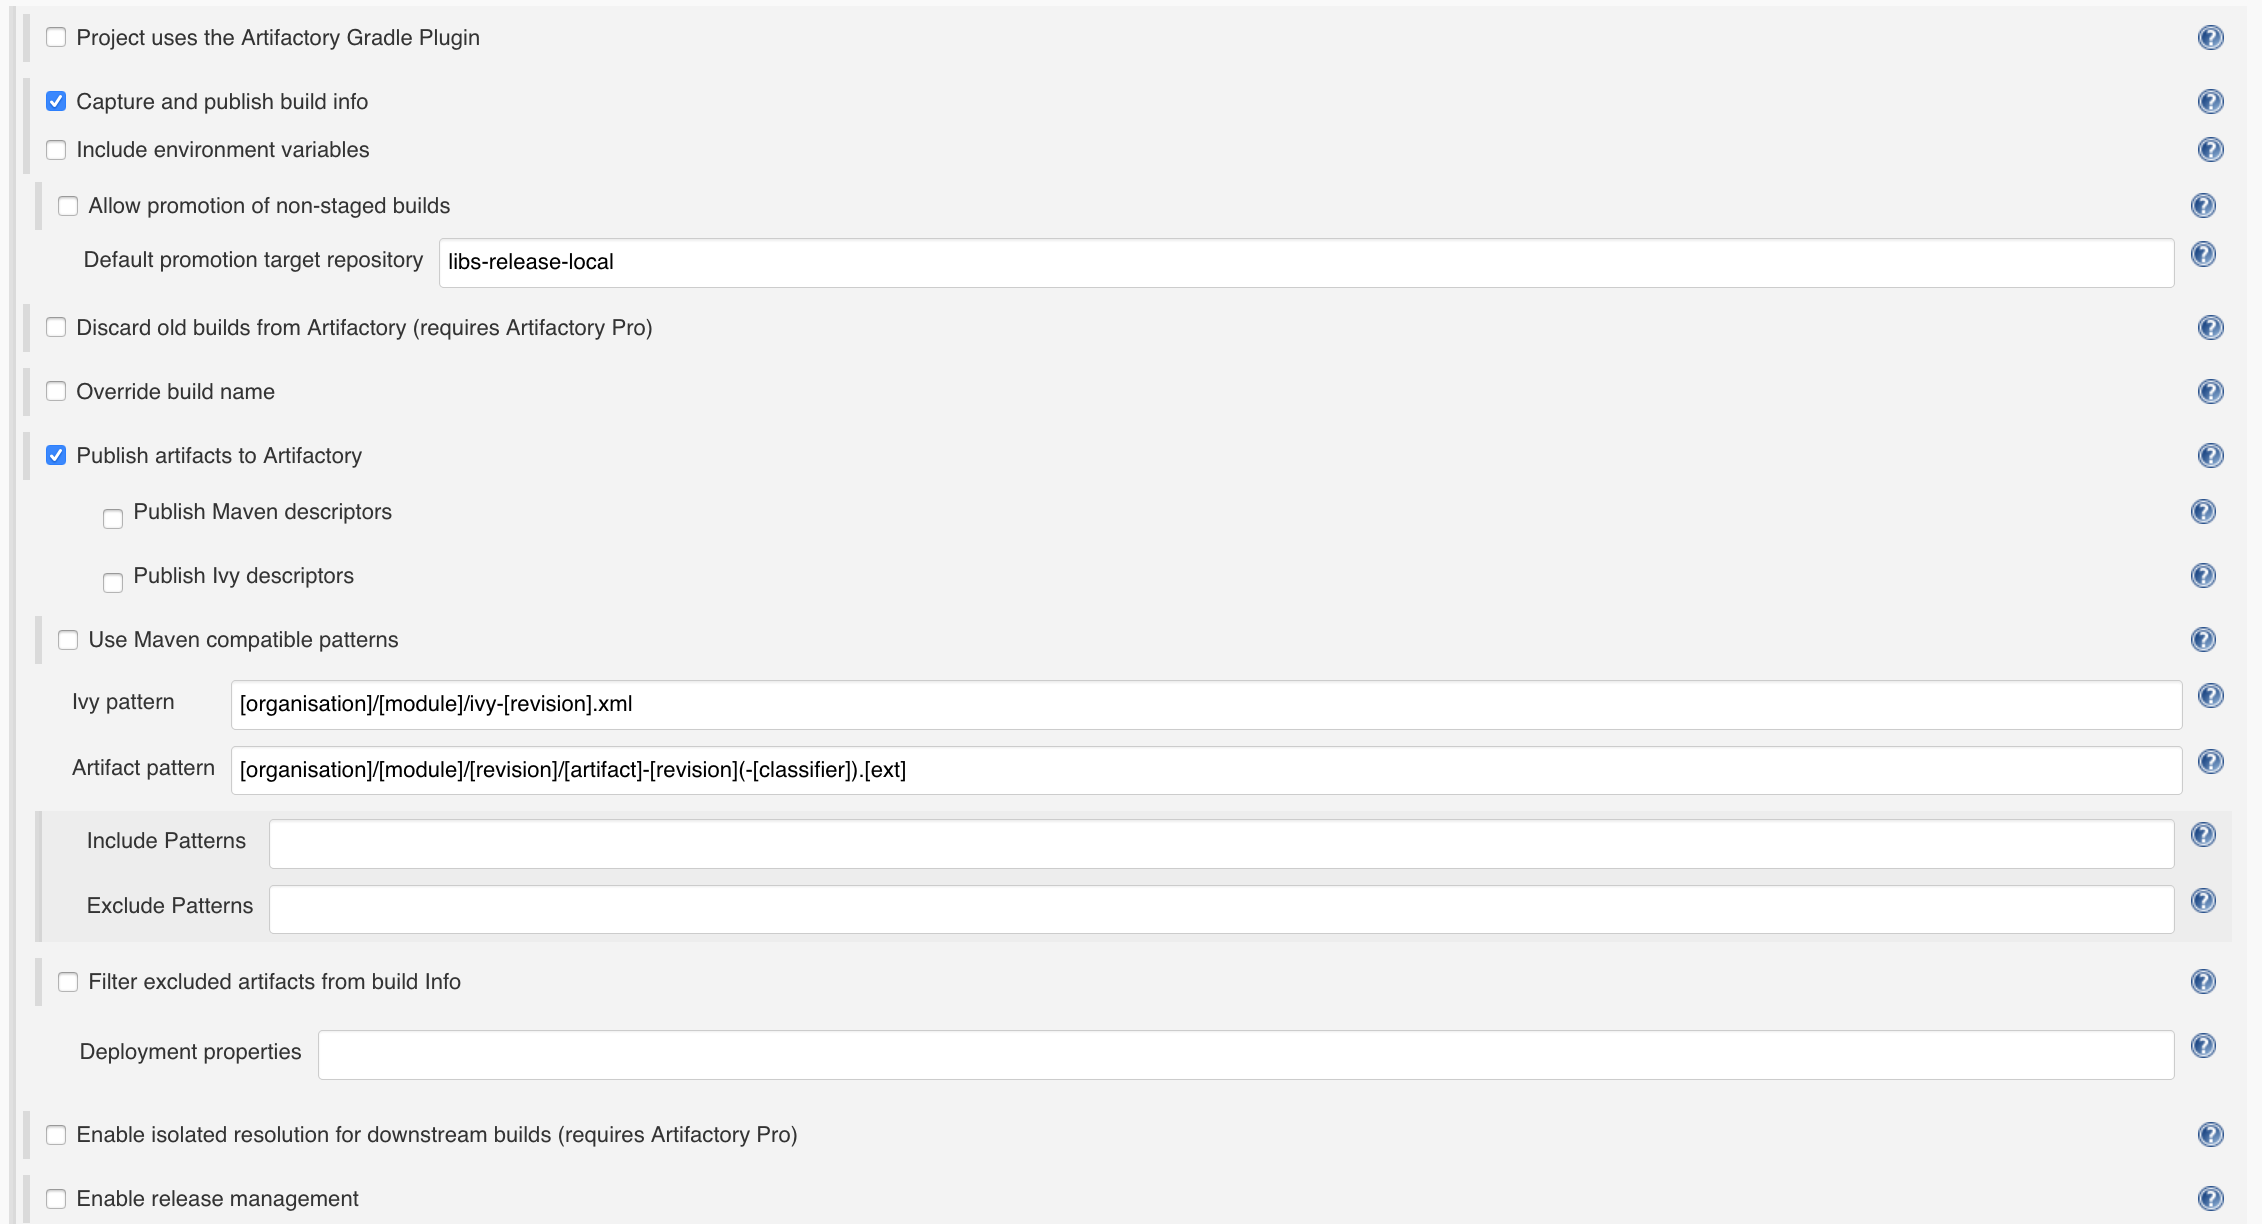
| Field | Description |
|---|---|
| Project uses the Artifactory Gradle Plugin | If this checkbox is not set, Jenkins assumes that the com.jfrog.artifactory plugin is not applied in the gradle script. It will then try to apply it, by adding an init script when triggering the gradle build. |
| Capture and publish build info | Check if you wish to publish build information to Artifactory. |
| Override build name | Check if you wish to override Artifactory default build name. |
| Publish artifacts to Artifactory | Check if you wish to publish produced build artifacts to Artifactory. |
| Publish Maven descriptors | Check if you wish to publish Gradle-generated POM files to Artifactory. Note: Maven descriptors are always deployed according to the Maven layout convention. |
| Publish Ivy descriptors | Check if you wish to publish Gradle-generated ivy.xml descriptor files to Artifactory. |
| Use Maven compatible patterns | Whether to use the default Maven patterns when publishing artifacts and Ivy descriptors, or to use custom patterns. Dots in [organization] will be converted to slashes on path transformation. |
| Filter excluded artifacts from build Info | Add the excluded files to the excludedArtifacts list and remove them from the artifacts list in the build info. |
| Enable isolated resolution for downstream builds (requires Artifactory Pro | When checked, a build parameter named ARTIFACTORY_BUILD_ROOT with a value of ${JOB\_NAME}-${BUILD\_NUMBER} will be sent to downstream builds. For example: ARTIFACTORY\_BUILD\_ROOT=Infrastructure-1025. The value of the parameter is also attached to published artifacts as the property: build.root as a matrix parameter on the deployment URL. Downstream builds will add build.root=${ARTIFACTORY\_BUILD\_ROOT} as a matrix parameter to their Artifactory resolution URL For example: build.root=Infrastructure-1025 to achieve isolated resolution from Artifactory and only resolve artifacts produced by the root build that triggered it, avoiding any artifacts produced by other runs that are out of the build chain. |
| Enable release management | Artifactory supports release management through the Jenkins Artifactory Plugin. When you run your builds using Maven or Gradle with jobs that use Git or Perforce as your version control system, you can manually stage a release build allowing you to: * Change values for the release and next development version. * Choose a target staging repository for deployment of the release. * Create a VCS tag for the release. Staged release builds can later be promoted or rolled-back, changing their release status in Artifactory and, optionally, moving the build artifacts to a different target repository. Inside Artifactory, the history of all build status change activities (staged, promoted, rolled-back, etc.) is recorded and displayed for full traceability. When release management is enabled, the Artifactory release staging link appears on the top header bar in the job page. |
Use Default Values in the Gradle Build Script when working with the Jenkins Artifactory Plugin
Behind the scenes, the Jenkins Artifactory Plugin utilises the [Gradl It does that by injecting the Jenkins job's configuration into the artifactory closure defined by the Working with Gradle.
You also have the option of defining the artifactory closure in the build script with default values. When the Jenkins job is triggered, it will override these values with the values defined in the job configuration.
Note
Since the resolution details are not defined as part of the artifactory closure in the gradle script, they cannot be overridden by the Jenkins job.
Ivy-Ant Build Jobs for the Jenkins Artifactory Plugin
The Jenkins Artifactory Plugin supports Ivy build jobs, allowing your build jobs deploy artifacts and resolve dependencies to and from Artifactory, and then have them linked to the build job that created them.
As described below, using the Jenkins Ivy Plugin together with the Jenkins Artifactory Plugin your Ivy builds will publish artifacts and build information to Artifactory whenever an ivy:publish task is executed.
Install the Jenkins Ivy Plugin
To use the Jenkins Artifactory Plugin with Ivy builds you need to install the Jenkins Ivy Plugin.
JDK compatibility
From version 3.0.0, the plugin no longer supports building with JDK 7.
Publishing to your local file cache repository is the best way to go (i.e. you do not need to publish to Artifactory). The plugin will intercept the publish events and will replay them against Artifactory according to the configuration. Using an ivy:publish task that publishes directly to Artifactory will result in (redundant) double publishing.
Integration Benefits JFrog Artifactory and Ivy
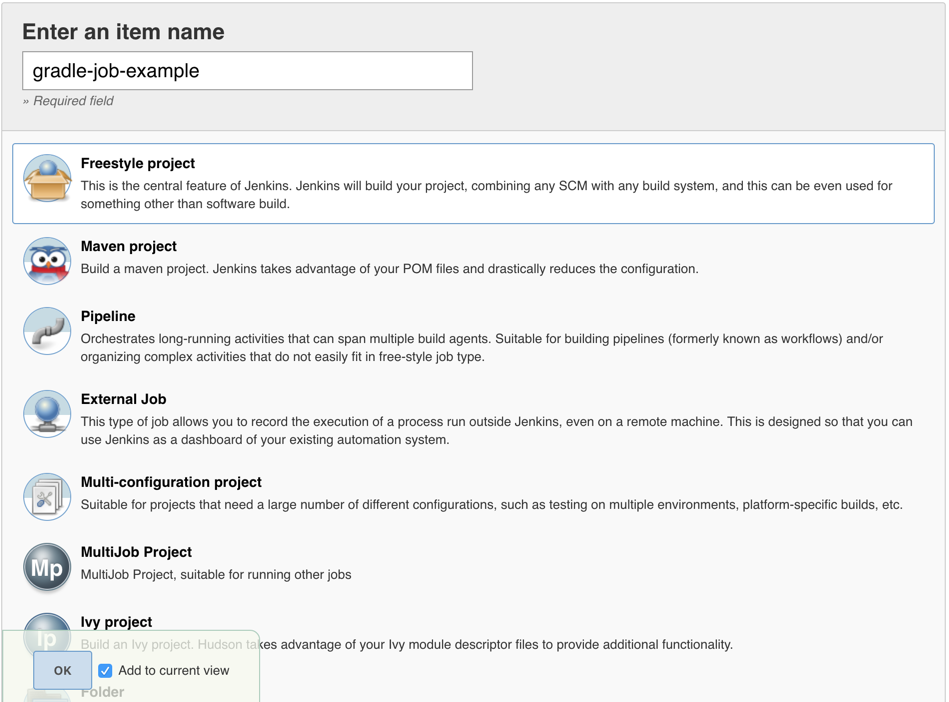
Configure Ivy-Ant Builds for the Jenkins Artifactory Plugin

| Field | Description |
|---|---|
| Artifactory Server | Artifactory server as defined in the Artifactory plugin configuration. The selected server will be used for artifacts resolution and build info deployment. |
| Target releases repository | Repository to deploy release artifacts to. Using the text mode will enable you to also use placeholders for environment variable which will be replaced with your environment value at build time. |
| Override default credentials | Override default credentials. |
| Override build name | Override Artifactory default build name. |
| Publish artifacts to Artifactory | Check if you wish to publish produced build artifacts to Artifactory. |
| Use Maven compatible patterns | Whether to use the default Maven patterns when publishing artifacts and Ivy descriptors, or to use custom patterns. Dots in [organization] will be converted to slashes on path transformation. |
| Ivy pattern | The pattern to use for published Ivy descriptors. |
| Artifact pattern | The pattern to use for published artifacts. |
| Filter excluded artifacts from build Info | Add the excluded files to the excludedArtifacts list and remove them from the artifacts list in the build info. |
| Deployment properties | Semicolon-separated list of properties to attach to all deployed artifacts in addition to the default ones (build.name, build.number, vcs.revision, etc.). Property values can take environment variables. For example: p4.cl=${P4\_CHANGELIST};buildStatus=RC;platforms=win386,win64,osx,debian |
| Capture and publish build info | Publish build information to Artifactory. |
| Include environment variables | Check if you wish to include all environment variables accessible by the builds process. Jenkins-specific EnvVars are always included. Note: including all environment variables as part of the captured build information may result in very large build objects and may slow down deployment. |
| Discard old builds from Artifactory (requires Artifactory Pro) | Automatically remove old builds stored in Artifactory according to Jenkins’s configured policy for discarding old builds. |
Ivy-Ant Build options for the Jenkins Artifactory Plugin
The build Goals and options should be set to clean install.

| Field | Description |
|---|---|
| Gradle Version | The Maven version. |
| Tasks | Specify the Gradle task to be invoked. The artifactoryPublish task will build your Gradle project and publish your artifacts to Artifactory. |
Generic Builds and the the Jenkins Artifactory Plugin
The Jenkins Artifactory Plugin supports Generic build jobs, allowing your build jobs deploy artifacts and resolve dependencies to and from Artifactory, and then have them linked to the build job that created them.
Integration Benefits JFrog Artifactory and Jenkins CI
Configure Generic (Freestyle) Builds for the the Jenkins Artifactory Plugin
Generic build integration provides Build Info support for any build type. This allows custom builds, such as non-Java builds to:
- Upload any artifacts to Artifactory, together with custom properties metadata, and keep published artifacts associated with the Jenkins build.
- Download artifacts from Artifactory that are required by your build.
You can define the artifacts to upload and download by using File Specs.
File Specs
File Spec are specified in JSON format.
You can use File Specs in one of the following ways:
You can read the File Spec schema here.
- Manage them in your SCM, and then during the build, have them pulled to the workspace with the other sources. If you choose this option, you should select the "File" option in the "Upload spec source" or "Download spec source" field and specify the relative path to the File Spec in your workspace.
- Save the File Spec JSON as part of the job configuration. If you choose this option, you should select the "Job configuration" option in the "Upload spec source" or "Download spec source" field and specify the File Spec JSON content in your workspace in the "File path" field.
Jenkins Artifactory Plugin - Release Management
The Artifactory plugin includes release management capabilities for Maven and Gradle jobs that use Subversion, Git or Perforce for VCS.
The plugin lets you manually stage a release build, allowing you to:
- Change values for the release and next development version
- Choose a target staging repository for deployment of the release, and
- Create a VCS tag for the release.
Staged release builds can, later on, be promoted or rolled-back, changing their release status in Artifactory and, optionally, moving the build artifacts to a different target repository.
Inside Artifactory the history of all build status change activities (staged, promoted, rolled-back, etc.) is recorded and displayed for full traceability.
Plugin Issue tracker
Plugin Source Code
Set Up Docker Build-info for the Jenkins Artifactory Plugin
To enable fully traceable Docker builds, the Jenkins Artifactory Plugin can collect build info for your Docker builds in Jenkins by setting up an internal proxy server through which the Docker daemon routes its traffic.
Important
Since version 2.14.0 of the Artifactory Plugin, docker build info creation no longer requires setting up the Build-Info Proxy.
Therefore the Pipeline API which uses the Build-Info Proxy is now deprecated.
Here's the deprecated API:
def rtDocker = Artifactory.docker [credentialsId: 'credentialsId'], [host: 'tcp://daemon IP:daemon port']
Please use the new API, which receives an Artifactory server as an argument, instead of credentialsId:
def rtDocker = Artifactory.docker server: server, [host: 'tcp://daemon IP:daemon port']
If you're moving from the old API to the new one, please make sure to remove the HTTP Proxy redirection in your docker configuration.
System Requirements
- Jenkins build agents running on OSX, Ubuntu 14.x, 16.x or Centos 7.
- Jenkins 2.x.
- Jenkins Artifactory Plugin 2.14.0 or above.
- Artifactory configured as a Docker registry.
Collect and Publish Docker Build-Info for the the Jenkins Artifactory Plugin
To set up Jenkins to collect Docker build info, carefully execute the following steps:
- Install Docker on all Jenkins build agents
- Setup Artifactory as a Docker registry
- Ensure Docker is working correctly with Artifactory
- Make sure Artifactory reverse proxy is trusted by Jenkins
- Make sure you have the correct version of the Jenkins Artifactory Plugin
- For OSX Agents, Run a Socat Container
- Test your setup
Install Docker on the Jenkins Build Agent
To install Docker on all the Jenkins build agents, follow the instructions in the Docker Documentation.
Make Sure Artifactory is Set Up as a Docker Registry
Make sure Artifactory can be used as docker registry and is used by the Docker daemon from all Jenkins build agents. If you need to configure Artifactory as a Docker registry, please refer to Getting Started with Docker and Artifactory in the JFrog Artifactory User Guide.
Make Sure Docker Works With the Artifactory Docker Registry
To ensure that Docker and your Artifactory Docker registry are correctly configured to work together, run the following code snippet from all Jenkins build agents:
docker pull hello-world
docker tag hello-world:latest <artifactoryDockerRegistry>/hello-world:latest
docker login <artifactoryDockerRegistry>
docker push <artifactoryDockerRegistry>/hello-world:latest
If everything is configured correctly, pushing any image including the hello-world image should be successfully uploaded to Artifactory.
Make Sure the Artifactory Reverse Proxy is Trusted by Jenkins
If you are using a self-signed SSL certificate to access your Artifactory reverse proxy, your Jenkins build agents need to trust the reverse proxy domain. If you're not using a self-signed certificate or your Jenkins builds can already access Artifactory successfully using SSL, it means that your reverse proxy is already trusted by your Jenkins agents, and you can, therefore, skip this section.
To add your reverse proxy’s certificate to your JRE trust store so your Jenkins build agents trust the Artifactory reverse proxy domain, execute the following steps on each Jenkins agent:
- Find the JAVE_HOME directory. Make sure that this is the Java distribution used by your Jenkins agent. The following sections refer to the JAVA_HOME directory as $JAVE_HOME.
- To see if your Artifactory reverse proxy domain is already trusted, list all the certificates that are in your JRE trust store using the following command:
sudo $JAVA_HOME/bin/keytool -v -list -keystore $JAVA_HOME/jre/lib/security/cacerts -storepass changeit- If your domain is not listed, obtain your Artifactory's proxy domain self-signed certificate file and add it to the trust store using the following command:
sudo keytool -import -alias <alias> -file <reverseProxyCertificateFile> -keystore $JAVA_HOME/jre/lib/security/cacerts -storepass changeitMake Sure You Have the Correct Version of Jenkins Artifactory Plugin
To collect Docker build information, you need to have Jenkins Artifactory Plugin 2.14.0 and above installed.
For OSX Agents, Run a Socat Container
If your Jenkins agent runs on an OSX machine, run the following command, to startup a Socat container. This container needs to be up and running for being able to push images to Artifactory using the Artifactory Pipeline API.
docker run -d -v /var/run/docker.sock:/var/run/docker.sock -p 127.0.0.1:1234:1234 bobrik/socat TCP-LISTEN:1234,fork UNIX-CONNECT:/var/run/docker.sock
Test Your Setup
Note
You can skip this part if you intend to use the Jenkins Artifactiry Plugin using Kaniko or JIB.
Create a new Jenkins Pipeline job with the following script and run it. If everything is setup correctly, the build should publish build info to Artifactory.
node() {
    // Step 1: Obtain an Artifactiry instance, configured in Manage Jenkins --> Configure System:
    def server = Artifactory.server '<ArtifactoryServerID>'

    // Step 2: Create an Artifactory Docker instance:
    def rtDocker = Artifactory.docker server: server
    // Or if the docker daemon is configured to use a TCP connection:
    // def rtDocker = Artifactory.docker server: server, host: "tcp://<docker daemon host>:<docker daemon port>"
    // If your agent is running on OSX:
    // def rtDocker= Artifactory.docker server: server, host: "tcp://127.0.0.1:1234"

    // Step 3: Push the image to Artifactory.
    // Make sure that <artifactoryDockerRegistry> is configured to reference <targetRepo> Artifactory repository. In case it references a different repository, your build will fail with "Could not find manifest.json in Artifactory..." following the push.
    def buildInfo = rtDocker.push '<artifactoryDockerRegistry>/hello-world:latest', '<targetRepo>'

    // Step 4: Publish the build-info to Artifactory:
    server.publishBuildInfo buildInfo
}
l
Updated 20 days ago